Calendar View Defaults
In this section we will cover:
All of this centers around how to make your Appointments > Calendar and Appointments > Availability views more suited for what you and your business care about.
As with many things in life, how the calendar displays on your Appointments screen may not be exactly how you want it right out of the box. The good thing about your calendar is that you can change it to fit exactly what you want to see (not so true with some of those other things in life). The following changes are only applied on a per user basis.
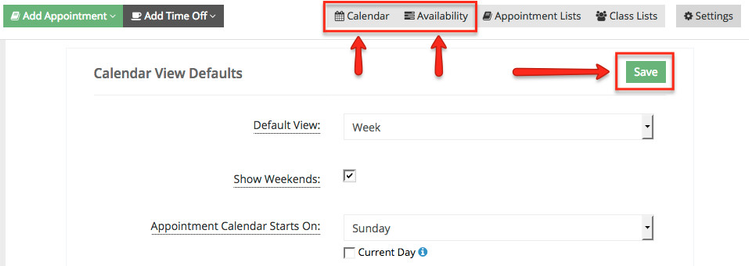
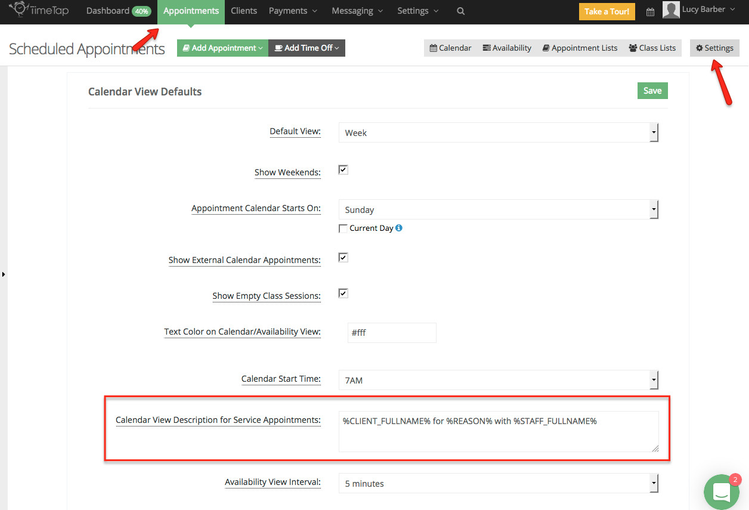
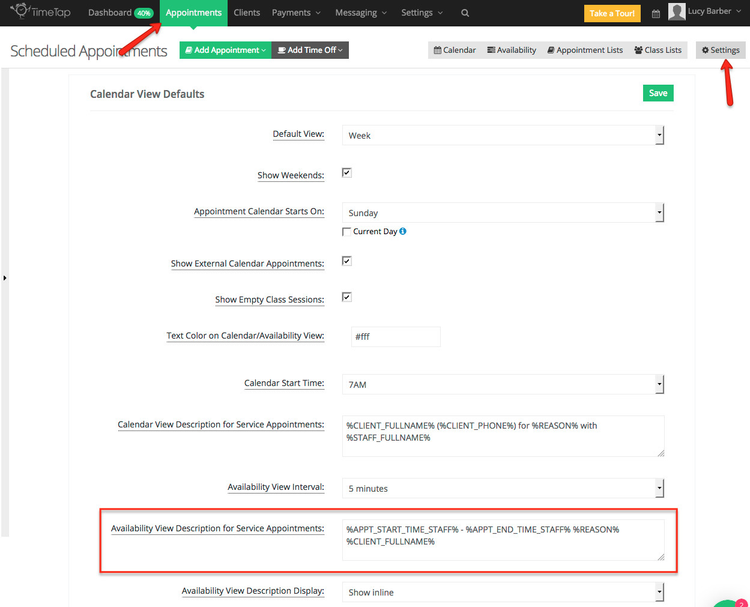
In order to customize how your calendar displays, go to your Appointments screen and select Settings:

This will bring up your list of Calendar View Defaults settings which offers a number of options that you can tweak to meet your needs:
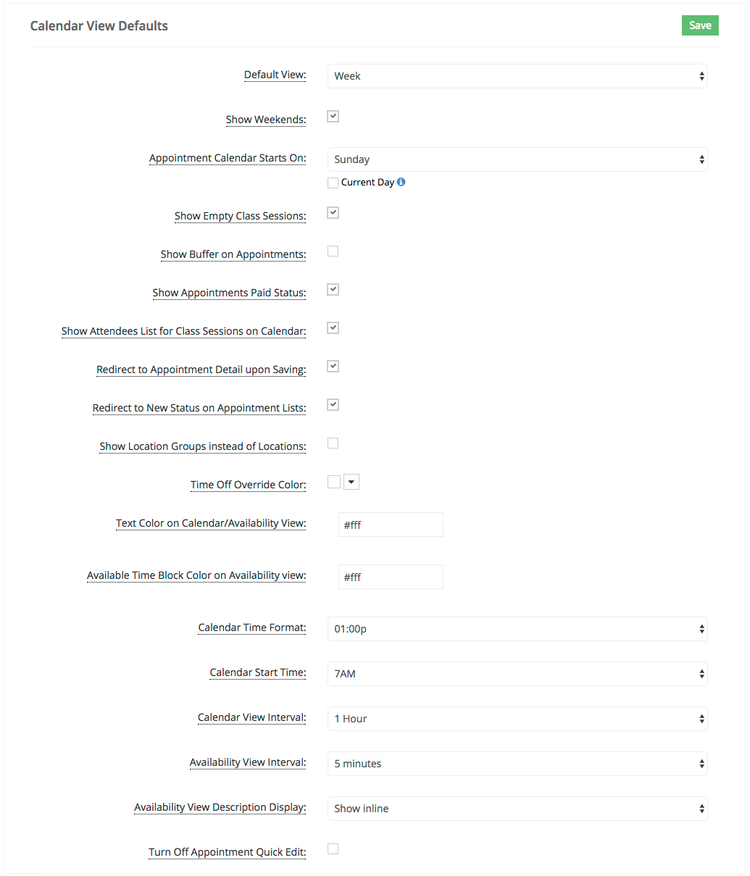
The options you can configure are:
- Default View: You can set it so that each time you login your Calendar goes to the Day, Week, or Month view by default depending on your preference
- Show or Hide Weekends: If you don't take appointments on the weekends, then they may just be taking up unnecessary space on your screen. You can hide them from view by deselecting the checkbox next to "Show Weekends".
- Appointment Calendar Starts on: This will configure what day of the week you want your calendar view to start on. If you choose "Current Day" then whenever you login the calendar will start one whatever day it currently is. (so if you login on a Tuesday, the start day will be Tuesday; if you login on a Wednesday the start day will be Wednesday; etc.)
- Show Appointment's Paid Status: This will make it so that if an appointment either does not have an invoice that it is assigned to or if the invoice it is assigned to is not paid in full then the appointment will have an "X $" next to it. If the appointment has been assigned to an invoice and that invoice has been closed and paid, then it will have a "$" next to it.
- Show or Hide Empty Class Sessions: This allows you to see/hide all scheduled sessions for your classes on your calendar, even if no clients have registered for them
- Show Buffer on Appointments: This checkbox would apply for anyone that has buffers defined on their services (under the Service Profile > Time section). If you want the appointment on the Appointments > Calendar view to display with the buffer times instead of the non-buffer times, check this checkbox off.
- Show Appointments Paid Status: This will show a $ icon in the top left appointment block if the appointment bas been paid or x$ if the invoice for the appointment is still pending
- Show Attendees List for Class Sessions on Calendar: This will hide/show the list of attendees from the displaying underneath the class title on the calendar view
- Redirect to Appointment Detail Upon Saving: If you want to be redirected to the appointment detail page after saving an appointment from the add one time appointment screen flow, select this option. Otherwise if it's left unselected, we'll return you to the main Appointment menu page
- Redirect to New Status on Appointment Lists: If you use the Appointments > Appointment Lists views to change the status of appointments in bulk (like marking all your open appointments as completed at the end of the day), this checkbox will determine whether after changing the status your screen directs to the new status or stays on the status you're on. If you want to stay on the status you're on, leave this checkbox unchecked.
- Show Location Groups Instead of Location: If you have added location groups, this options allow you to toggle on and off appointments by the location group instead of the individual locations
- Time Off Override Color: If you want all of your time offs to show in one color regardless of whose schedule they're on or what they're for, you can set that color in this field. This will only impact the Calendar view, not the availability view
- Font Size on Calendar: This determines the size of the text on your main calendar view that describes the time and information about the appointment
- Text Color on Calendar/Availability view: This determines what color the title/description of the appointment appears in in your Appointments > Calendar and Appointments > Availability views. By default it is white (or #fff in hexadecimal)
- Border Color on Calendar View: This changes the color of the hour and a half hour lines on the main calendar view
- Available Time Block Color on Availability View: This changes the color that available time slots show on the Availability view
- Calendar Time Format: This determines how the time on the appointment on your calendar displays, for example, 01:00, 01:00p, 1:00, 1:00p, 1, 1p, 13, 13:00
- Calendar Start Time Format: This determines how time on the appointment blocks on your calendar is displayed, for example: 01:00, 01:00p, 1:00, 1:00p, 1, 1p, 13, 13:00
- Calendar Start Time: This determines what hour of the day your Appointments > Calendar view loads starting at. If you offer early morning appointments, you may want to set this earlier than our default of 7am so that you see those early morning appointments as soon as you login
- Calendar Min Time: This is the minimum time of the day that will be scrollable on the calendar
- Calendar Max Time: This is the maximum time of the day that will be scrollable to on the calendar
- Calendar View Interval: By default, the Calendar view under the main Appointments menu shows hour long intervals. You can change the display of this screen to show intervals in 5 minutes, 10 minutes, 15 minutes, 20 minutes, or 30 minutes if you need more granular options.
- Availability View Interval: It may not seem like much, but your Appointments > Availability view is a heavy screen. By default it loads every single one of your staff's availability in 5 minute increments. This can make the loading of that screen take longer than you might need, particularly if you don't offer appointments in such narrow increments as 5 minutes. You can adjust this to a higher setting to make that screen load faster. For most accounts 30 or 15 minute increments will do
- Availability View Description Display: This determines how your description appears under Appointments > Availability. By default it will show the description both as inline text and as a tooltip, but you can change it here so that it only shows as one or the other
- Turn Off Appointment Quick Edit: This will make it so that as soon as you click on the appointment, you'll go into its details instead of getting the quick edit pop over
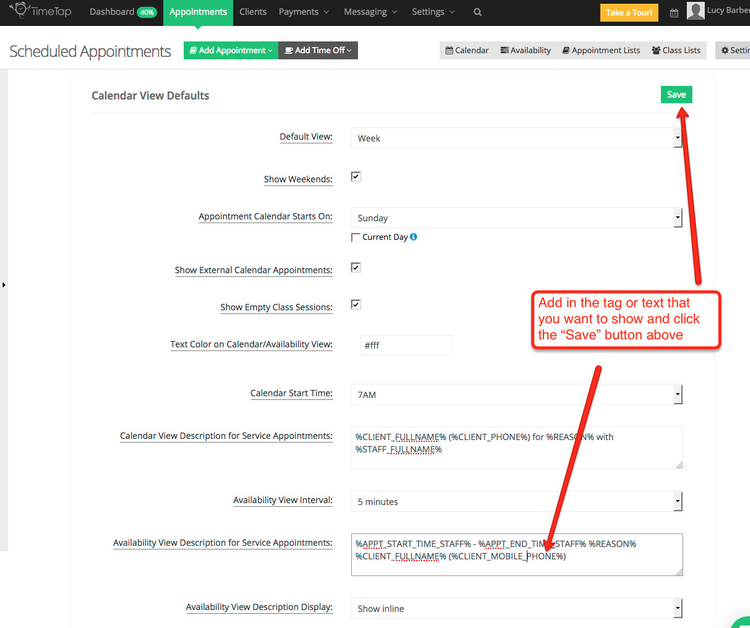
Once you've adjusted these settings to match what you want to see, press the "Save" button and then click on the Calendar or Availability view to see the changes:
Changes made to the Account Level Calendar and Appointment View Details section apply to all staff members.
In order to customize how your calendar displays, go to your Appointments screen and select Settings:

This will bring up your list of Calendar View Defaults settings, scroll to until you find the Account Level Calendar and Appointment View Details:
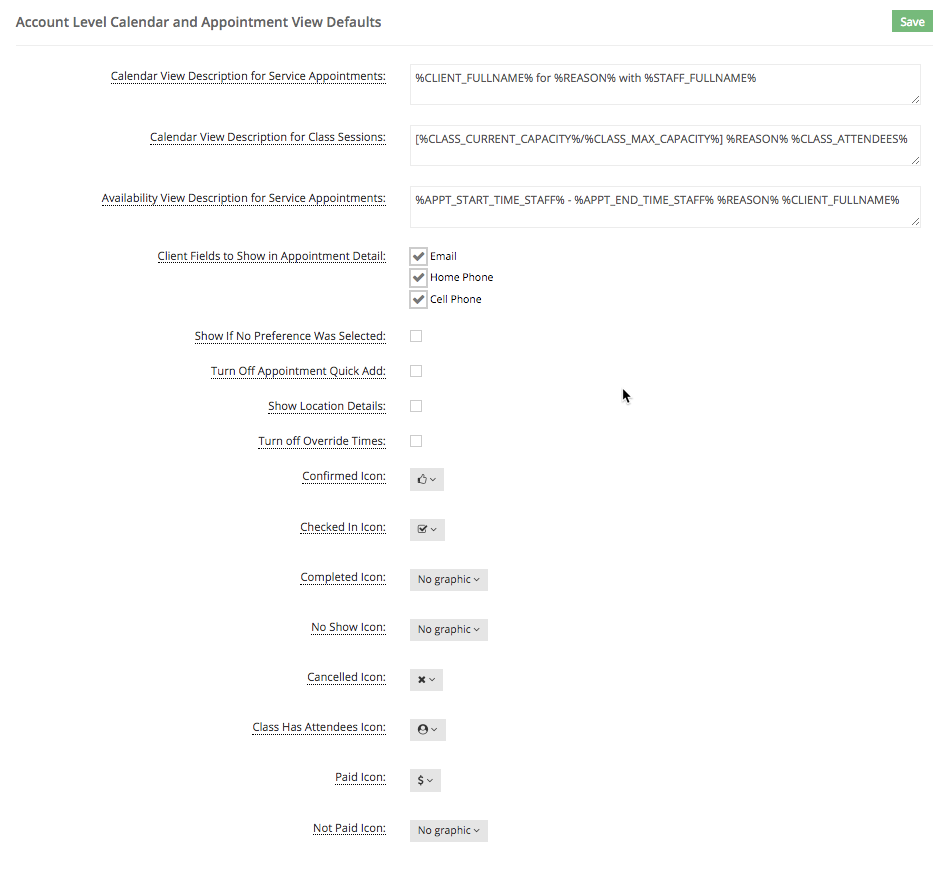
The options you can configure are:
- Calendar View Description for Service Appointments: This is how you can change what the title reads as in your appointment on your Calendar view. This field is tag enabled (click here to learn more about using tags) and can use any of the tags that are associated with appointments or clients. By default it reads as "%CLIENT_FULLNAME% for %REASON% with %STAFF_FULLNAME%". So if I had a Consultation appointment with Jane Doe, it would read as "Jane Doe for Consultation with Lucy Barber". This is only for services, not for Classes.
- Calendar View Description for Class Sessions: This is how you can change what the title reads as in your class sessions on your Calendar view. This field is tag enabled (click here to learn more about using tags) and can use any of the tags that are associated with classes or clients. By default it reads as %APPT_START_TIME_STAFF% - %APPT_END_TIME_STAFF% %REASON% %CLIENT_FULLNAME%.
- Availability View Description for Service Appointments: This is how you can change what the title reads as in your appointment on your Availability view. This is very similar to the Calendar View Description noted in the bullet point above, except this field impacts what you see on the Appointments > Availability screen instead. This field is tag enabled (click here to learn more about using tags) and can use any of the tags that are associated with appointments or clients. By default it reads as "%APPT_START_TIME_STAFF% - %APPT_END_TIME_STAFF% %REASON% %CLIENT_FULLNAME%". So if I had a 9am - 10am Consultation appointment with Jane Doe, it would read as "9:00am - 10:00am Consultation Jane Doe". This is only for services, not for Classes.
- Client Fields to Show in Appointment Detail: This section will give a list of all your client fields, check which details about the client you'd like to display int he appointment detail screen
- Show if No Preference Was Selected: If you have "No Preference" turned on in the staff page of your scheduling flow, then by checking this option TimeTap will show you on the appointment detail page whether or not the client selected no preference when booking
- Turn Off Appointment Quick Add: If you'd prefer to have your staff always go to the add appointment screen when clicking on the calendar, check this option
- Show Location Details: Select this option if you want to show the location address, phone number, & email on the appointment & class session detail screens.
- Turn off Override Times: Select this option if you don't want your staff (including account owner) to be able to enter their own times for appointments. You would just have the option to select from the list of times. This would also disable the option to drag and drop appointments on the calendar view.
- Substatuses for Open, Completed, No Show, and Cancelled statuses: These are custom substatuses you can set any appointments that are in Open, Completed, No Show, and Cancelled statuses
- Confirmed Icon: This is the icon that will display in the top right of the appointment on your calendar view if the appointment is in confirmed sub-status
- Checked In Icon: This is the icon that will display in the top right of the appointment on your calendar view if the appointment is in checked in sub-status
- Completed Icon: This is the icon that will display in the top right of the appointment on your calendar view if the appointment is in Completed status
- No Show Icon: This is the icon that will display in the top right of the appointment on your calendar view if the appointment is in No Show status
- Cancelled Icon: This is the icon that will display in the top right of the appointment on your calendar view if the appointment is in cancelled status
- Class Has Attendees Icon: This is the icon that will display in the top right of the appointment on your calendar if the class has at least one attendee booked
- Paid Icon: This is the icon that will display in the top right of the appointment on your calendar if payment has been accepted for this appointment
- Not Paid Icon: This is the icon that will display in the top right of the appointment on your calendar if payment has not been received for this appointment
One of TimeTap's biggest benefits is how customizable it is to your business's particular needs. One such example of this customization is how you can configure how the description for your appointments appear on your calendar view for your business.
The text that displays on the calendar is made dynamic by using tags (click here to learn more about using tags) which merge values that are stored on the appointment into text that displays on the calendar view. The default description that is added on the calendar event is "%CLIENT_FULLNAME% for %REASON% with %STAFF_FULLNAME%" which would fill in with the respective values (i.e. the tag %CLIENT_FULLNAME% would fill in with the name of the client).
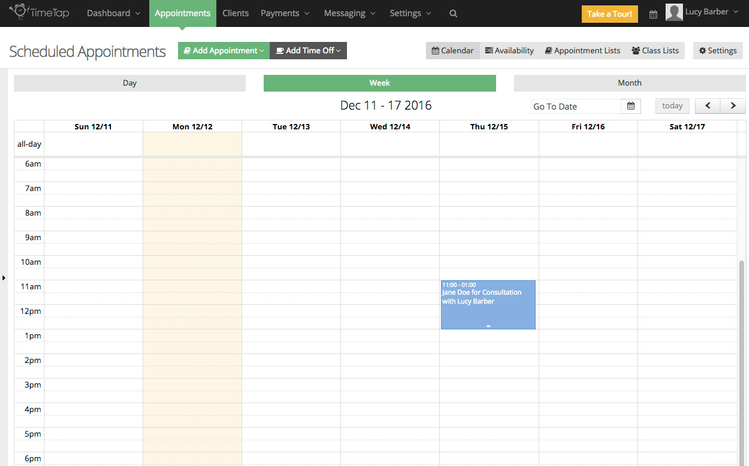
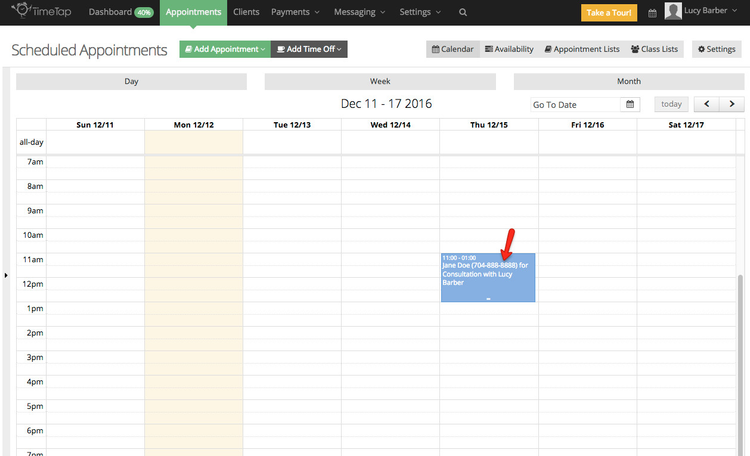
Since that is the default description, then if I as a staff member have the service "Consultation" scheduled with my client "Jane Doe", the event that shows on my calendar would have the description "Jane Doe for Consultation with Lucy Barber", as shown below:
You may, however, care about different details around the appointment that you'd like to have displayed here. Maybe for you, you want to see the client's cell phone number in that view. By looking at the list of tag values, we can see that the tag we'd want to use is %CLIENT_MOBILE_PHONE%.
My next step is to add that tag to the calendar description. To do this I'll go to Appointments > Settings to find the "Calendar View Description for Service Appointments" field:
I'm going to change the text that I have stored in there so that it includes that tag I'm interested in: %CLIENT_MOBILE_PHONE%
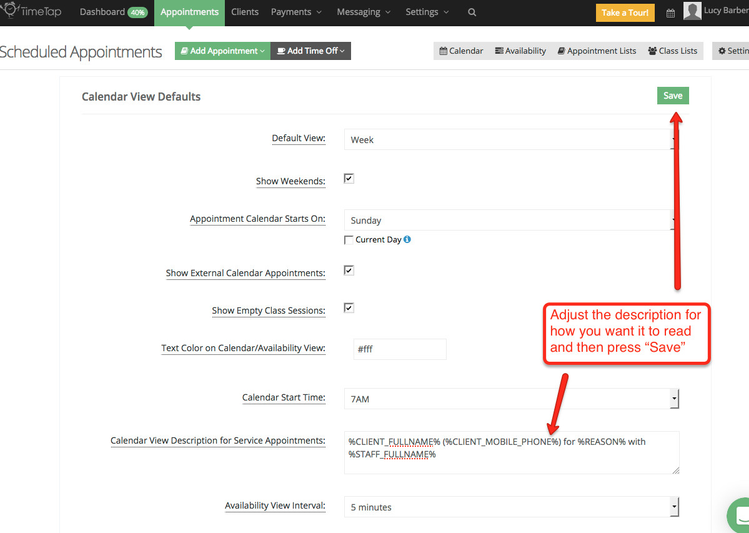
Since I've included that tag, then when I go back to look at the calendar view under Appointments > Calendar, I'm going to see the client's name and phone number in the description:
Again, good documentation to familiarize yourself with on this front is how to use tags and what tags we have available. If you are trying to get your calendar to display something specific and can't figure out how to do that, simply write our support team with the specifics of what you'd like it to show and we'd be happy to help you with that.
One thing that we strive for at TimeTap is making the app really customizable for your particular business needs. We know all too well that what works for one business doesn't work for the next so we've made TimeTap easy to adjust based on your personal preferences. One such way we've done this is by making the descriptive text you see on the appointment under Appointments > Availability adjustable based on what information your business is concerned with seeing.
The text that displays on the availability view is made dynamic by using tags (click here to learn more about using tags) which merge values that are stored on the appointment into text that displays. The default description that is added on the calendar event is "%APPT_START_TIME_STAFF% - %APPT_END_TIME_STAFF% %REASON% %CLIENT_FULLNAME%" which would fill in with the respective values (i.e. the tag %CLIENT_FULLNAME% would fill in with the name of the client).
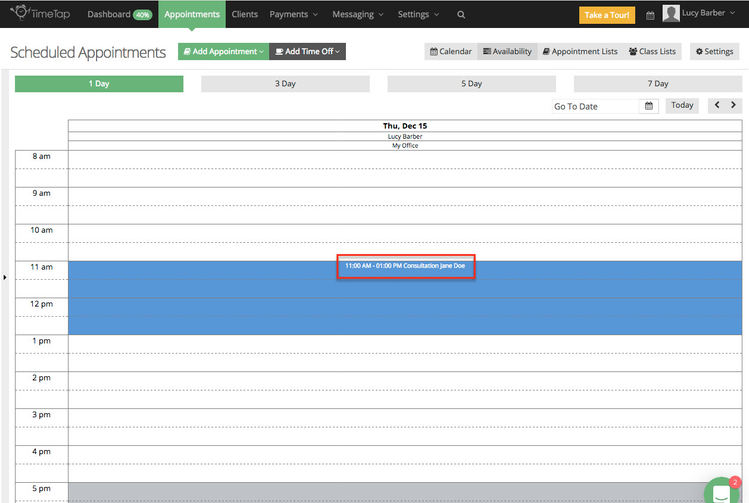
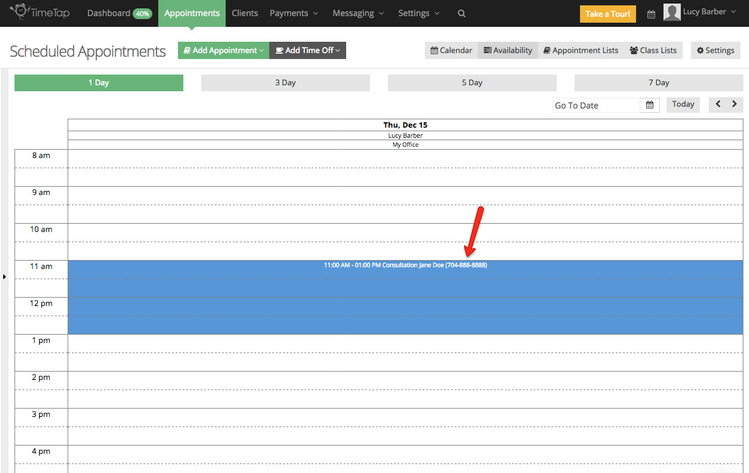
Since that is the default description, then if I as a staff member have the service "Consultation" scheduled with my client "Jane Doe" between 11am - 1pm, the event that shows on my availability view would have the description "11:00 AM - 01:00 PM Consultation Jane Doe", as shown below:
You may, however, care about different details around the appointment that you'd like to have displayed here. Maybe for you, you want to see the client's cell phone number in that view. By looking at the list of tag values, we can see that the tag we'd want to use is %CLIENT_MOBILE_PHONE%.
My next step is to add that tag to the calendar description. To do this I'll go to Appointments > Settings to find the "Availability View Description for Service Appointments" field:
I'm going to change the text that I have stored in there so that it includes that tag I'm interested in: %CLIENT_MOBILE_PHONE%
Since I've included that tag, then when I go back to look at the Availability view under Appointments > Availability, I'm going to see the client's phone number in the description:
Again, good documentation to familiarize yourself with on this front is how to use tags and what tags we have available. If you are trying to get your Availability view to display something specific and can't figure out how to do that, simply write our support team with the specifics of what you'd like it to show and we'd be happy to help you with that.