| Anchor | ||||
|---|---|---|---|---|
|
From this section you can:
- Allow client side booking
- Update your Panel Flow
- Turn Auto Advance On or Off
- How far in advance of appointments clients can reschedule
- How to restrict rescheduling to same staff member
- How How far in advance of appointments clients can cancel
- Make cancellation reason optional
- Require staff confirmation for booked appointments
- Set up zip code filter
In this documentation we'll go over each of these features (click the links above to jump to the specific section on that feature). If you have any questions about your Scheduler's Configuration settings, please reach out to us here at TimeTap Support to let us know.
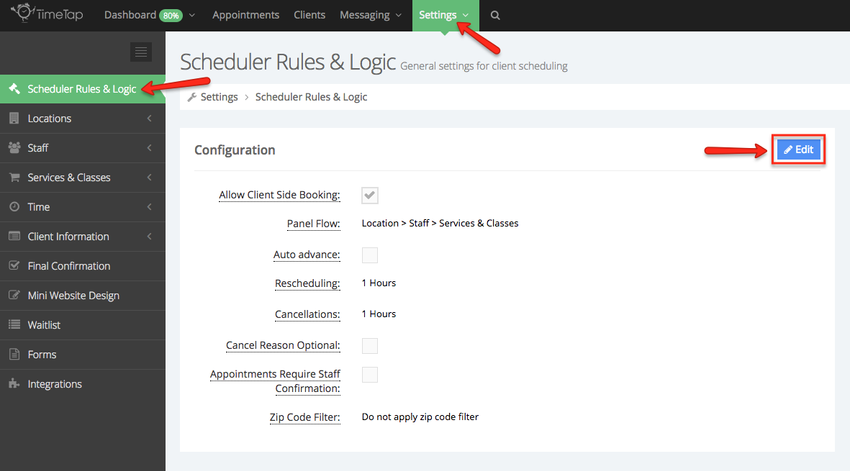
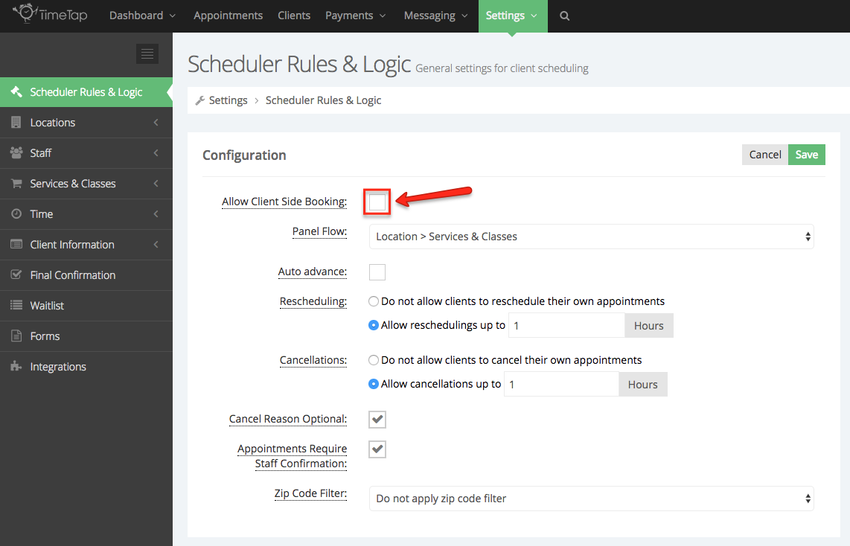
There may be time when you don't want to allow clients to book their appointments, to disable your scheduler and mini website go to Settings → Scheduler Rules & Logic and click on the "Edit" button next to configuration and uncheck the box next to "Allow Client Side Booking":
After the client scheduling end has been disabled if any of your clients go to your mini-website they will see the following message:

Your Panel Flow determines the order of screens that the client clicks through in making his/her appointment choice.
If you are a TimeTap Professional or Businessuser, you have the option to add multiple staff to your TimeTap account for clients to make appointments with. In order for clients who are booking with your business to be able to select between the multiple staff on your account, you have to configure the flow of your scheduler to include the "Staff Panel".
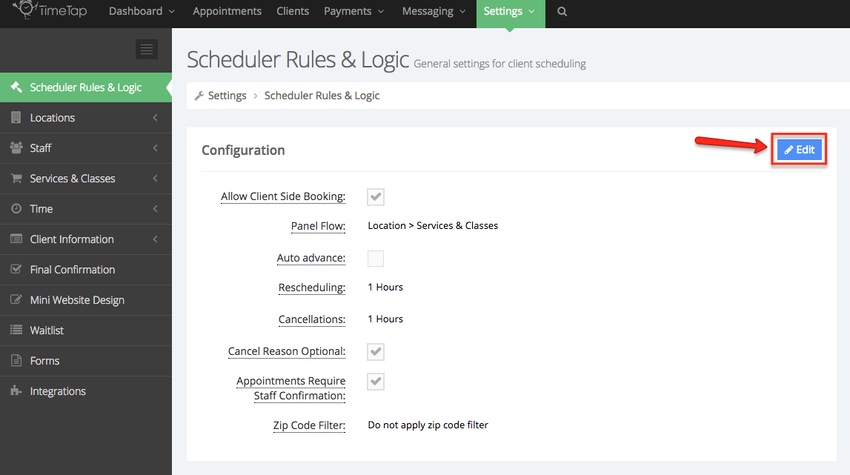
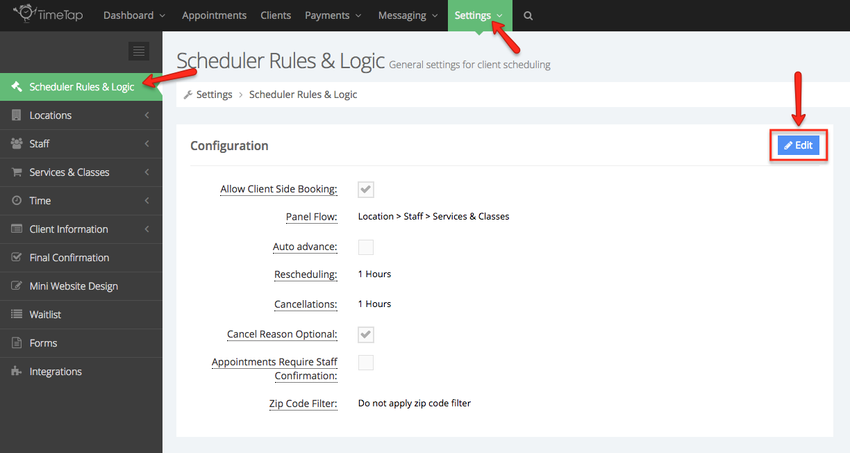
To configure your scheduler's flow, go to Settings → Scheduler Rules & Logic and click on the "Edit" button next to "Configuration":
Once the Configuration section goes into Edit mode, you'll see towards the top of the section that you have the option to select how you want the scheduler's flow to be ordered:
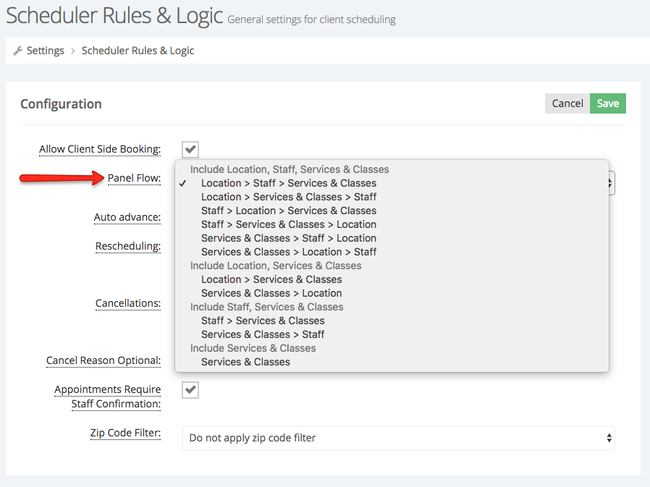
The "Welcome Panel", "Time Panel", "Client Info Panel", and "Confirmation Panel" are all going to show in the scheduling flow since they are required to successfully save the booking. This part of the flow determines how clients will click through and select what they are booking and who they are booking with. You have the option to set this up as:
- Location → Staff → Service: With this set up, clients first select which location they want to go to for their appointment, then which staff (from among the available staff at that location), then which service (from among the services that staff offers)
- Location → Service → Staff
- Staff → Location → Service
- Staff → Service → Location
- Service → Staff → Location
- Service → Location → Staff
- Location → Service
- Service → Location
- Staff → Service
- Service → Staff
- Service
Once you have made the selection that makes the most sense for your business, just press "Save" and your scheduler will be updated with the new flow.
Ever think it's a bit of a nuisance if you only have one service that clients have to click the service on the scheduler to move on to the next panel? Well, by turning on Auto Advance you will stop that nuisance in its tracks!
Auto Advance (which is a feature that's only available to TimeTap Professional and Business users) works for your Staff and Service panels in your scheduling flow. If, when clients are clicking through your scheduler, you only have one staff or one service on a panel, then Auto Advance will auto-select that staff or service and move the client automatically to the next panel in the flow. If you have more than one option on the panel then the client will still have to select which option they want before they can click "Next" and move to the next panel.
You can turn on Auto Advance by going to Settings → Scheduler Rules & Logic and Editing your Configuration settings:

When the Configuration section goes into Edit mode, you'll see the checkbox you can use to turn on Auto Advance for your scheduler:
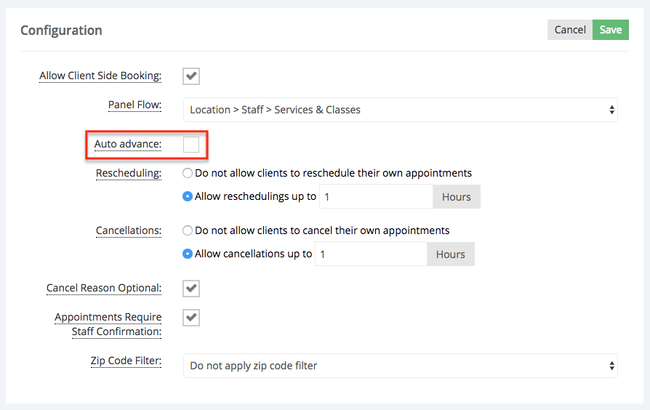
Once you've turned it on, Just make sure to press "Save Changes" at the bottom of the window to commit the change to your scheduler.
Have questions about Auto Advance? Feel free to contact our support team and we'd be happy to answer them for you!
The fourth option in Scheduler Configuration Settings is the "Allow ReschedulingUp To" field. By default the value here is "1 Hour":
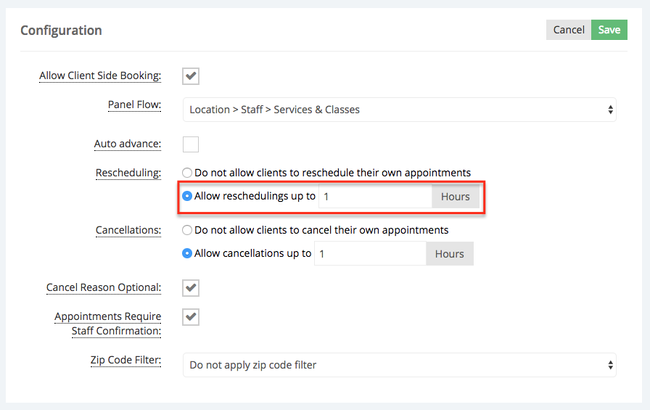
This essentially means that clients can reschedule their appointments up to 1 hour in advance of the appointment start time. So, if an appointment was set for 11:00am on 11-26-2017, a client could reschedule his/her appointment up until 10:00am on 11-26-2017. After 10:00am, the reschedule appointment button on the appointment details page for clients when they click on the link from the reminder &/or confirmation emails will be disabled.
If the field was set to 12 hours then, given the same situation, the client would have to reschedule before 11:00pm on 11-25-2017.
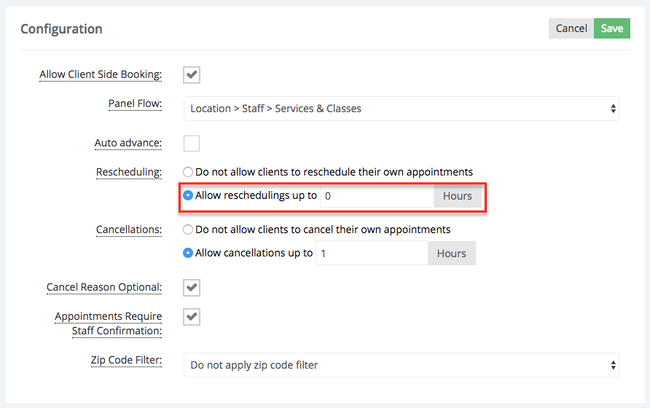
If you want clients to be able to cancel or reschedule appointments up until the start time of the appointment, you can enter in 0 in the hours and press "Save":
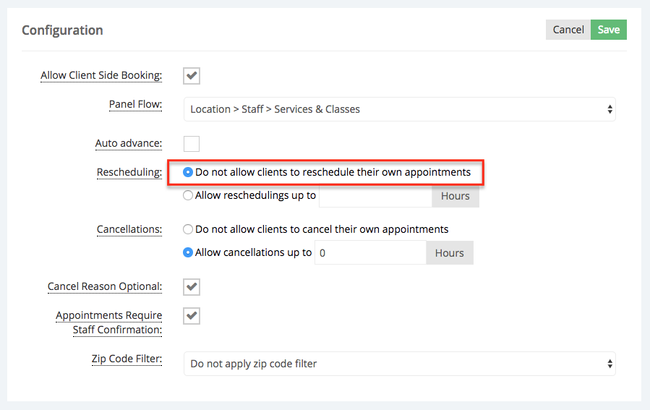
If you don't to allow your clients to reschedule their appointments, choose the option "Do not allow clients to reschedule their own appointments":
The fifth option in Scheduler Configuration Settings is the "Restrict Rescheduling to Same Staff" field. By default the value is disabled. If you wish to enable this feature, when the Configuration section goes into Edit mode, you'll see the checkbox you can use to turn on
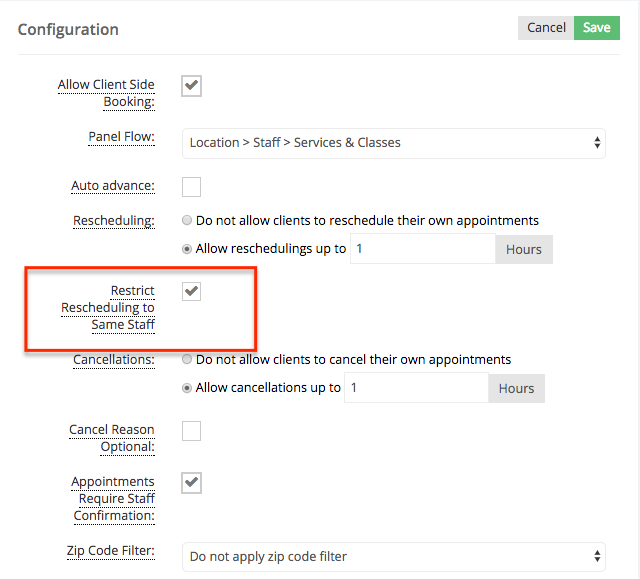
By enabling this feature you are only allowing your clients to reschedule with the staff member assigned to their original appointment. When a client reschedules their appointment(s) the online scheduler will only show the availability of the staff member who is assigned to the appointment they are rescheduling.
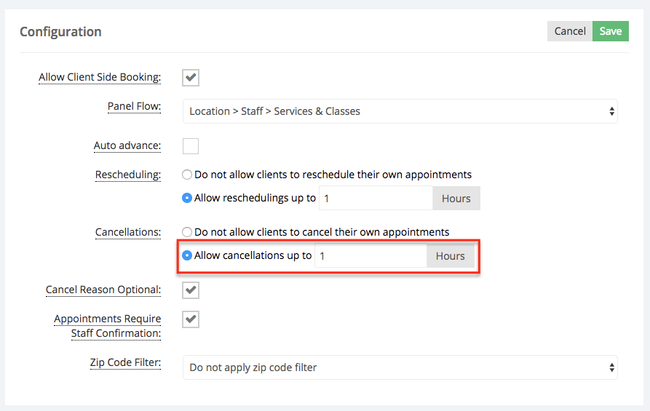
The fifth option in Scheduler Configuration Settings is the "Allow Cancellations Up To" field. By default the value here is "1 Hour":
This essentially means that clients can cancel their appointments up to 1 hour in advance of the appointment start time. So, if an appointment was set for 11:00am on 11-26-2017, a client could cancel his/her appointment up until 10:00am on 11-26-2017. After 10:00am, the cancel appointment button on the appointment details page for clients when they click on the link from the reminder &/or confirmation emails will be disabled.
If the field was set to 12 hours then, given the same situation, the client would have to cancel before 11:00pm on 11-25-2017.
If you want clients to be able to cancel appointments up until the start time of the appointment, you can enter in 0 in the hours and press "Save":

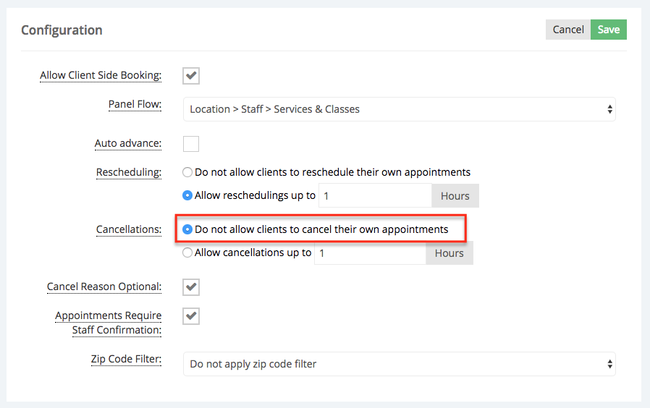
If you don't to allow your clients to cancel their appointments, choose the option "Do not allow clients to cancel their own appointments":
If you allow your clients to cancel their own appointments you have the option to determine whether they must provide a reason for their cancellation or make this step optional for them. If this field is selected the client will not have to enter a reason for cancellation:
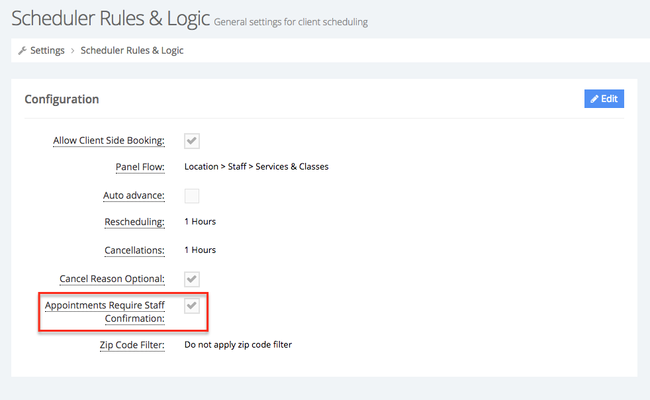
This feature will allow clients to request appointment times from the times you and your staff have available. Before the appointments are officially confirmed and added to your schedule you (the staff person) will need to either accept or decline them.
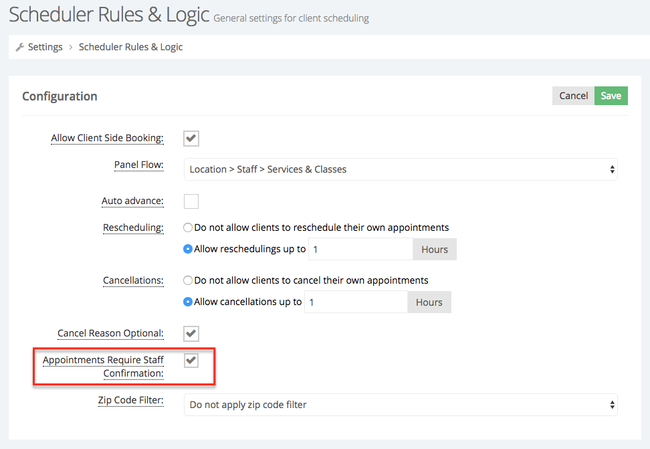
You can enable staff confirmation by going to Settings > Scheduler Rules & Logic and Editing your Configuration settings:
Once the Configuration goes into Edit mode, you'll see the checkbox you can use to turn on the Appointment Require Staff Confirmation setting. One thing to keep in mind is that in order to use the 'Payment Required' feature upon booking an appointment you need to turn off staff confirmation requirements:
Below are some examples on how this setting can be utilized in your Scheduler and Mini Website. Let's assume that you have a customer who wants to book an appointment with a specific member of you staff:
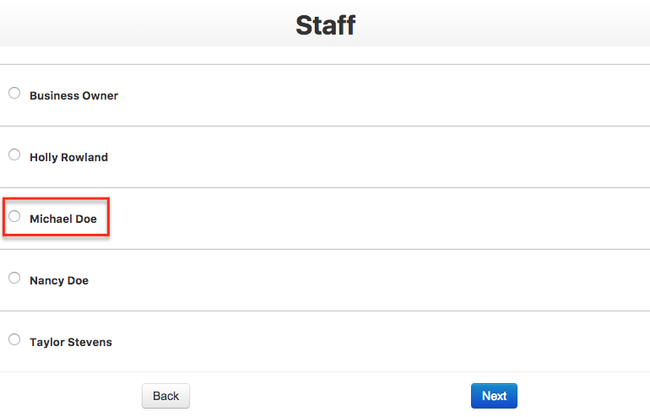
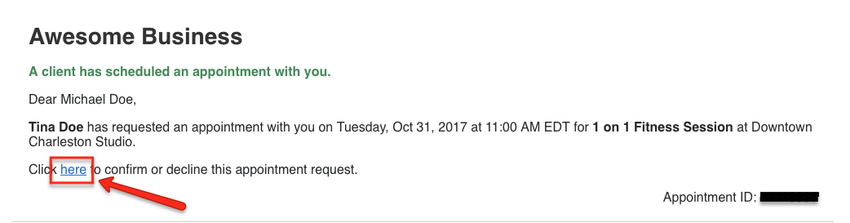
Once your client has finished their booking, an email will go out to the staff member that the appointment request was made with. In this case, that staff member would be "Michael Doe". Below you will see the email she received informing her that a customer has requested an appointment with her. By default the email sent to the staff member will contain the name of the customer requesting the appointment, the desired time and date, type of service, and the location the customer selected. This information can be changed under Messaging → Appointment Templates → To Staff → Appointment Requested by Client if you'd like. The staff member will be asked to Accept or Decline the appointment by clicking the link inside the email:
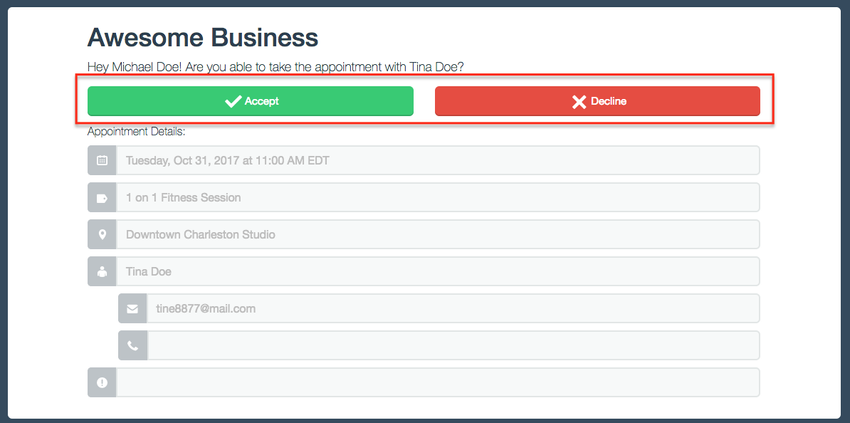
Clicking the link inside the email will open a new window in which the staff member will be given the option to Accept of Decline the appointment:
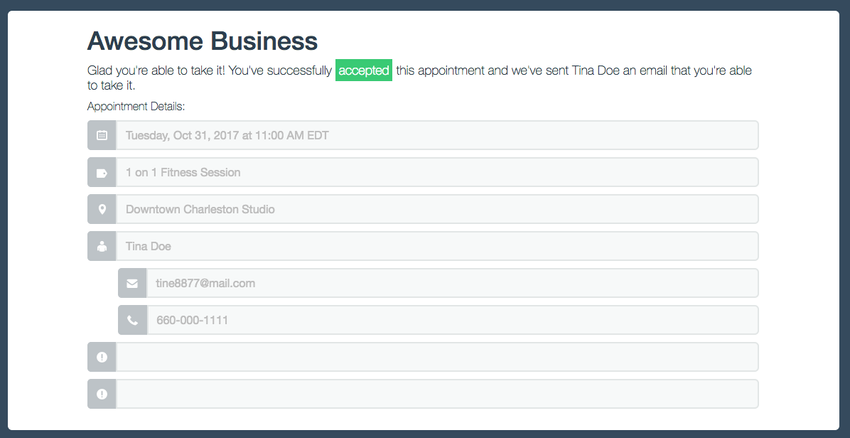
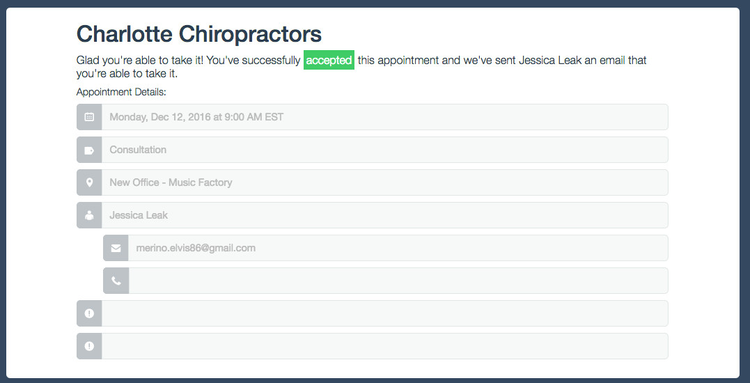
If the staff member chooses to accept the appointment, they will be taken to a new page where they will see the appointment details and the appointment will be added to the staff's calendar:
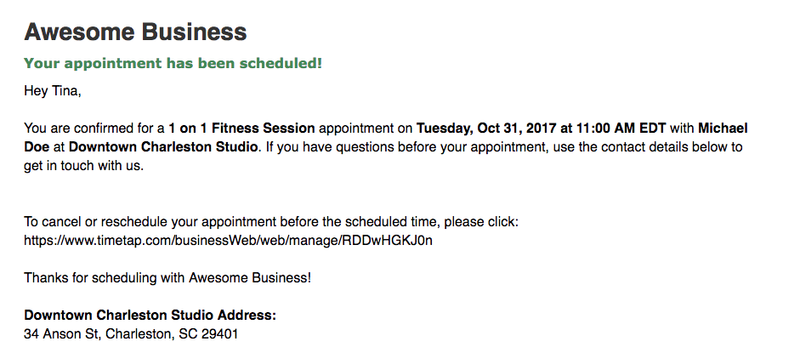
After the appointment has been accepted, your customer will receive an email confirming the appointment has been scheduled:
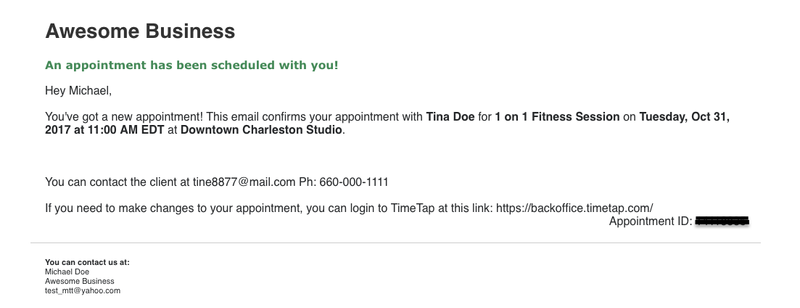
The staff member who accepted the appointment will also receive and email confirming the appointment:
In the case that the member of your staff is not able to accept the appointment and chooses to decline, he/she will be asked to enter a reason why he/she is not able to take the appointment, this field is not required to decline an appointment. The reason you enter in this box will be visible to the customer who booked the appointment:

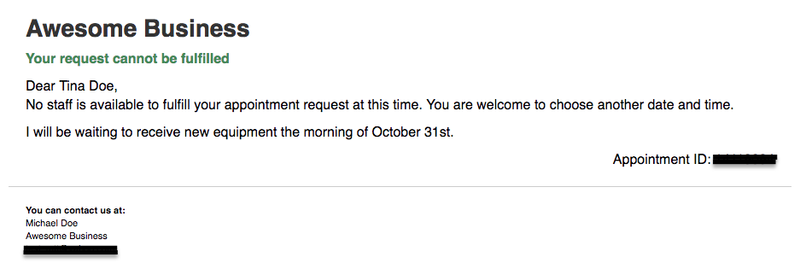
After the appointment has been declined an email will be sent to the customer letting them know that the staff member they selected is not able to take their appointment:
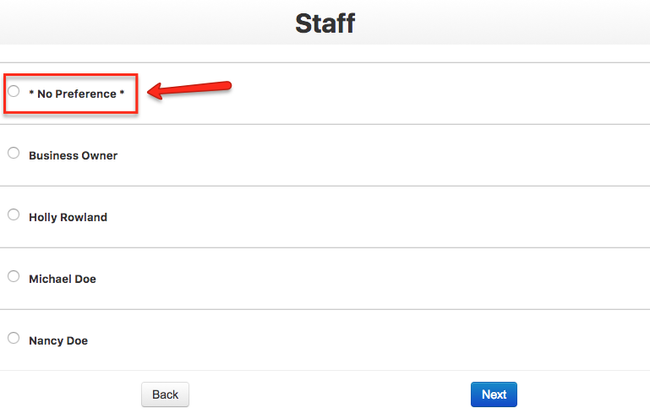
When your clients don't particularly mind which staff they meet with for any particular service and you have chosen to enable the 'No Preference' option in the Staff Panel Settings, then your customer will have the option to book an appointment with any of your staff available at that time:
Once your customer has chosen no preference on the staff panel page, they can then choose which service they are interested in and the time & date they'd like to request for an appointment. After they save their appointment request, an email will be sent to all the staff with open availability and who are able to take the appointment. Let's assume that in this case we have three staff members with open availability at a specific location, all three will receive the same email asking them to accept or decline the appointment: 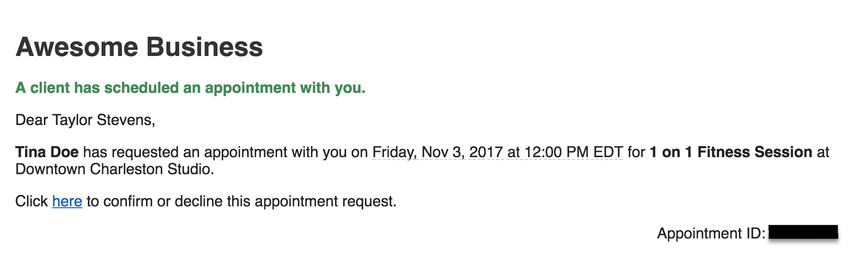
Which ever member of your staff chooses to accept the appointment first will have the appointment added to his/her calendar:
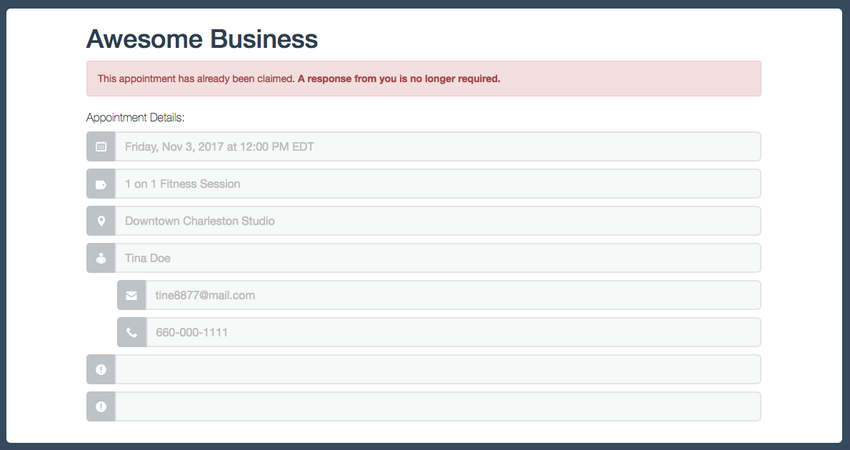
If a staff member opens the link inside the email after the appointment has already been accepted by another user then he/she will see a screen informing them that their input is no longer required:
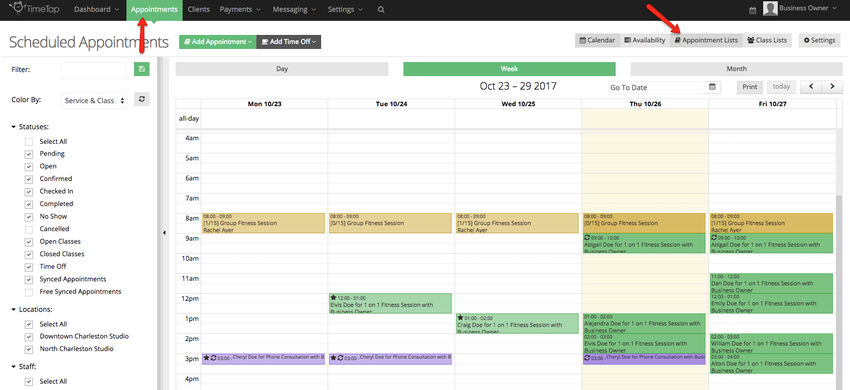
There may be a time when your staff is busy with a client and they are not able to Accept or Decline an appointment, in this case a Location Super User (only if the appointment is requested for the location they are assigned to), Administrator or Account Owner can assign Pending Appointments to staff. Let's assume that a client wants to schedule an appointment but they have no preference on which staff is ultimately assigned to it. At the time the client made the request, all the staff who were sent the alert are busy and don't immediately see the email above. Any staff member can then go to Appointments → Appointment Lists → Pending to see all appointment requests that have been made over a given time period:
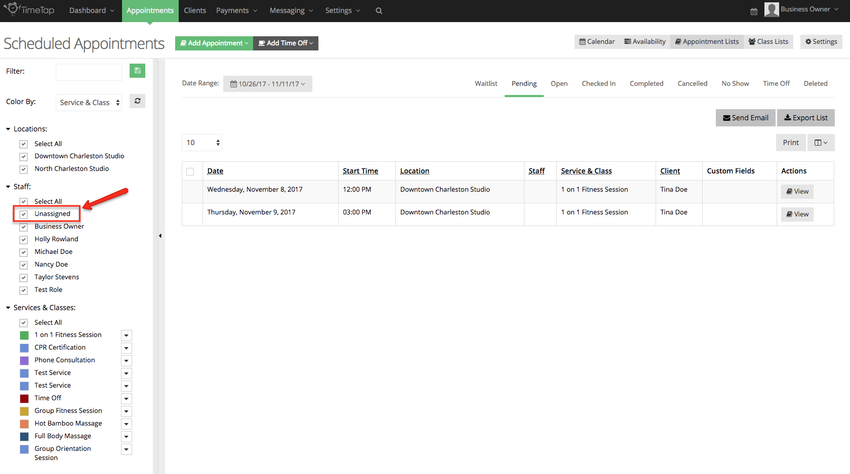
If you are accessing the back office as an Administrator or Account Owner you will be able to filter the results by selecting different locations in the filter, to display appointments pending approval make sure to select "Unassigned" under the Staff section within the filter:
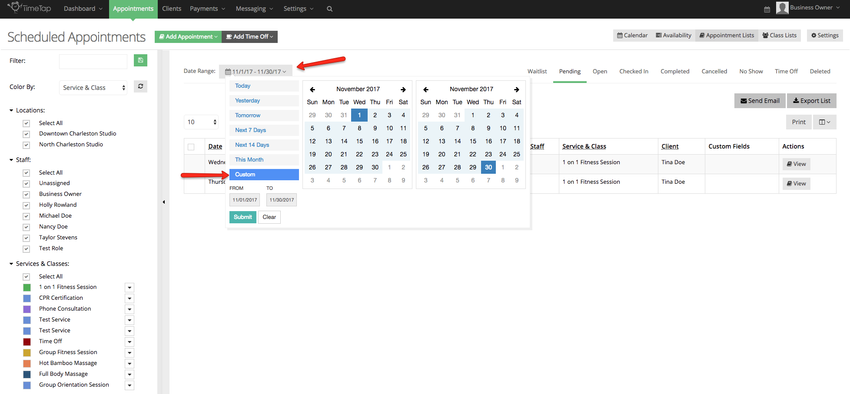
Next we want to select a Date Range, let's say that the appointment you want to assign to staff member was requested for the month of November, click the Calendar next to Date Range and select the appropriate range, in this case I want to see all appointments from November 01, 2017 to November 30, 2017:
Under the Pending Tab I will be able to see all the appointments pending approval and appointments assigned to staff members from 11/1/17 - 11/30/17:

Appointments that have NOT been accepted or declined can be assigned to a staff member by clicking View:
Once in the Appointment Detail window you are able to accept the appointment for yourself, accept the appointment for another staff member with open availability at that location, reschedule the appointment, or edit (once the appointment has been accepted).
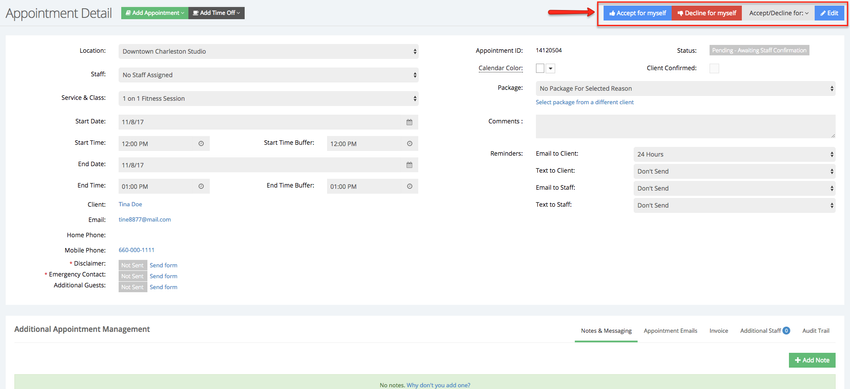
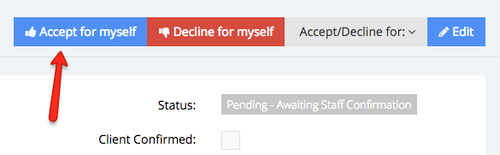
To Accept an appoint for yourself simply click the Accept for myself button:
To Accept or Decline an Appointment for another user click the 'Accept/Decline for:' button. In the dropbox you will see to which user received email for this appointment asking to accept or decline and the action each user has taken. In this example I see a only blue thumbs up because next to Nancy Doe because she has declined this appointment, but I can still assign this appoint to her or any other staff member:

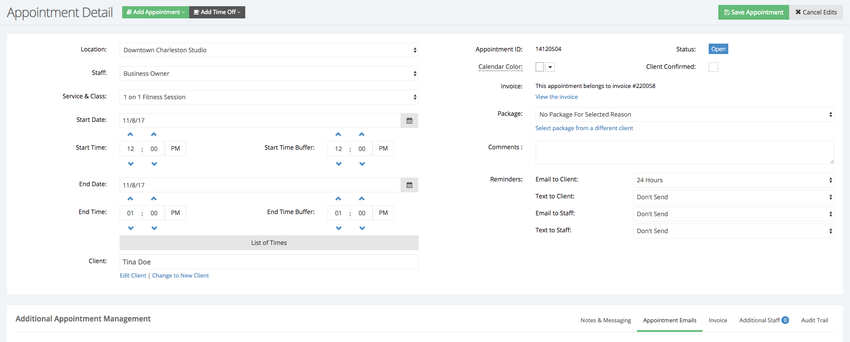
The option to edit an appointment will only be made available once you accept the appointment for yourself or for another user, once the appointment has been assigned you are able to edit the start and end times, location, service type as well as adding a comment or set reminders:
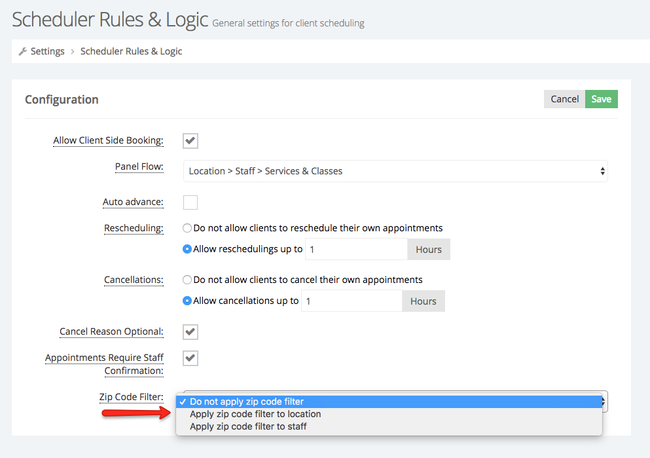
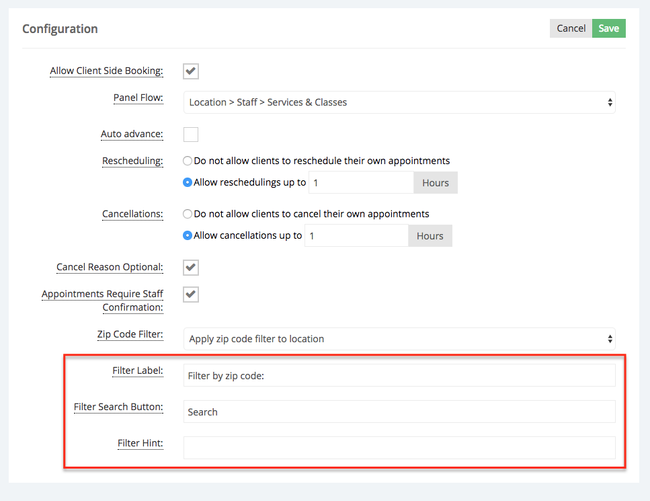
Filters are a versatile tool that will make your client's booking experience much more efficient. For example, adding a Location Filter will allow your client to find your closest location to them and adding a Filter to your Staff members will allow clients to search by service, class, or any other criteria you'd like to set. This field will allow to select whether the filter should be applied to your locations or staff:
Once the filter has been applied to either the locations or the staff you'll have the option to setup:
- Filter Label: This is the label that shows in the filter and allows you to give clients a better idea as to what they can type in to search your list of locations or staff
- Filter Search Button: Change the label of the button that appears next to the filter input field on your scheduler
- Filter Hint: In this field you can add a description that will be placed underneath the filter search field to give clients greater context as to what they're searching or how to search
To learn more about how to setup filter for staff and location make sure to read our "Setting Up Filters" page.