...
- Login to the parent account where you see your list of child accounts
- Before creating the new account, it is worth thinking which of the accounts the new account you want to create most closely resembles.
Once you've determined which account the new account you want to create most closely resembles, click the "Clone" button to the right of that account: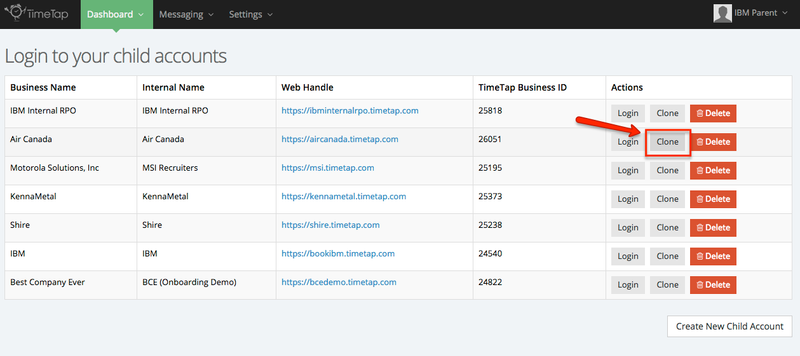
- This will bring up a pop up window where you'll want to fill in the details for the new account you're creating. Here's description of each of the fields that you'll be filling out:
Screenshot of window: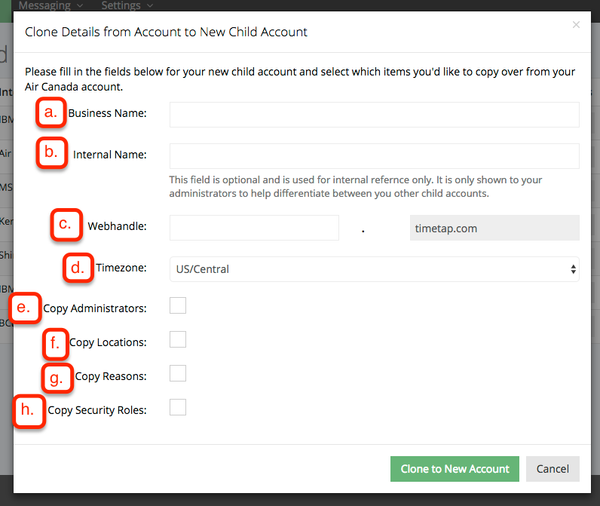
- Business Name: This is the name of the business as it will appear to the candidates booking on this account. It can be dynamically included in any of your messaging by using the tag %BUSINESS_NAME%
- Internal Name: This is the name of the account as it will appear to you and the other recruiters/administrators logging into TimeTap. This is an optional field, but will help you to differentiate between the accounts that you add with a little more description than just the business name. If you leave this blank, we will default to showing you and the other recruiters whatever value you put in the Business Name field
- Webhandle: This is the main booking page on the account. The main booking page shows all recruiters, all reasons, and all locations. For all of the accounts created on IBM so far, we have not used the main booking page. Instead we've been using a dedicated page based on the reason selected when emailing the candidate to come book.
- Please note: this field should contain no special characters or spaces
- Timezone: This is the timezone where the main branch of the child account will be based out of. This will be the default timezone that applies to any recruiters or locations that you add to this child account. It can be overridden on a per recruiter/per location basis if you have a child account where recruiters are spread out across timezones. I recommend setting this to whatever the primary timezone is knowing it can be customized as needed.
- Copy Administrators (aka Recruiters): This would copy the recruiters that are on the child account that you're cloning from (under Settings > Recruiters) to the child account that you're cloning to so you can add hours for them there. I do not think you'll want to check this off since most of your recruiters are dedicated to on child account.
- Copy Locations: This would copy all the locations that are on the child account that you're cloning from (under Settings > Locations) to the child account that you're cloning to so that candidates can book at those locations. If you just have a generic "Phone Location" or "By Phone" location on the account you're cloning from, and you want the same generic location to be included on the new account, check this off and it will save you from having to recreate the location on the new account.
- Copy Reasons: This would copy all the reasons that are on the child account that you're cloning from (stored under Settings > Reasons) to the child account that you're cloning to so that candidates can book for those reasons. For instance, if you wanted the new account to have the "Phone Screening" option on it as well and you are copying from a child account that already has that reason, I'd recommend checking this box so that you don't have to spend any time creating the reason on the new account.
- Copy Security Roles: We have created the security roles for your account on the parent level so you will not need to check this off. We established it at the parent level so that all of the child accounts will have access to that "Recruiter Security" role we established. If new security permissions need to be made for different user types, we'll also add that at the parent level. My recommendation is to leave this unchecked so that security roles pass down from the parent to the child.
- Once you've filled out the fields, click the green button to "Clone to New Account" and a new child account will be created that you can login to and continue with further setup
...