If you're an in home or traveling service provider, you'll need to set up your TimeTap scheduler so that you make sure to account for the following three points:
Point #1: Capturing the address upon booking
When you are an in-home service provider, it’s best practice to go ahead and get the address for the appointment at the same time that the client is booking. Waiting until later could mean not that you don’t get it in time to stay on schedule with your appointments for the day. Or, worse yet, it could mean that you can’t get in touch with the client and can’t confirm their appointment at all. So, this point is critical and below we’ll go through how to make sure this is turned on in your TimeTap account.
Point #2: Immediately confirming that you got their address
When clients are booking themselves, it gives them peace of mind to feel reassured that you have their correct information. A great opportunity to reassure them is on the final confirmation screen that clients see after setting their appointments. By default this screen in TimeTap just prints the location’s address, but since this is going to be the client’s address, we will have to do some swapping to some of the default settings. It gives clients a lot of comfort that their appointment was scheduled correctly if, after putting in their address & saving the appointment, the confirmation message reads, “We look forward to meeting you at the following address” and displays their address back to them.
Point #3: Including their address on email messages:
...
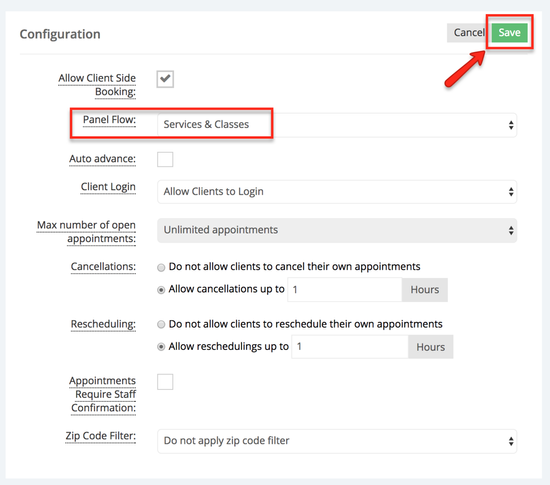
From the Panel Flow dropdown select any of the flows that do not have location in them, in the example below I only want my clients to see the services I offer so I will select Services & Classes and click Save:
...
Step 1: Making sure that client address is turned on and is mandatoryAnchor Step1ClientLoc Step1ClientLoc
...
Now, when clients of my demo cleaning company fill in their name and email address to confirm their cleaning appointment, they’ll also be prompted to fill in their address. This address will get stored on their client profile so if they login next time, they won’t have to fill in their address again.
Step 2: Put your client’s address in your confirmation message Anchor Step2ClientLoc Step2ClientLoc
...
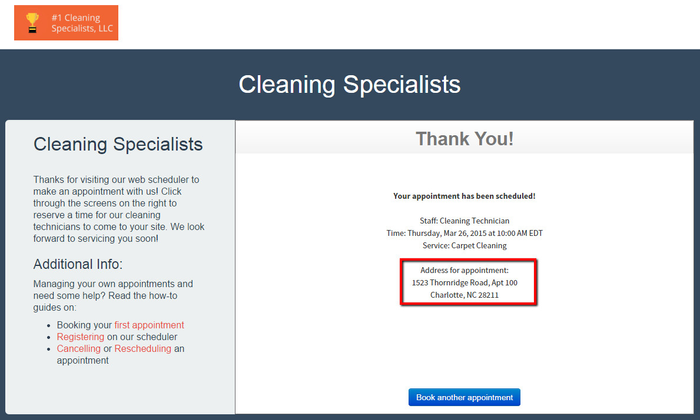
Test out your booking process now and you’ll see that the success message prints out the address that the client puts in on the Your Info page:
Step 3: Add your client's address in the appointment confirmation emailAnchor Step3ClientLoc Step3ClientLoc
...