When an appointment is first created, it is shown as being in "Open" status. As clients arrive for their appointments, you have the option to mark the appointment as "Checked In" which will time stamp the start time of the appointment and display it on the Audit Trail. An appointment can be checked in either by the staff in the back office or by client in a designated kiosk where they can enter their name or appointment ID, in this page we will cover how you can allow your clients to check in for themselves when they arrive to your office by setting up a check in screen.
Once the client leaves, you can then mark the appointment as "Completed" and essentially check out the client. Marking clients as checked in and checked out/completed will give you an overview of how long your appointments for a given service typically last, whether or not a client is typically early or late for his/her appointment, and an idea of who is in your office at any given time.
In this documentation we will cover:
- Setting up your check in screen
- How clients can check in for appointments for services
- How clients can check in for appointments for classes
- How staff can check in appointments
There are a few important things to note about checking in appointments. This is the only status change that does not trigger an email to send out to the client or staff person. It is really just for internal tracking using the TimeTap Back Office application.
Also, Checked In appointments are not a separate status altogether. Rather, they are a sub-status of Open appointments, almost like a staging area before the appointment is checked out.
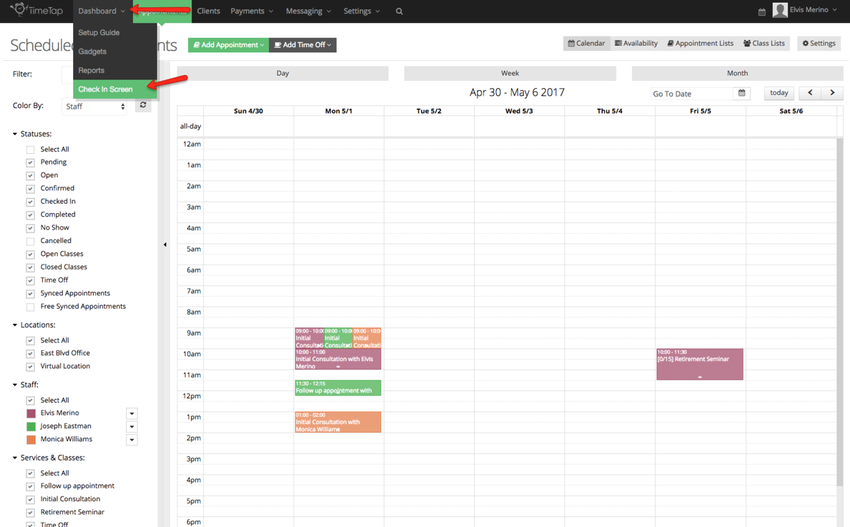
First, we will cover the different parts of the the check in screen and how this can be used to allow clients to search by their name, appointment ID or both. To go to the screen where you can configure your check in screen click Dashboard and select Check In Screen:
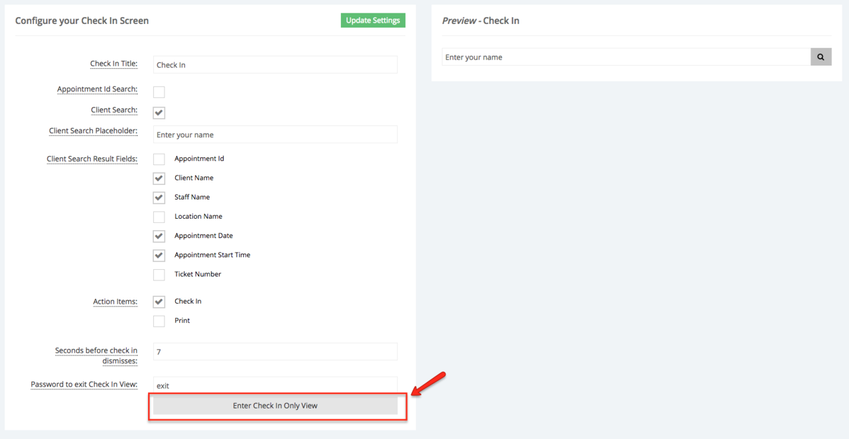
Once in the Check In screen you are presented with a few different options to setup your screen:
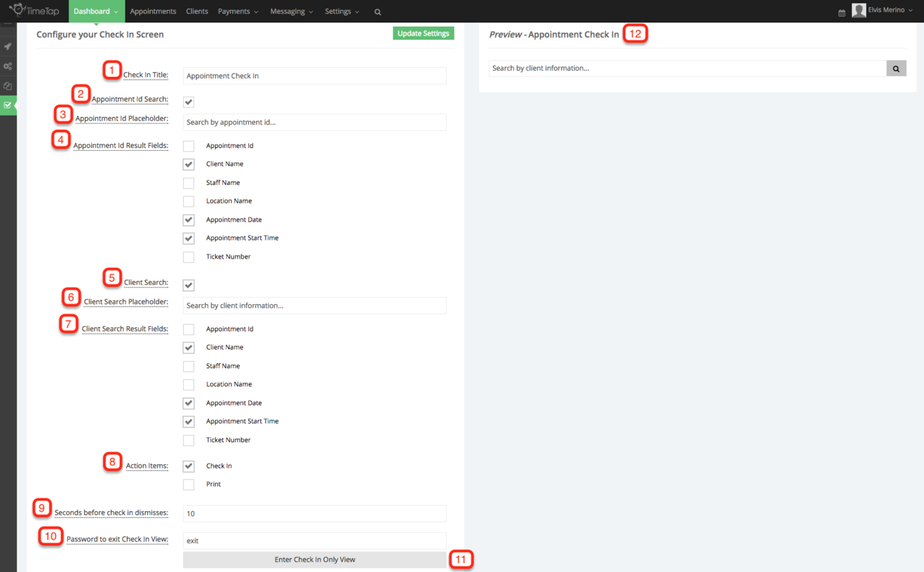
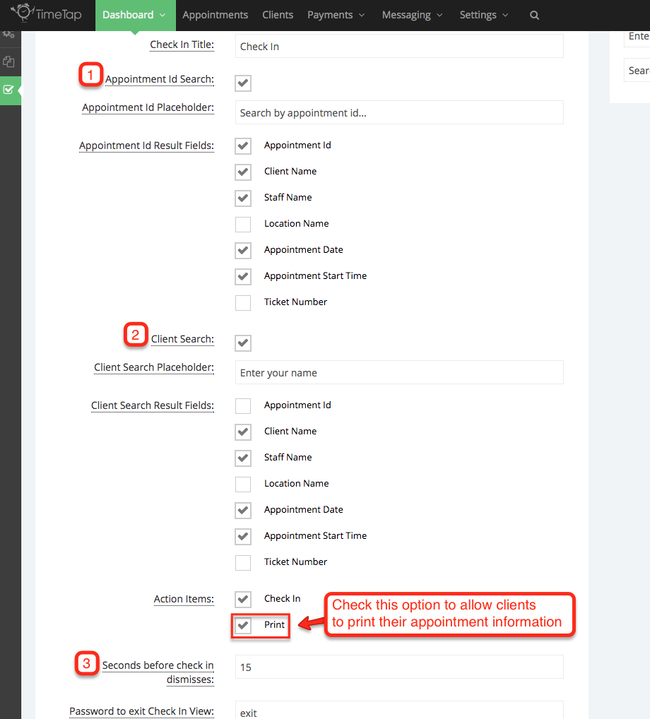
- Check In Title: This is what appears at the top of your check in form
- Appointment ID Search: If selected this will allow clients to search for their appointments in the check in screen using their appointment ID
- Appointment ID Placeholder: This is what appears in the search field if you have appointment ID search turn on
- Appointment ID Result Fields: This is the information about the appointment that will display in the results after the client searches by appointment ID
- Client Search: If selected this will allow clients to enter their names, email, phone, etc, and pull up a list of appointments scheduled for them
- Client Search Placeholder: This is what appears in the search field if you have client search turn on
- Client Search Result Fields: This is what appears in the search field if you have appointment ID search turn on
- Action Items: These are the buttons that will appear in the search results for your clients to use. Based on your selection you can allow your clients only check in or print their appointment details
- Seconds before check in dismisses: After your client checks in, you can determine how long the confirmation message stays on screen before disappearing, enter how many seconds the confirmation message should stay in the screen in this field. It's a good idea if you are asking your clients to print their ticket to leave the message in the screen a little longer
- Password to exit Check In View: If you enter into the check in only view, this will be the password you have to enter to exit and return to full access
- Enter Check In Only View button: Click this button to enter the check in screen
- Preview: After you have made your selections to configure your check in screen and clicked the Update Settings
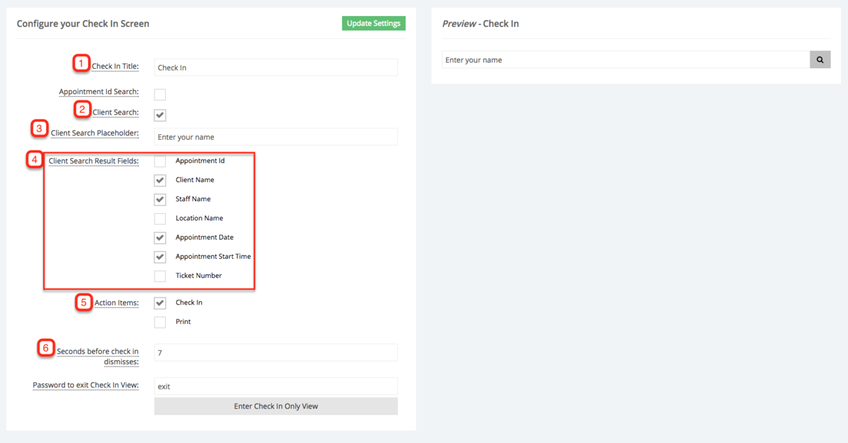
First, I want to change the check in screen title (1) to read only "Check In", next I want to allow my clients to search for their appointments using the name (2), and will change the client search placeholder to "Enter your name" (3) and once their appointment information appears in the screen I want to them to see their name, staff name (who will be assisting them), appointment's date and time (4). I want to only allow clients to check in and not print their appointment information (5) and I also want the confirmation message to stay in the screen for 7 seconds (6). After the necessary changes have been made I will click Update Settings to see a preview of my check in screen under the Preview section:
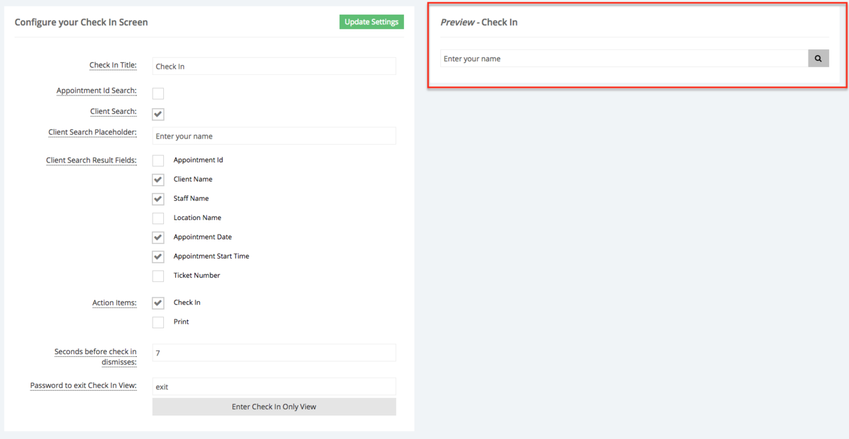
The right side of the screen give me a preview of what the check in screen will look like:
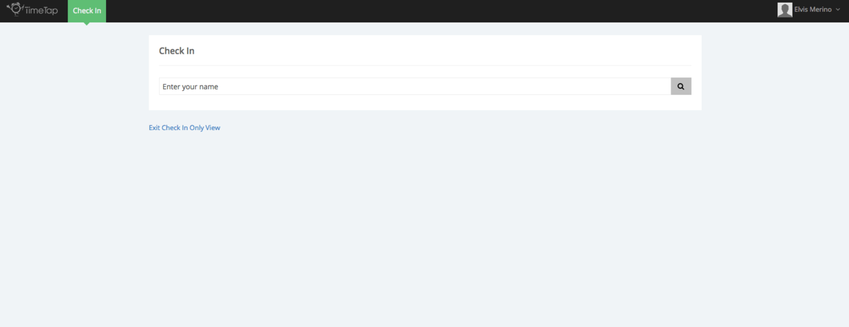
To enter the Check In view click the "Enter Check In Only View" button:
You will then be redirected to the check in only screen:
In the next section we will cover how this setup can be used to allow clients to check in for their 1 on 1 appointments.
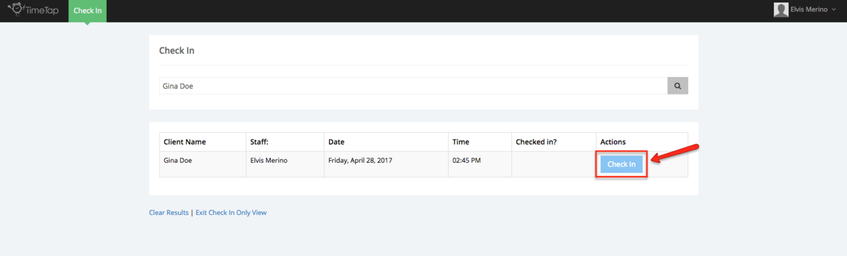
For this example let's assume that I run a retirement consulting firm and my team and I take 1 on 1 appointments and we also organize seminars where we have multiple clients come in at once. We have set up a dedicated kiosk in the office lobby to allow clients to check in when they arrive at our office, this will allow staff members to start wrapping up their current appointments. After I've setup my check In screen and entered the Check In only view, clients will now be able to type their name in the client search field and click the search button to see their appointment information:

After the client click the search button, the appointment information will appear below, at this point the client can click the Check In button:
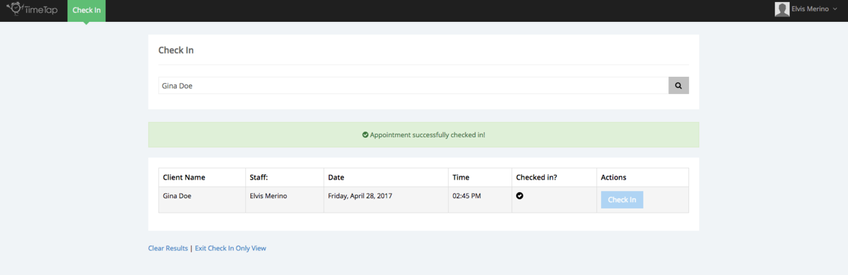
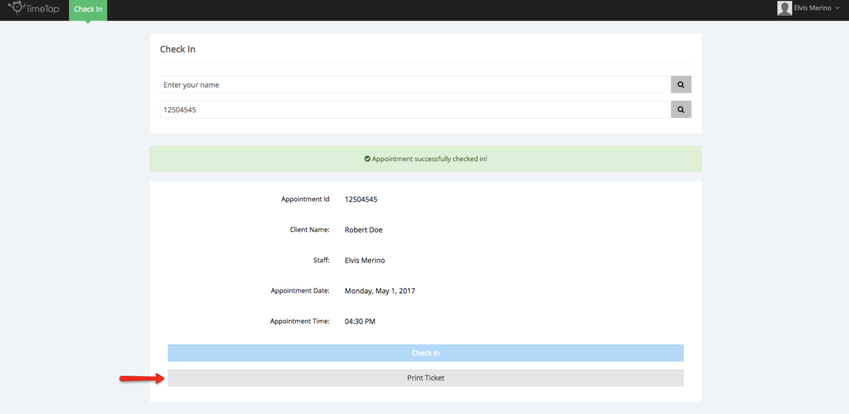
After the client has checked in a message will appear to confirm that they have successfully checked in and will stay in the screen for the amount of second that was added in the "Seconds before check in dismisses":
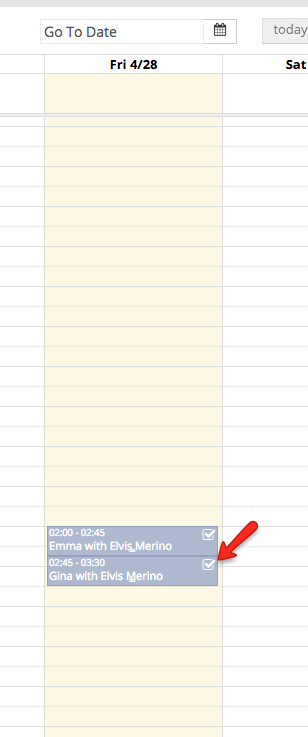
After the client has checked in the a check mark will be added to their appointment in the calendar view:
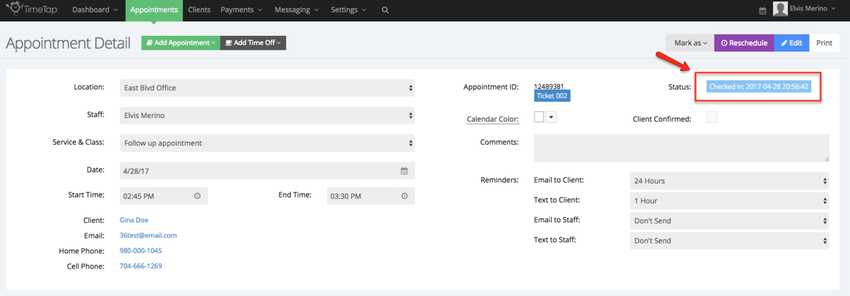
If you go to the appointment directly to view it in the appointment detail screen, you will notice that the status now reads Check In and it will also tell you the time when the client checked in:
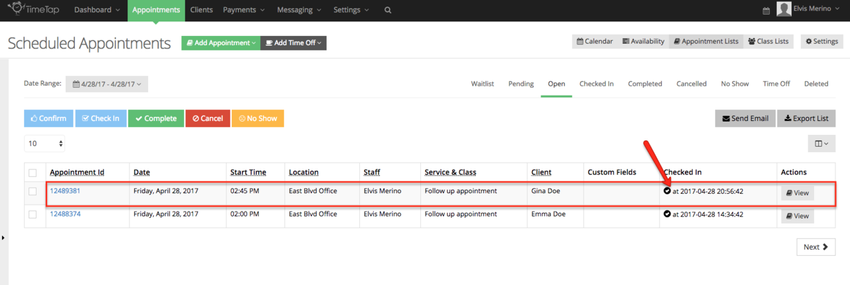
If you look at the appointment in the Appointment Lists > Open, you will also see when the client checked in, the check mark next to the time stamp indicates that the client has checked in:
After the appointment has taken place you can mark it as Complete by clicking the Mark As button and selecting "Check Out & Complete" from the appointment detail screen:

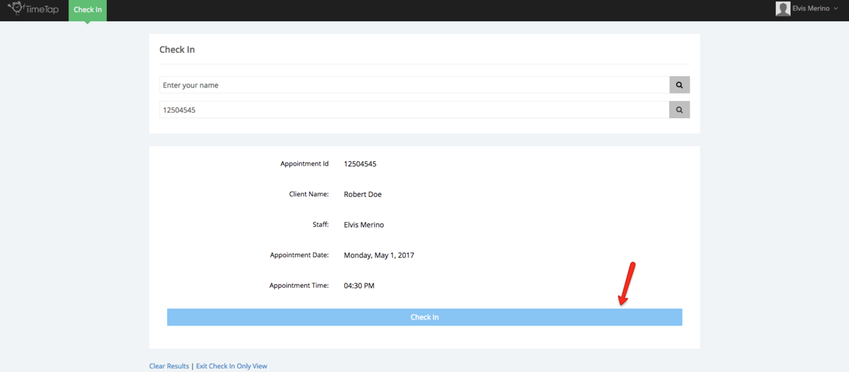
Now that we've covered how to allow clients to check in for their appointments for 1-on-1 services, we will cover how client can check in appointments that are part of a class session. In this case we will pretend that we have scheduled a financial education seminar where the maximum capacity has been set to 10 attendees. We will allow clients to print their appointment information at the time of checkin, they will be allow to search for their appointment using their appointment ID (1) (which they can find in their appointment confirmation email and reminder), or name (2) which they can find in their appointment confirmation email and reminder, and finally to give the clients enough time to click the print button we will increase the time the confirmation message stays in the screen (3) to 15 second. We will head over to Dashboard → Check In to make the necessary changes:
After the changes have been made. I will then enter the Check In Only View in the kiosk that I've setup for the clients. Now when a client enters his/her appointment ID or name the will have the option to check in first:
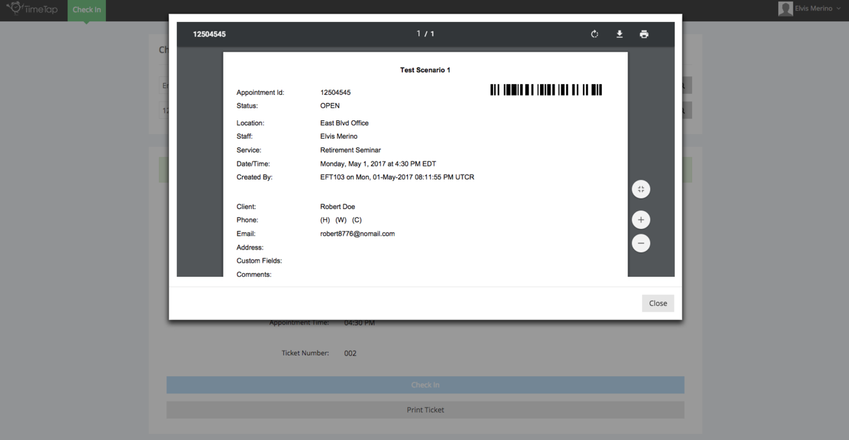
Once they've checked in they will have the option to print their appointment information:
Note: Allowing clients to print their appointment information is not limited to checking in for appointments that are part of class sessions, the same function can be applied when client are checking in for their 1-on-1 appointments.
This will bring up a new window where they will get to preview and appointment details and print:
If you go to the Class Session Details screen you will be able to see which clients have checked as well as the time and date:

Staff members can also checkin appointments from the appointment detail screen as well as the Open Appointment Lists, click here to learn more how staff can do this in the backoffice.