| Anchor | ||||
|---|---|---|---|---|
|
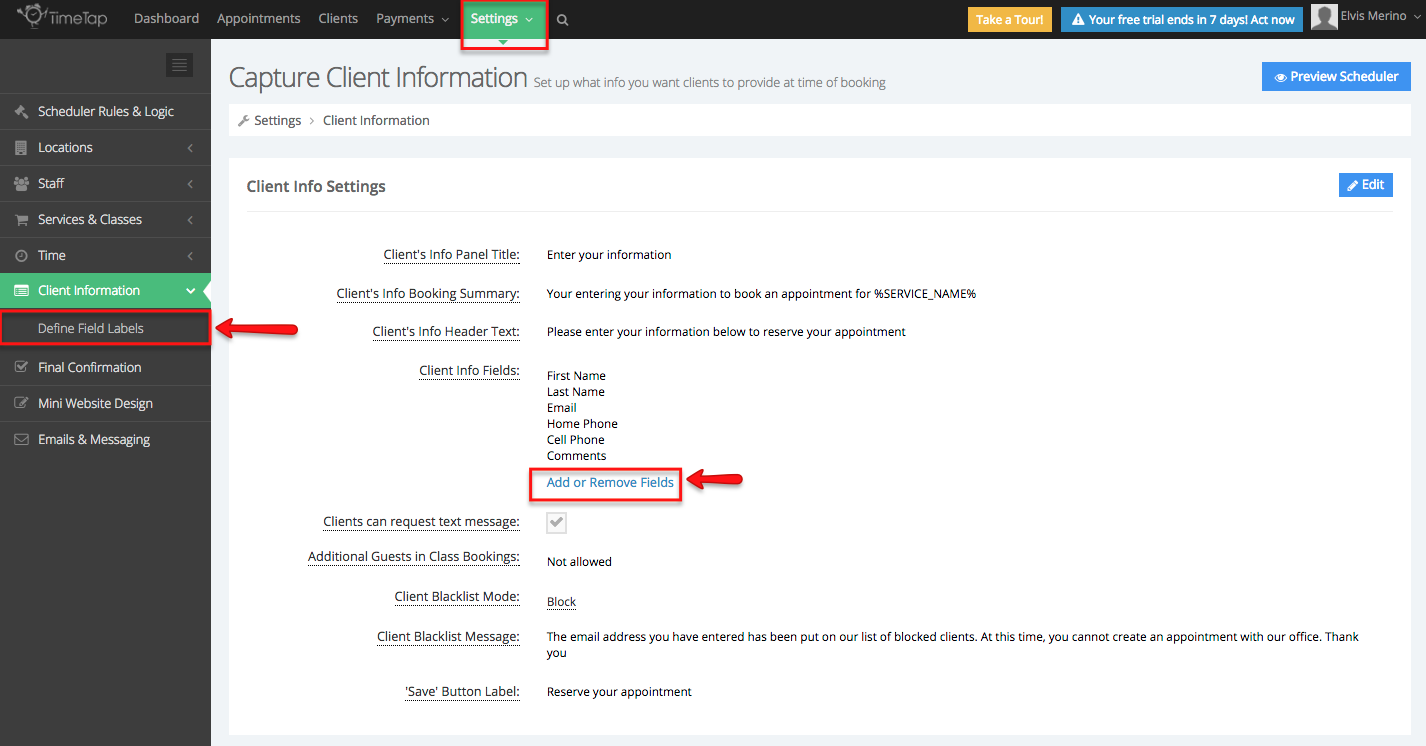
You can get to this screen by either clicking on the "Define Field Labels" link underneath Client Information in the left hand Settings menu or by clicking on the link to "Add or Remove Fields" on your Client Info section of the Client Information screen.
In this documentation we will go through how to:
- Edit the labels and hints that are applied to your field (and check those changes)
- Make a field either required or optional
- Turn on or off whether a field shows on the scheduler for the client to fill out him/herself
- Hide fields (and bring them back if you need to)
- Reorder the display of fields
Click on the links above to go to the specific section of this documentation where we cover those topics. If you have any questions about customizing your client information fields after reading through this documentation, please feel free to reach out to our support team and we'd be happy to answer them for you.
The "label" for a field is what displays next to the field and prompts the client to fill in that information. The "hint" displays underneath the field and can be used to provide a bit more information around what you're looking for them to fill in there.
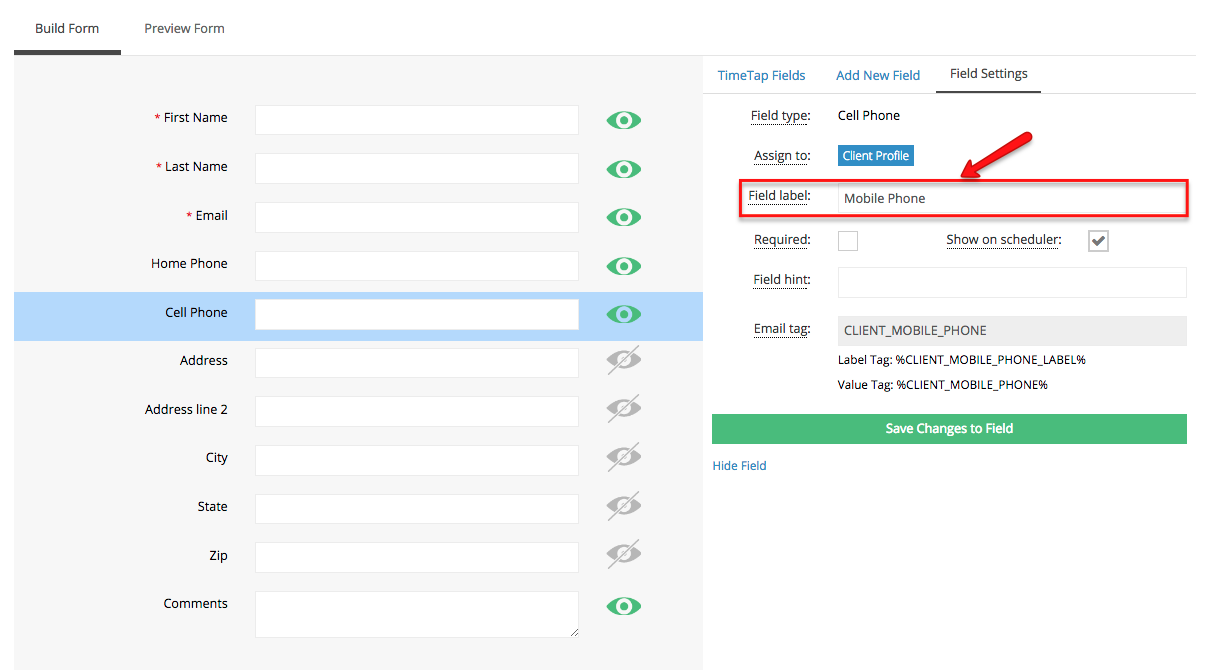
Maybe in your lingo, you ask clients to fill in their "Mobile" number rather than their "Cell" number. If that's the case, it's easy to update the label for where you're capturing that phone number to better match your business. To start just go to Settings → Client Information and click either the "Define Field Labels" link from the left hand menu or the "Add or Remove Fields" link from the Client Info section (they'll both take you to the same place):
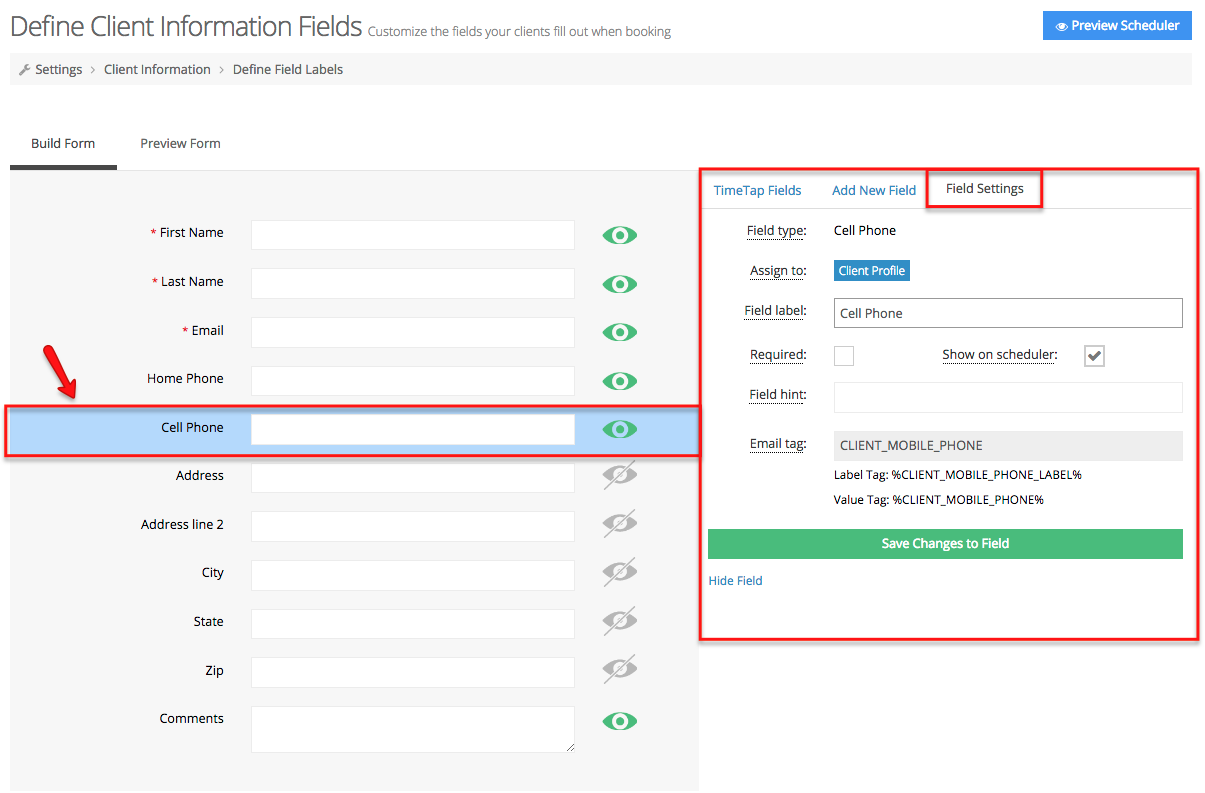
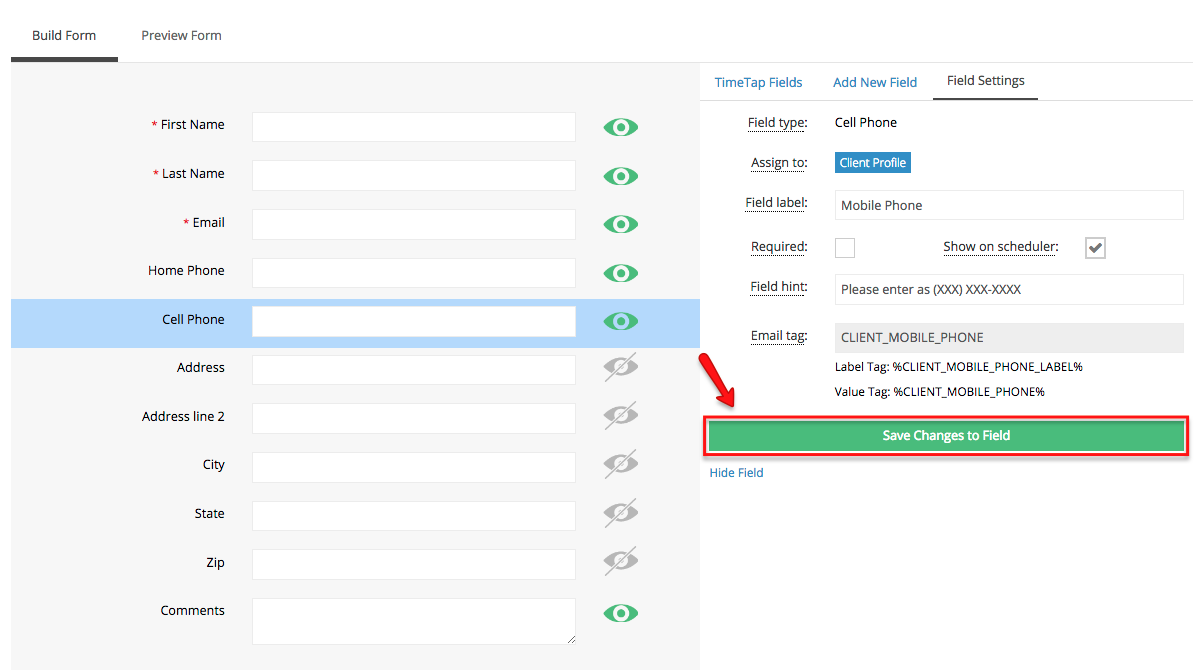
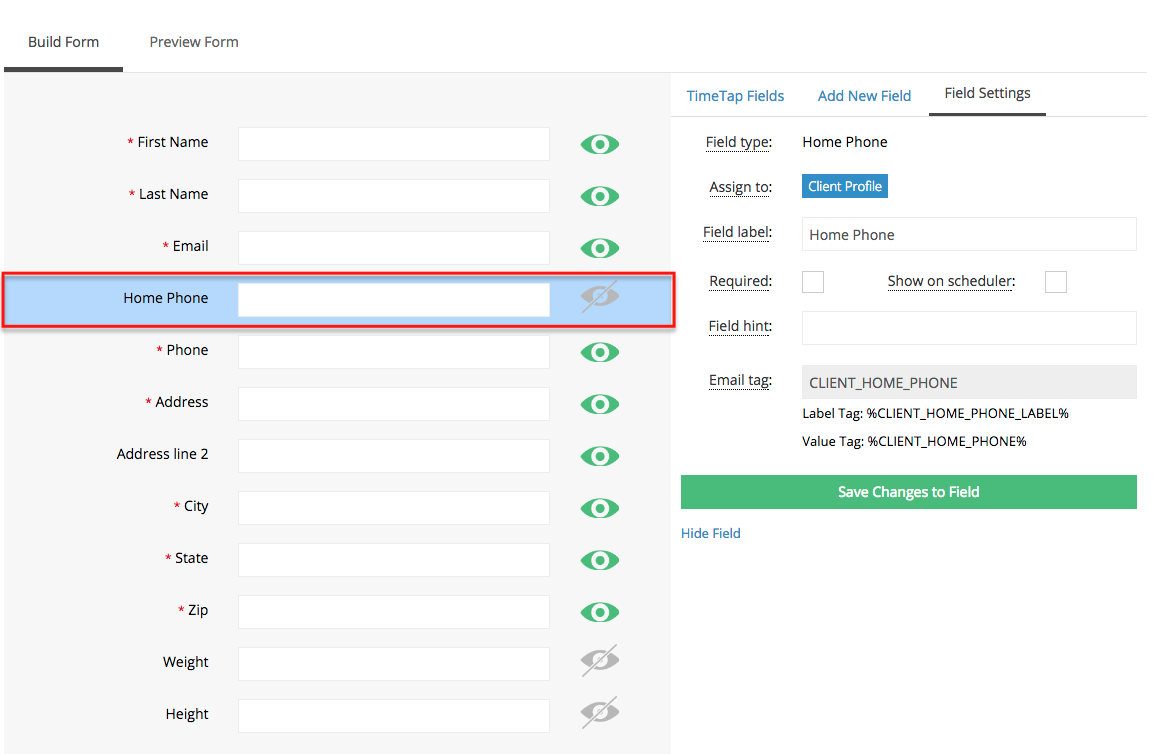
On the next screen, find the field that you need to change the label for (in this case we're looking for the cell phone field but it could be a different field for you). Click the Cell Phone field and this will open the Field Setting to the right of the screen:
In the Field Settings go to the Field Label section and change the display name from "Cell Phone" to "Mobile Phone".
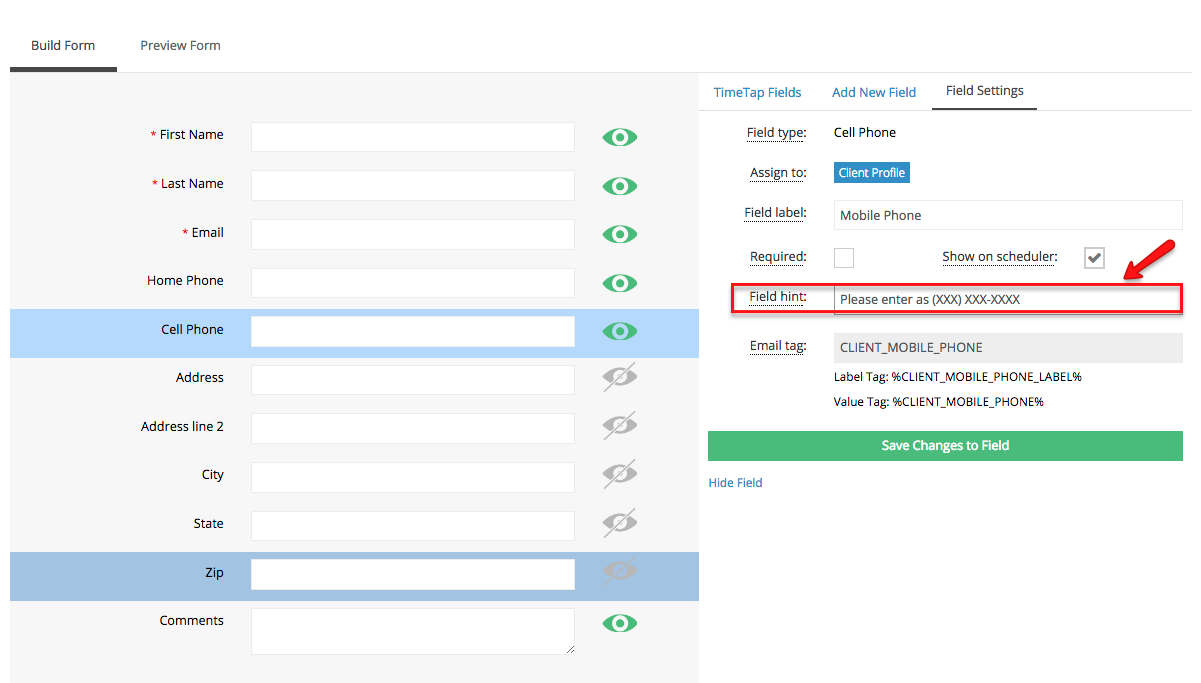
You can also add a hint that will display beneath the field and give clients and/or staff a better idea of what to put in the field. In this case, I'm going to type in a hint that tells clients and my fellow staff how I would like the mobile phone to be formatted:
Next, you'll want to click the "Save Changes to Field" button which will commit the changes that you've made to your field label and hint:
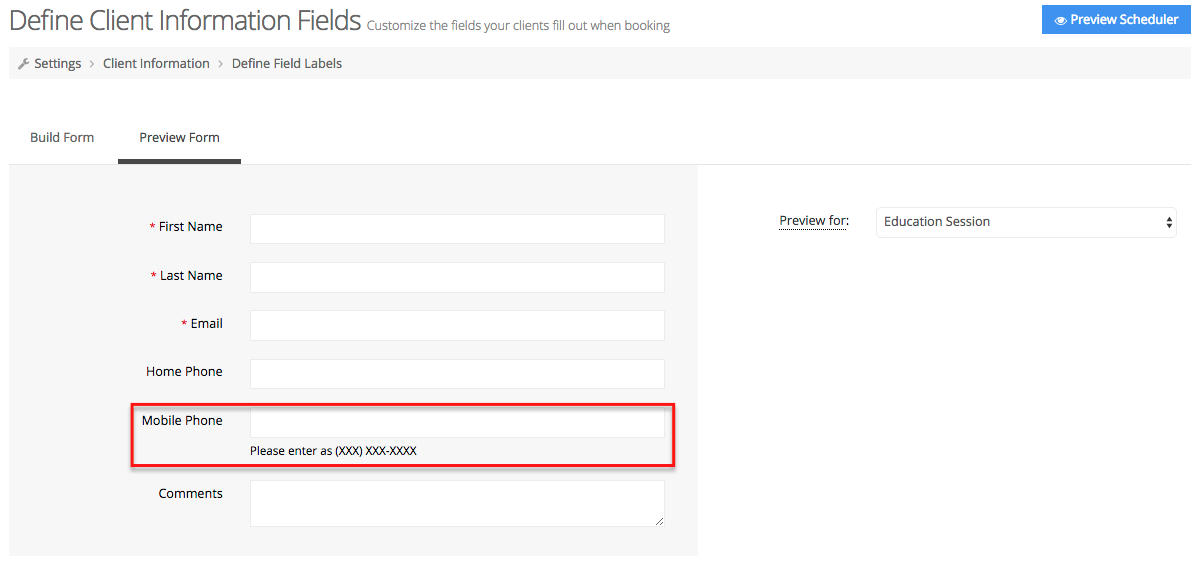
You can then click the "Preview Fields" button to the right of the "Add New Field" button to see how your field will look now to your clients on your scheduler:
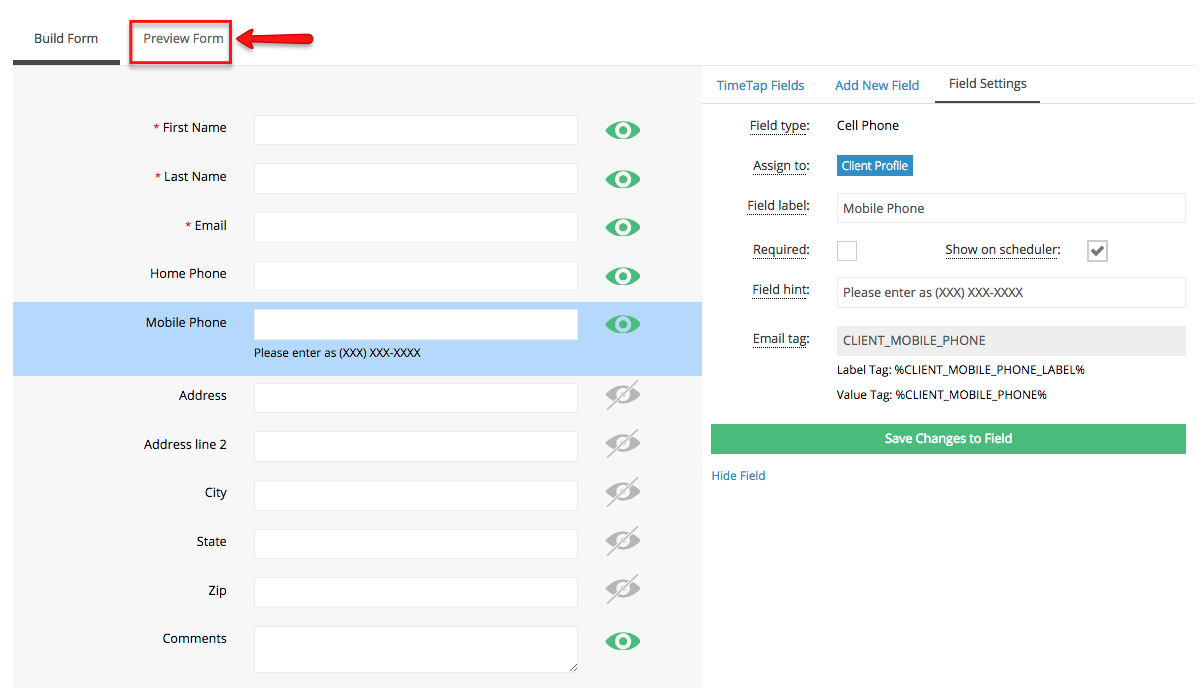
Now you should be able to see the field added to your client form:
Have questions about changing the field label or hint values? Contact our support team and we'd be happy to help answer those.
When having clients fill out your booking form, there are some fields that you have to have filled out and others that are just "nice to haves". Every field in TimeTap can be made to be either required (which means it's mandatory that either you or the client fills it out before you can book the appointment or add the client) or optional (which means that you can leave it blank and just fill it in whenever you have the information).
It's pretty much always required for a business to capture the client's first and last name to book an appointment, but all the other information varies on a case by case basis. If there's a field that absolutely MUST be filled out before an appointment can be made then you will want to toggle check the "Field Required" switch next to the field to the "On" statusbox in the Field Settings.
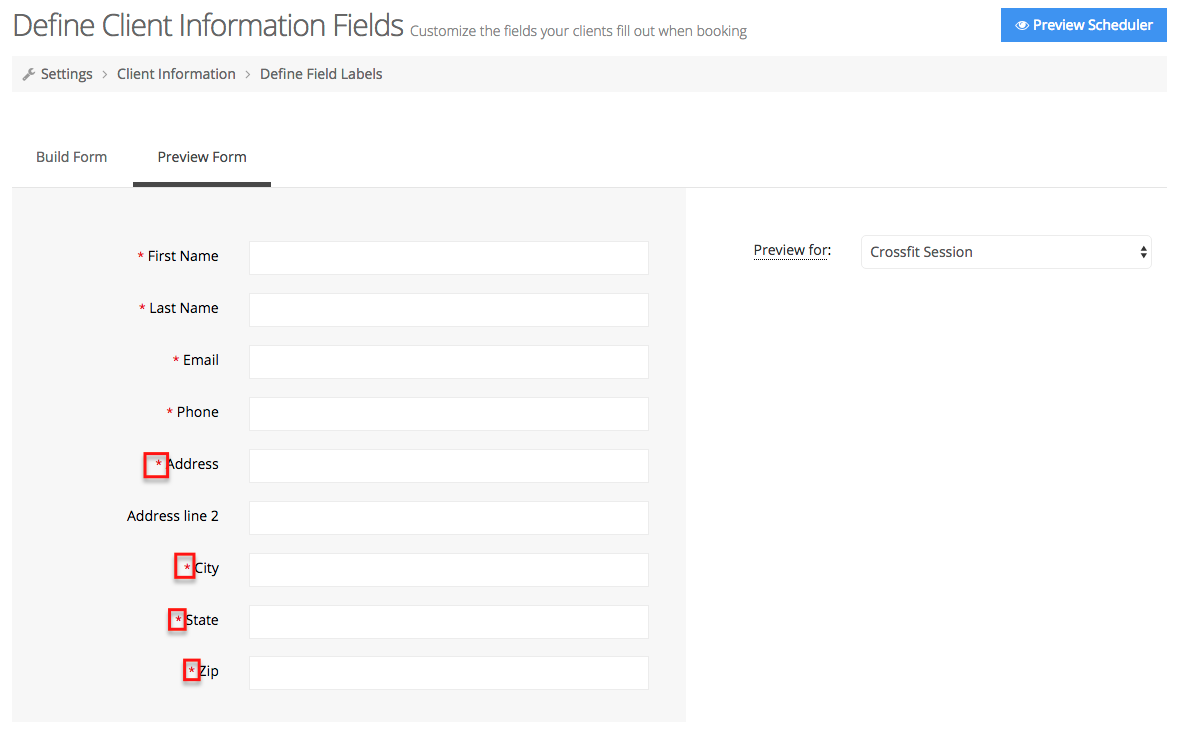
Let's look at "Address" as an example. Many business's require that a client fills in an address, but sometimes clients don't have any information to put into "Address line 2" (if they live in a house instead of an apartment for instance). In this case, you'd want to make all the fields except Address Line 2 required. To do this, you can click the "Edit" button for the each one of the following fields: Address, City, State, & Zip fields or you if you hover over the "Off" switch under the heading "Required" so that the field will show on your Client Quick Add form, then you can easily toggle the switch to "On".  , check the box Required and click Save Changes to Field, this step must be done for each field:

Once you've toggled the checked Require for Address, City, State, & Zip fields to the "On" position, you can click on the "Preview FieldsForm" button to see how these fields will appear to your clients:

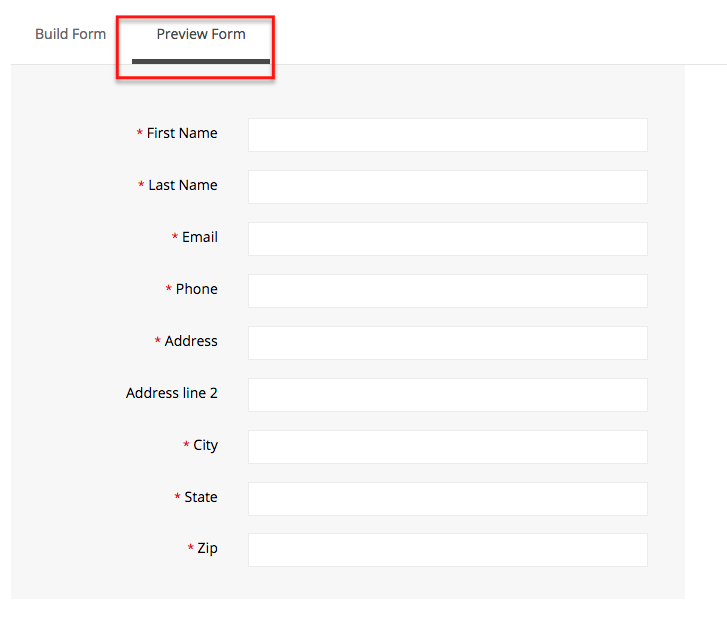
On the preview fields Preview Form screen, you'll see that Address line 1, City, State, and Zip all have an asterisk next to them to indicate they are required while address line 2 is left as optional:

If you're happy with how these fields look, click the "Add or Edit Fields" button to go back and see the Address, City, State, & Zip fields toggled "On".

To commit all of your changes click on one of the "Update" buttons. I'm going to click on the update button for the Address field. This will update your settings for the Address, City, State, & Zip fields.

Have questions about making fields required or not? Please get in touch with our support team and we'd be happy to answer them for you.
Some businesses have information that they want to be able to fill in about an appointment or about a client, but don't want to prompt the client to fill it in themselves. At most doctors' visits, for instance, you will be weighed and measured. This is information the nurse wants to record on your appointment slip, but doesn't want to make the client fill it in themselves when they are scheduling the appointment.
By toggling the switch unchecking for "Show on Scheduler" to the "Off" positionbox, TimeTap will make it so that the field only displays to the staff who are logged into TimeTap. On this form, for instance, I have added the new fields "Weight" and "Height":

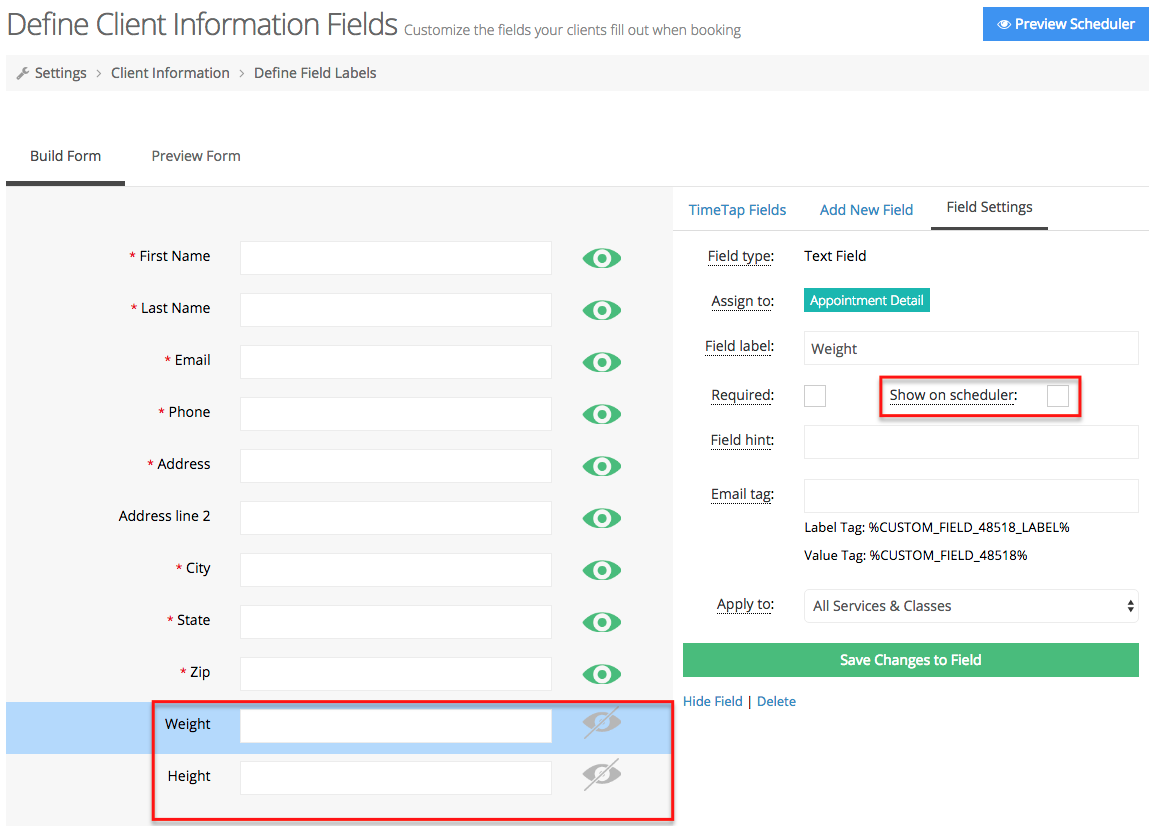
Because the "Show on Scheduler" switch is set to "Off"box is not checked, then these fields will not show up to clients who are booking through my scheduler or when I hit the "Preview FieldsForm" button, but they will show up when I go to book an appointment as a staff person:

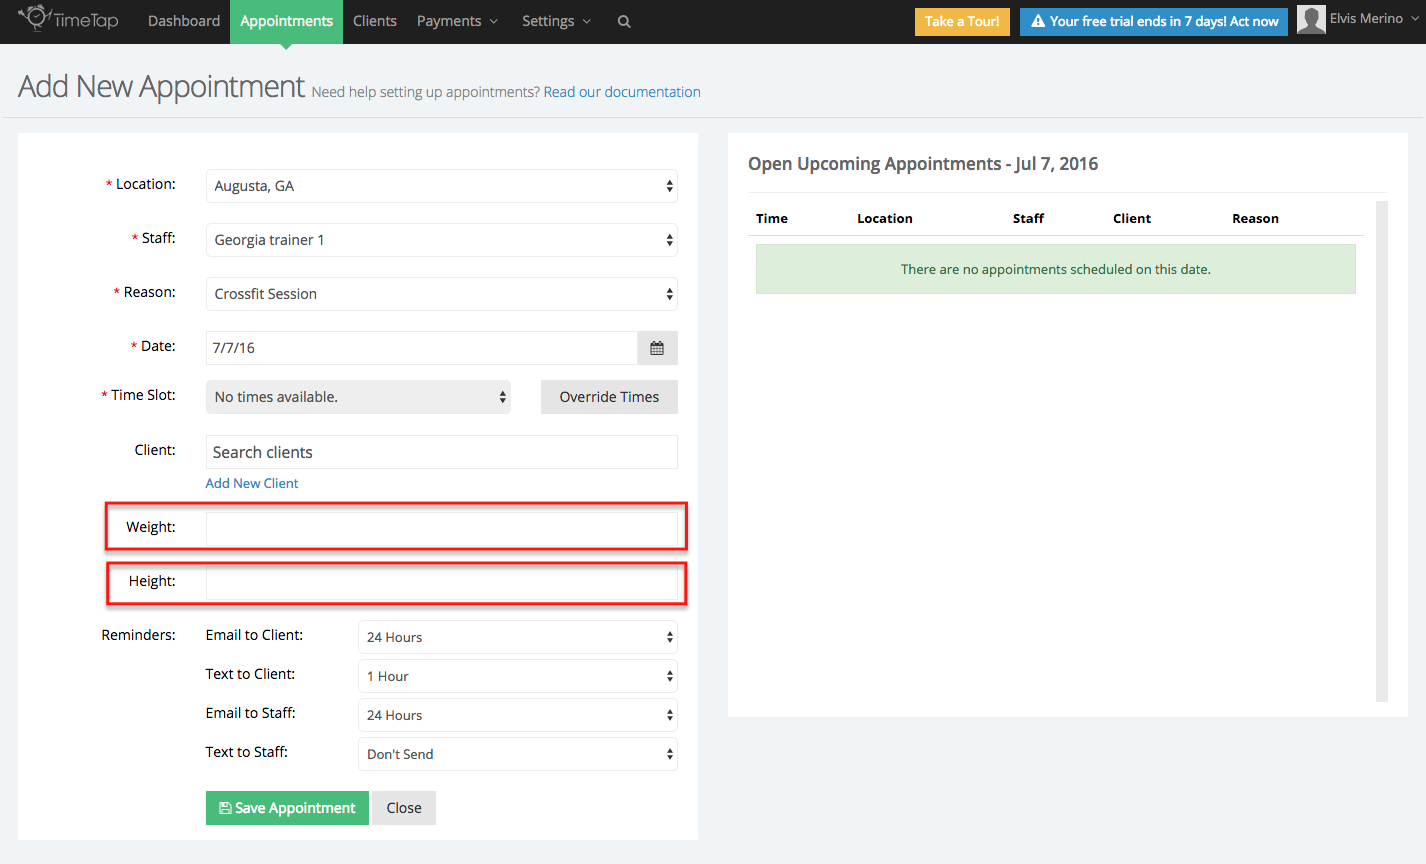
You can then fill these measurements in on the appointment when the client actually comes in to see you.
Have questions about making a field show on your scheduler or making it visible only to staff? Write into our support team and we'd be happy to help!
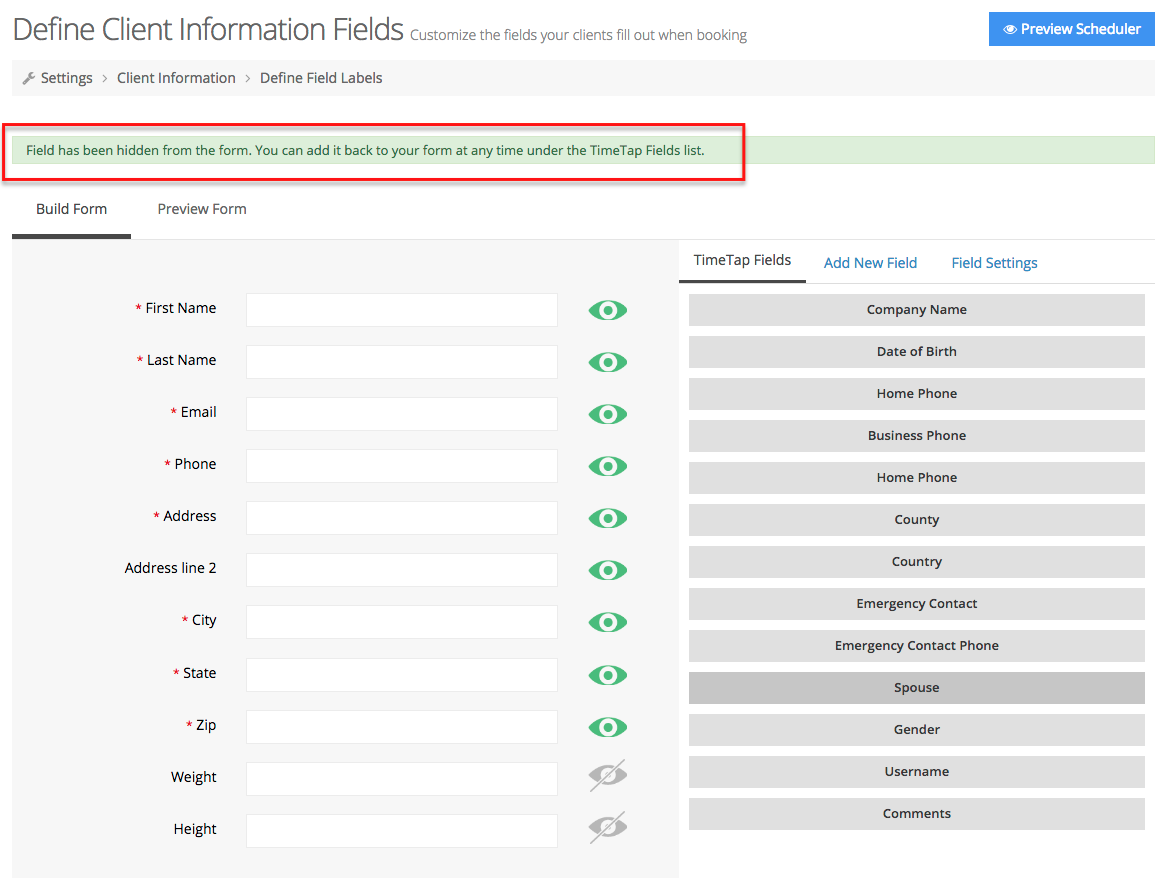
If you no longer wish to display a field (either to clients who are booking or to your staff in the back office), you can click the "Hide Field" button to the right of the name link in the Field Settings section and it will remove the field from view on either you scheduler or in your back office.
Once you click the hide field button link the field will no longer display on the screen:

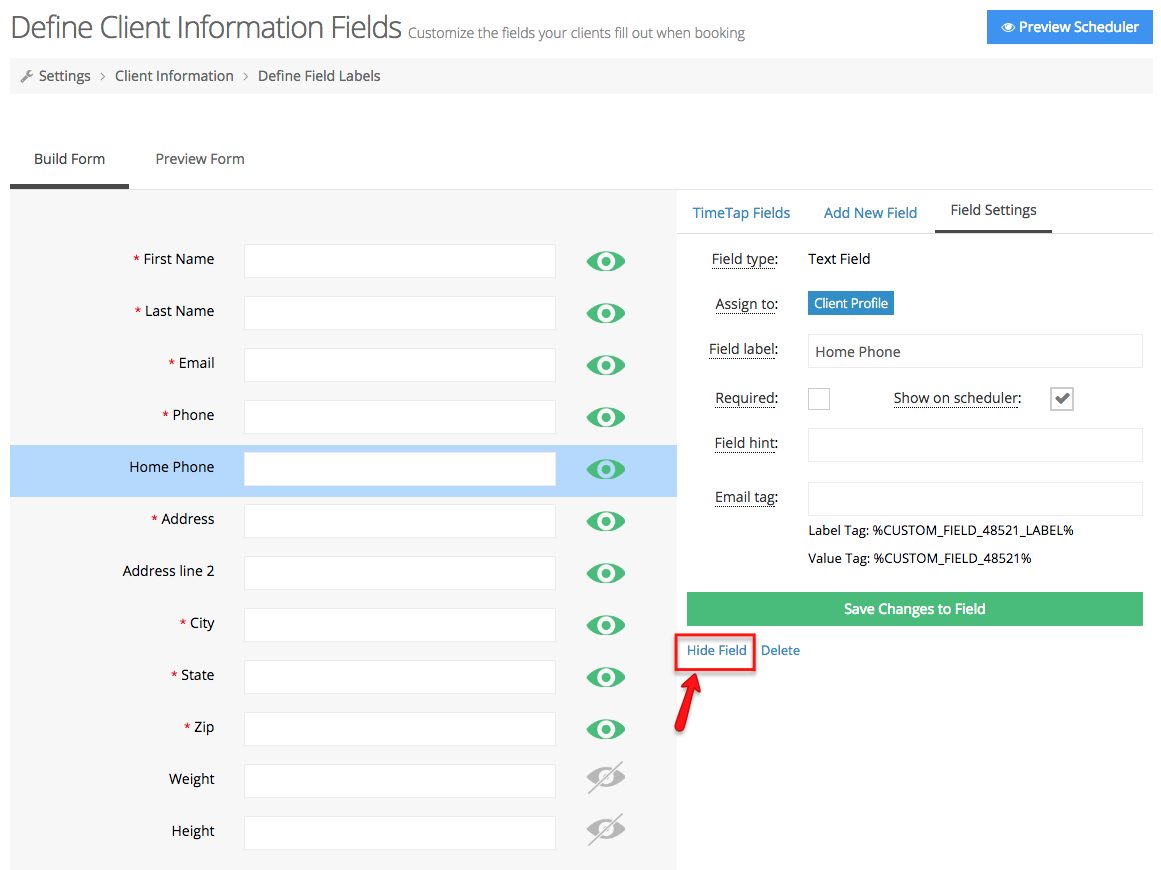
You can now see that the Mobile Home Phone field is no longer between the Home Phone & Address fields. You can also see a notification that my client information fields have been updated after hiding the Mobile Phone field.

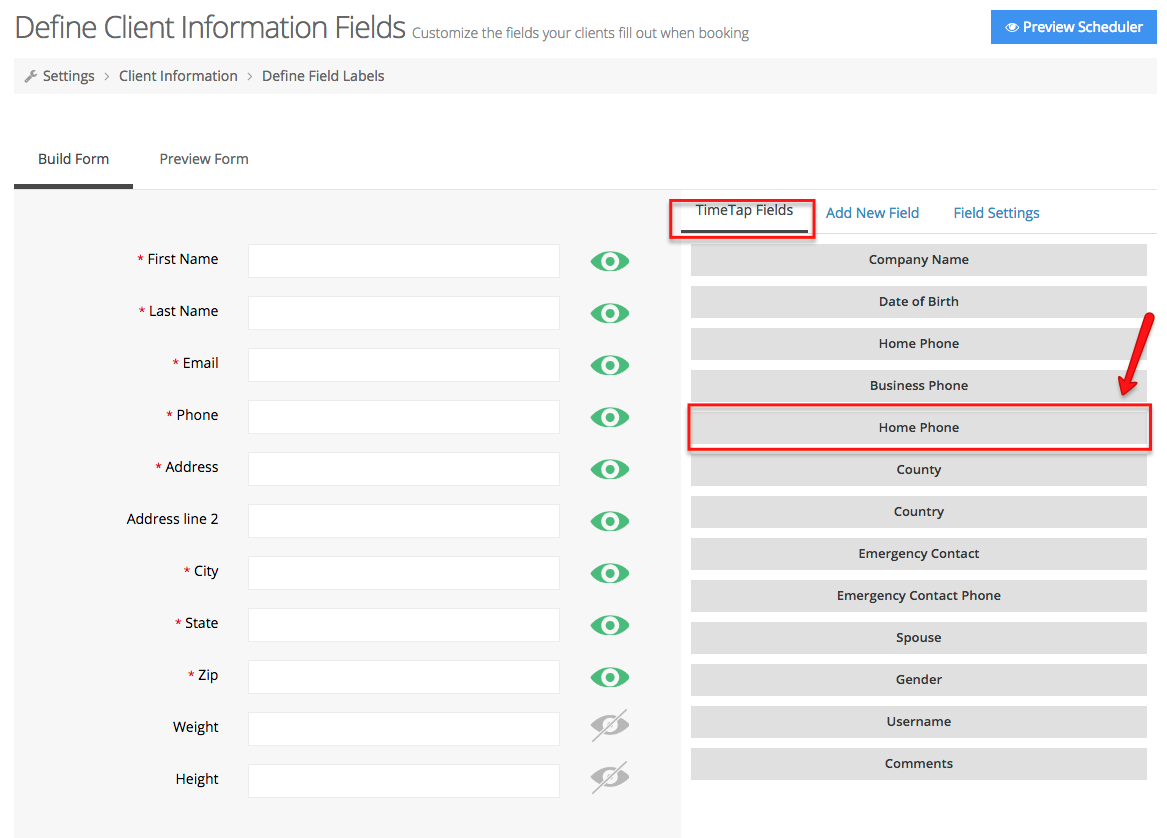
Once you've hidden it, you can always recover the field by clicking on the "+ Add New Field" button on the upper right-hand side of the screen (covered further on our documentation here):

By clicking that button, you'll see a list of all of TimeTap's default fields as well as any fields you created that you had hidden. You can click the fields you've hidden and press the button to add those selected fields to bring them back to your client information form:
 is then moved to the TimeTap Field tab. If you would like to unhide it all you have to do is click the field located on the right side of your screen:
You can now see that I've added the Mobile Home Phone field is back to my list of Client Information Fields.

Have questions about hiding or unhiding fields? Please reach out to our support team and we'd be happy to answer them for you!
Want to change the order for how your fields display in your add new client or add new appointment forms? You can do that from the "Reorder" link found at the top right of your Settings → Client Information → Define Field Labels page:

By clicking "Reorder" you'll see a list of all of your fields (both the ones that are hidden and the ones that are displaying) and you can use the arrow buttons to reorder them. The double up/down arrows will move the item to the top or bottom of the list (respectively) whereas the single arrow will just move the field up or down one item. The little eye symbol indicates whether it is on your form or if it is hidden and not on your form:

Once you have your field arranged the way you want them, scroll to the bottom of the window to press "Save Changes":

This will commit whatever reordering work you've done to your fields. That order will now be updated on your scheduler as well as wherever you see the forms in your TimeTap back office.
Have questions about reordering the display of the information fields? You can always contact our support team and we'd be happy to get those questions answered for you.