Invoices
- Matt Bryant (Unlicensed)
You'll need to create an invoice for each appointment or product that you sell.
Invoices can be created in one of two ways:
Once you've created an invoice, you may want to add something to it, such as an appointment, product, or discount:
After you've added items to an invoice, you can do things like record a payment, download, or email the invoice, void or delete it:
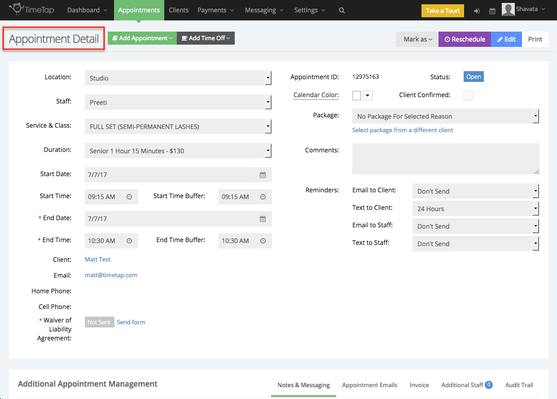
Once you create an appointment, or if you click on an appointment from the Calendar screen, you'll be taken to the Appointment Details screen:
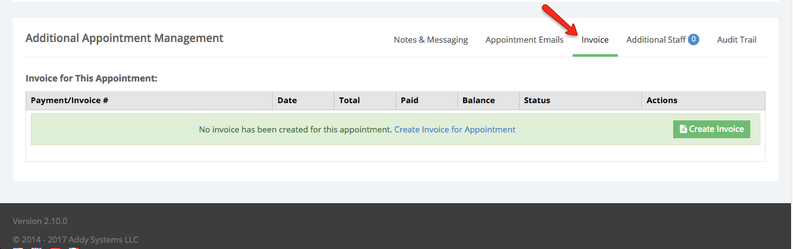
On this screen, scroll down to the section entitled "Additional Appointment Management" and click the Invoice tab:
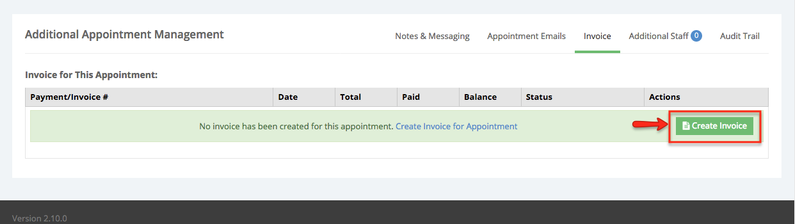
And on this tab, click the green "Create Invoice" button:
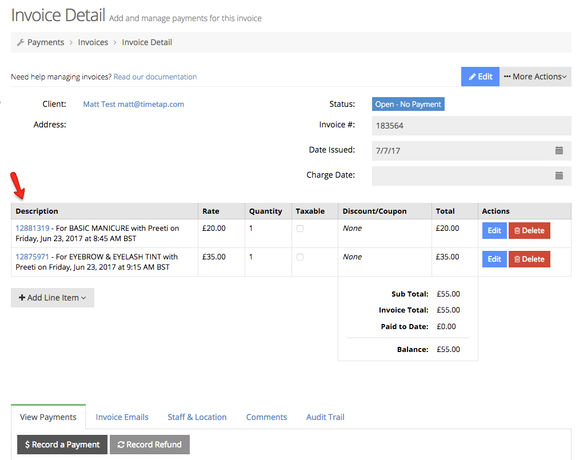
This will bring us to an Invoice Detail screen where we can see 1) an Invoice number, 2) the date issued, 3) the appointment with cost added as the first line item, and 4) the balance due on the invoice:

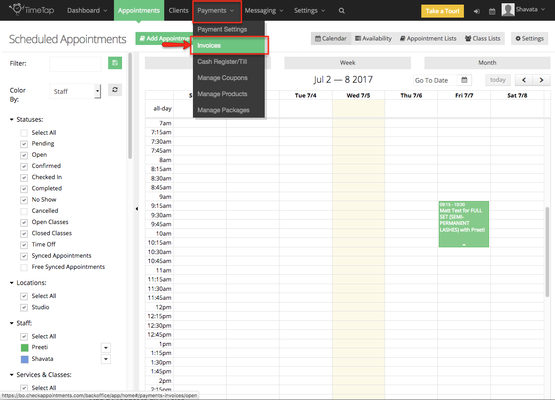
To create an invoice from the Invoice Lists screen, first we'll select Payments from the top ribbon bar, then Invoices from the drop-down menu:
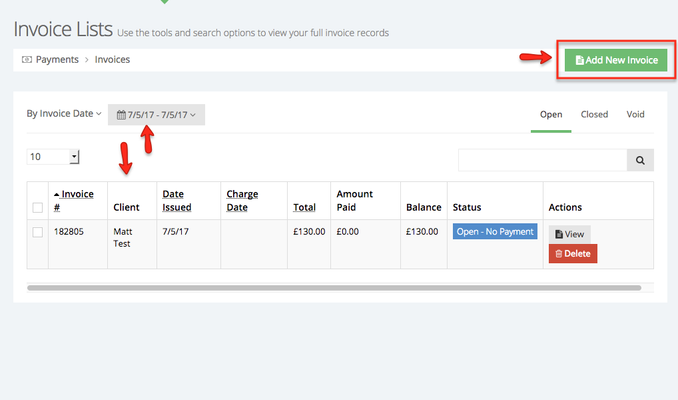
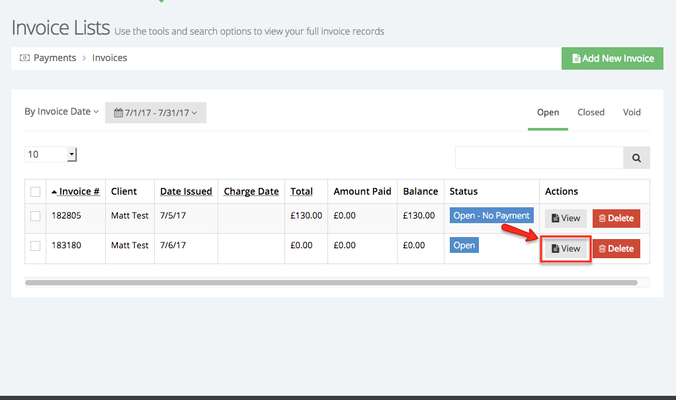
This will bring us to the Invoice Lists screen where we'll see any current invoices for the date range selected, and also a button to Add New Invoice:
Clicking the Add New Invoice button will take us to the Add New Invoice screen:
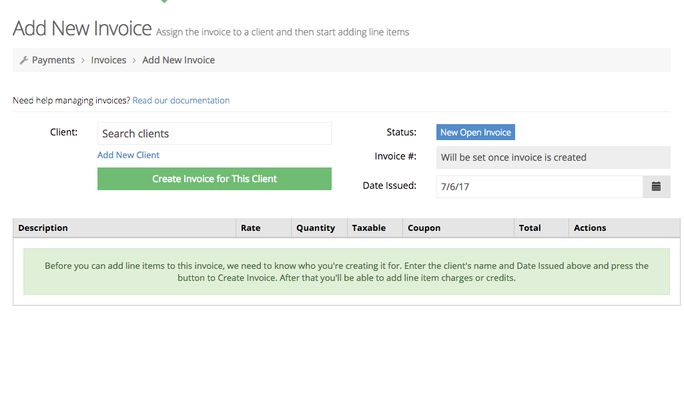
The first thing we'll need to do is to add a client to the invoice. You can use the search box to search for existing clients:
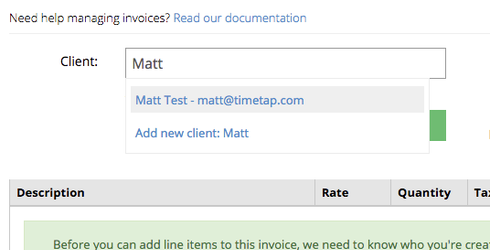
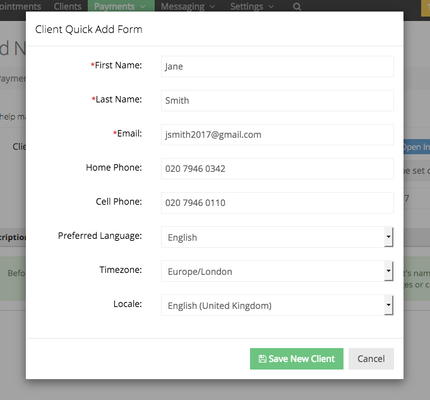
Or click the "Add new client" link to bring up the Add Client form:
Once you've selected or added a client, click the "Create Invoice for This Client" button:
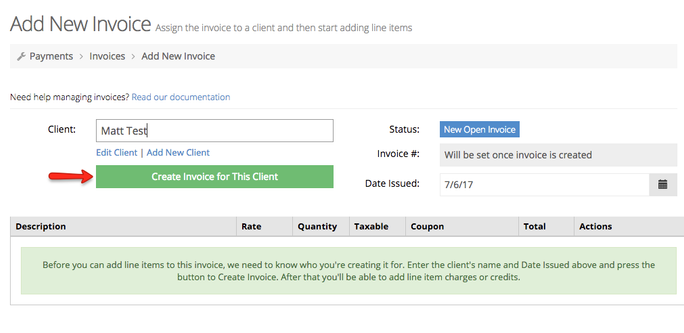
Now we have a blank invoice that we can begin adding line items to:
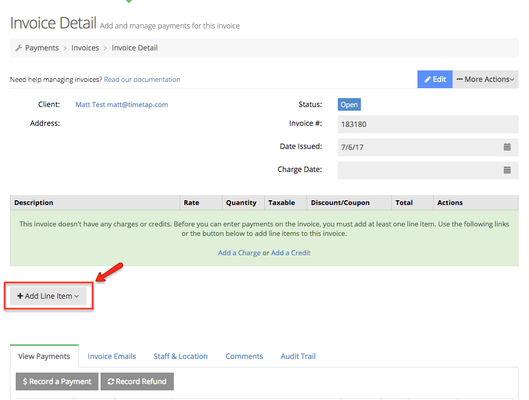
To add an appointment to an invoice, we'll first open the invoice, either from the Appointment Detail screen (shown above) or from the Invoice Lists screen:
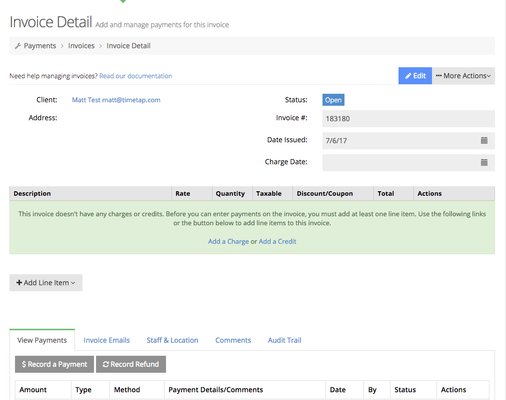
Clicking View will take us to the Invoice Detail screen, where we'll click the "Add Line Item" button to begin adding an appointment:
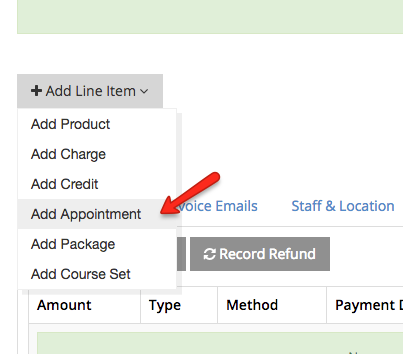
Clicking Add Line Item will open a list where we can choose the type of item we'd like to add. In this case, we'll select Add Appointment:
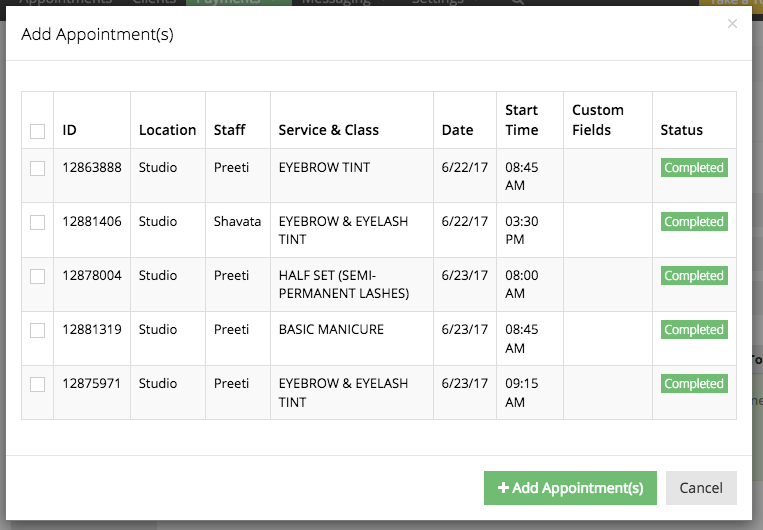
Next, we'll see a list of any appointments for the selected client that have not been previously added to an invoice:
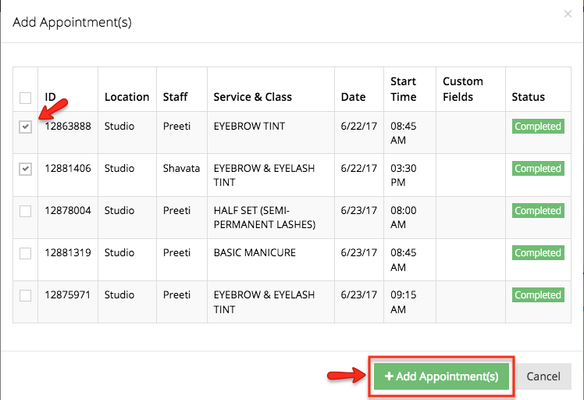
Click the checkbox beside the appointment(s) you want to add to the invoice, then click the green Add Appointment(s) button:
Now we should see the appointments we selected as line items on the invoice:
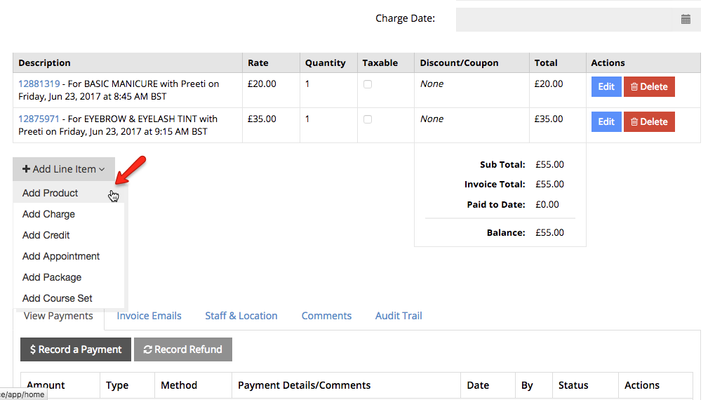
Let's take the invoice we created in the example above and add a product to it. Just as with our previous example, we'll open our invoice and Add a Line Item to it.
In the drop-down list, select "Add Product":
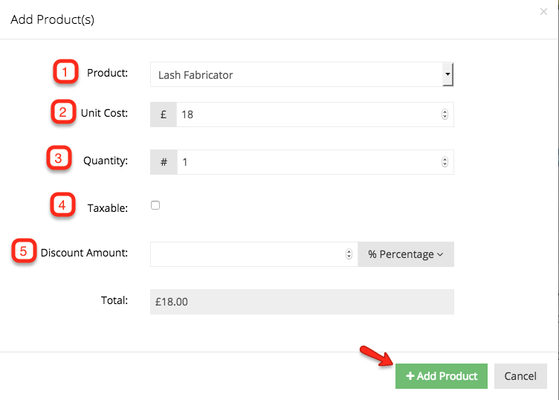
A new screen will appear where we'll fill in the details of our product. First, we'll select the product, then the Unit Cost should populate automatically. Next, select the quantity, click the checkbox if the item is taxable (most items are), and enter a discount percentage, if any. Note: This is not where you enter a voucher, promotional, or regularly offered discount. We'll cover that in the section Add a Discount to an Invoice.
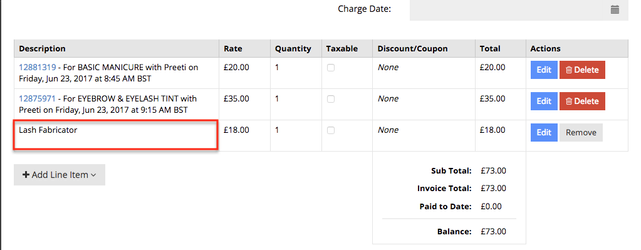
Once you click Add Product, a notification window will tell you the product was added successfully, and you'll see the product as a new line item on the invoice:
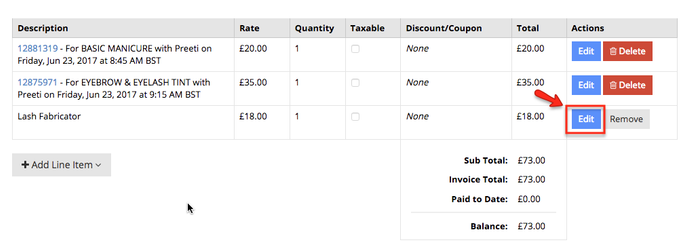
If you want to add a discount, voucher, or promotional offer discount to an invoice, you'll add it to the line item. So, for example, if we are running a promotional offer of £5 off the purchase of a Lash Fabricator, we'll click the blue Edit button under Actions on the Lash Fabricator line:
Now we can edit the fields for this line item:
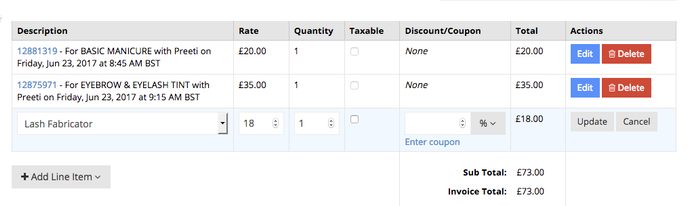
Under the heading Discount/Coupon, click the blue "Enter Coupon" link:
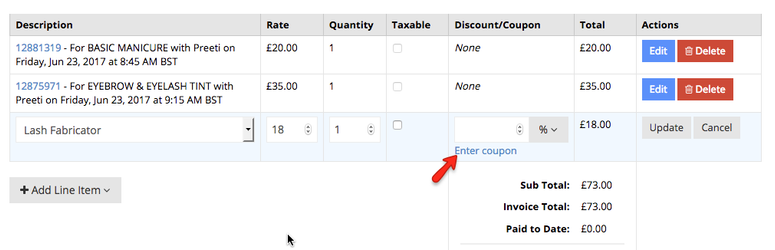
Now, click into the search box:
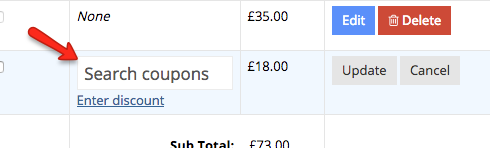
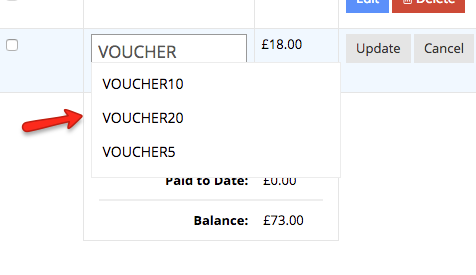
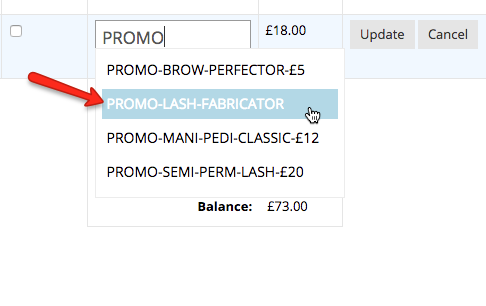
In the system, coupon codes have been entered for each type of discount Shavata Brow offers, such as Vouchers, Promotional Offers, and miscellaneous Discounts. The codes for each type of discount are prefixed with the words VOUCHER for Vouchers, PROMO for Promotional Offers, and DISCOUNT for miscellaneous discounts. In our example, we're looking for a Promotional Offer, so we'll start typing the word PROMO, and a list of available Promotional Offers will populate below the search box:

We can use the same method for Vouchers:
And miscellaneous discounts:

Once we've found the discount we're looking for, we'll highlight it with our mouse and click to add it to the invoice:
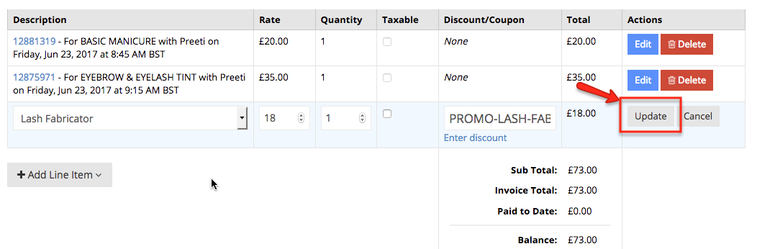
Then click Update just to the right of the search box to update and save the Invoice:
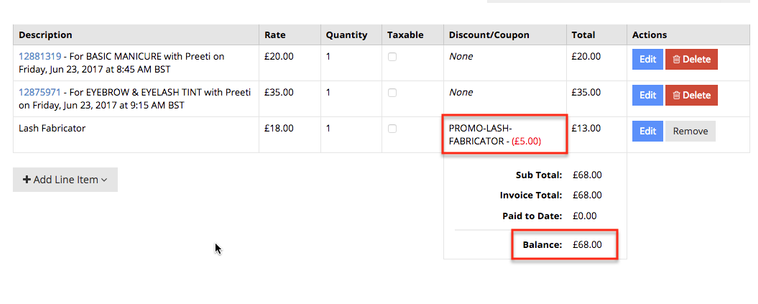
And now we see our discount on the line item and that our balance due has decreased by the discount amount:
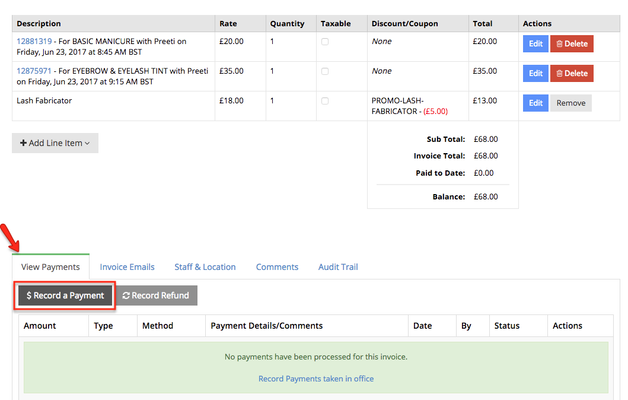
Taking up our example invoice from the Add a Discount to an Invoice section, we see the "Record a Payment" button under the View Payments tab, just below the Add Line Item button:
Clicking here will bring up a form for filling in the details of the payment:
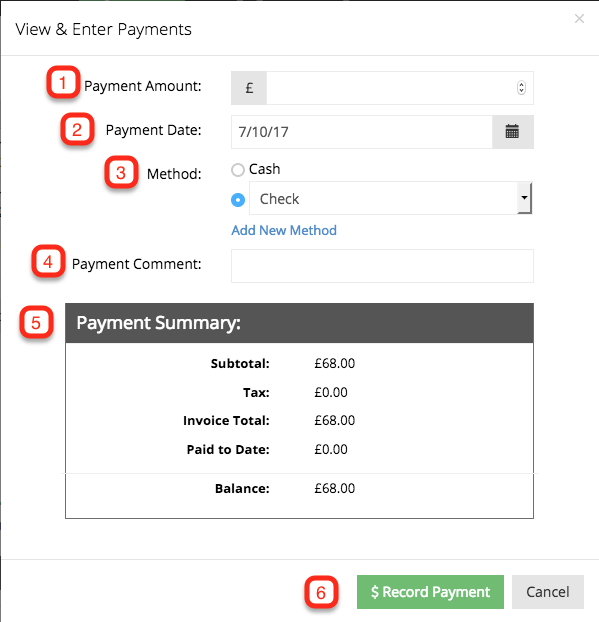
Here we have 1) The amount of the payment (you can record partial payments to an invoice by entering an amount smaller than the total balance due). 2) The payment date. Generally, this should be left set to today's date. 3) The payment method. The methods available by default are Cash, Check, Visa, Mastercard, American Express, and Discover. There is an optional link to add a new method. 4) A payment comment. This is an optional field for leaving notes about the payment. 5) The payment summary which shows the remaining balance on the invoice and any payment amount made to date. 6) The Record Payment button. Click when ready to record the payment to the invoice.
Once we add our payment amount, the balance due amount in the payment summary will update to reflect the amount paid:
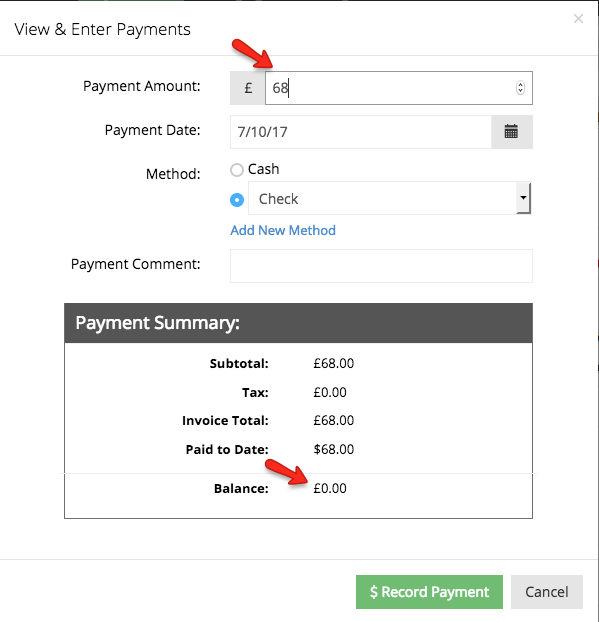
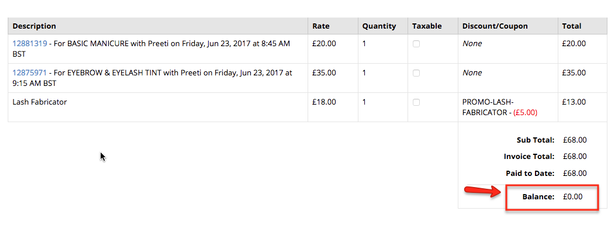
And once we click the Record Payment button to save the payment, the balance of the invoice will update to reflect the amount paid:
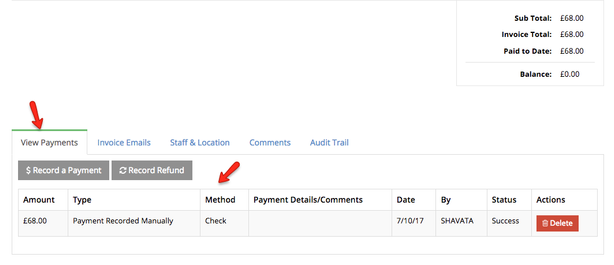
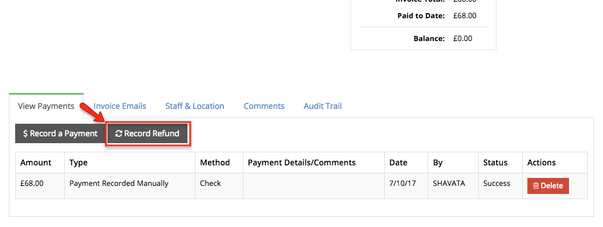
We can also see a record of the payment in the View Payments tab just below:
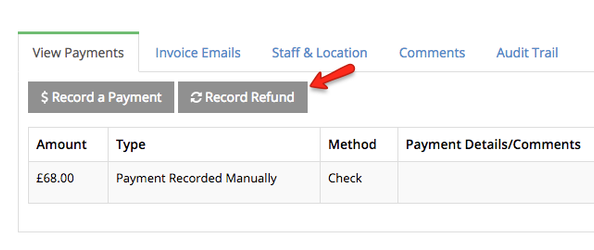
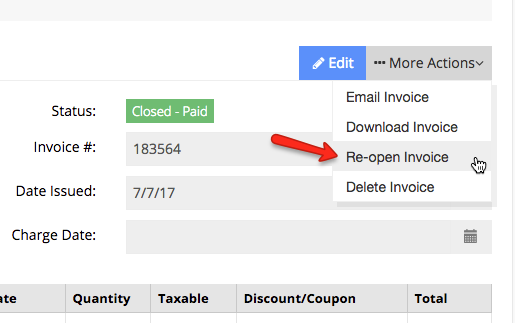
Recording a Refund works in a similar manner. We'll use the Record Refund button located to the right of the Record a Payment button. One key difference here is that we may need to re-open the invoice in order to process the refund. Looking at the example invoice we've been working with, we can see that the Status is "Closed - Paid." This is because our balance is zero:
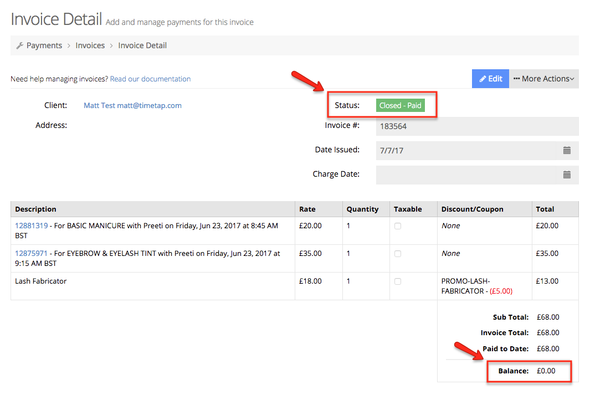
The system automatically closes out invoices with no remaining balance, so we'll have to open this one back up before we can process a refund. Notice that the "Record Refund" button is greyed out below:
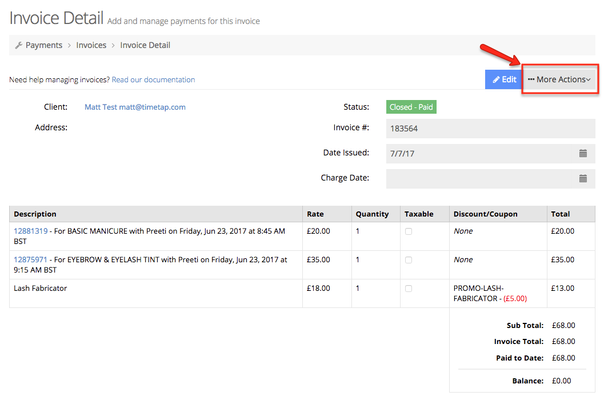
To re-open an invoice, we'll click the "More Actions" button in the upper-right-hand corner of the Invoice Detail screen:
And from the list that drops down, select "Re-open Invoice":
Now we see that our status has updated to "Open - Partial Payment":
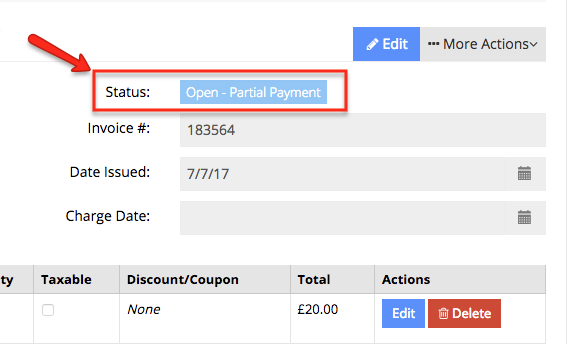
And we can now click the "Record Refund" button:
Clicking here will bring up a screen almost identical to the Record Payment screen:
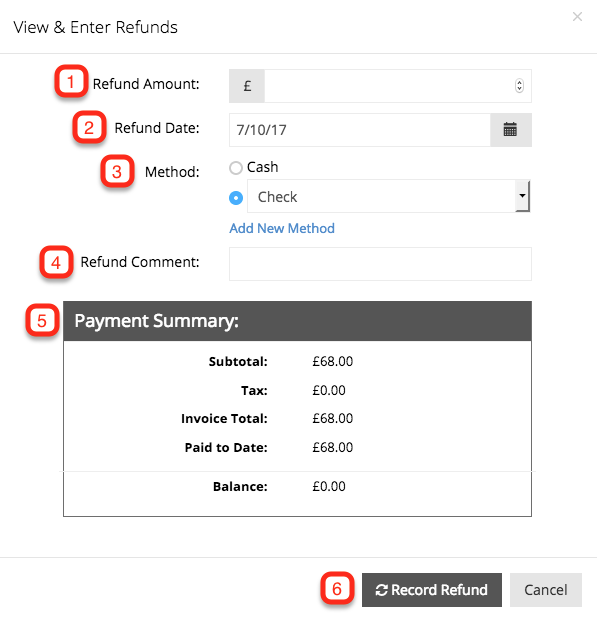
Here we see 1) The refund amount. Again, as with the record payment screen, you can refund partial amounts of the total bill. 2) The refund date: automatically populates to today's date. 3) The refund method: should match the payment method. 4) The refund comment: an optional text box for leaving a note. 5) The payment summary: shows the invoice total and paid to date. Will update to account for amount entered in step 1. 6) The "Record Refund" button. Click this button when ready to save the refund to the invoice.
After clicking the "Record Refund" button, we'll see the refund transaction show up under the View Payments tab:
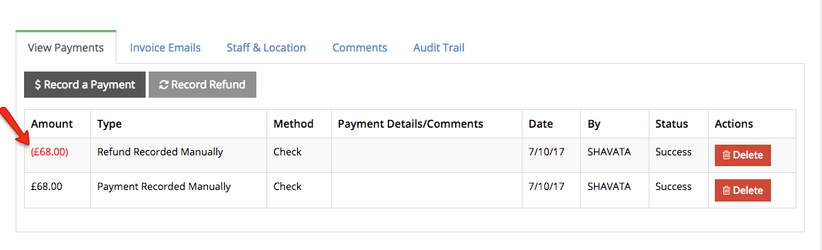
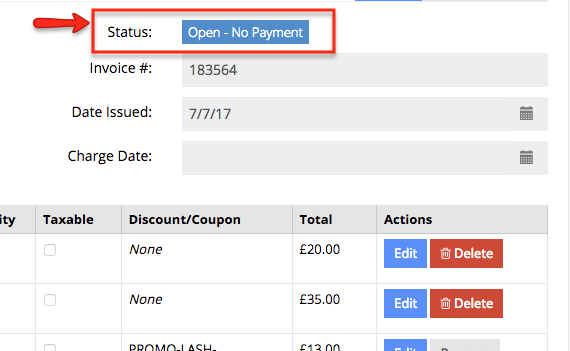
And since we refunded the entire invoice amount in this example, the invoice Status reset to "Open - No Payment":
If this transaction is a complete refund, we can just Void out this invoice. Otherwise, we just refund the amount required, or remove or delete the individual line item that a client wants refunded and the invoice will close out as Paid.
To provide your client with a copy of the invoice, you can either download and print a copy to give the client directly, or email a copy to the client.
To download an invoice, click "More Actions" in the upper-right-hand corner of the screen, and select "Download Invoice":
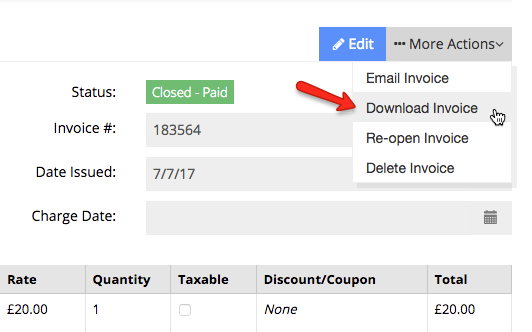
Clicking here will download the invoice in .pdf format. Depending on your web browser, you can either Save or Open the file. I'm using FireFox, so I'll select to Open the file:
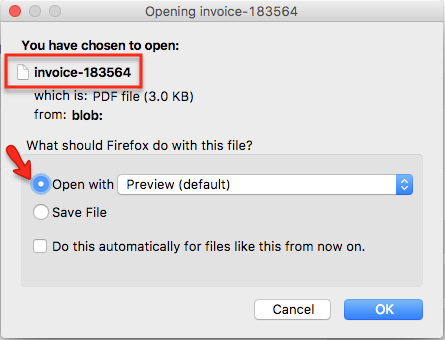
Note, the file name includes the invoice Id number. Below is a copy of the invoice we downloaded. You can click the invoice to view it in your browser:
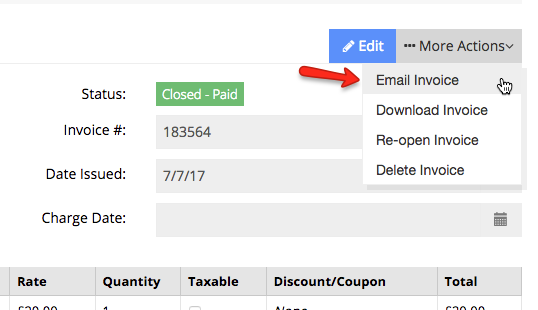
Emailing an invoice is a similar process. We'll start by clicking "More Actions" in the upper-right-hand corner of the Invoice Detail screen and select "Email Invoice":
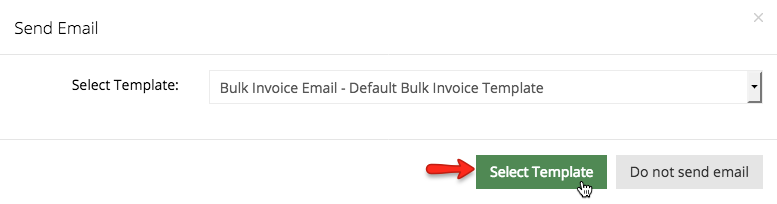
Clicking here will present a selection screen pop-up where we can select the template we'd like to use in sending this invoice. The two templates you can select by default are the "Bulk Invoice Email - Default Bulk Invoice Template" and the "Invoice Pay Remaining Balance - Default Template":
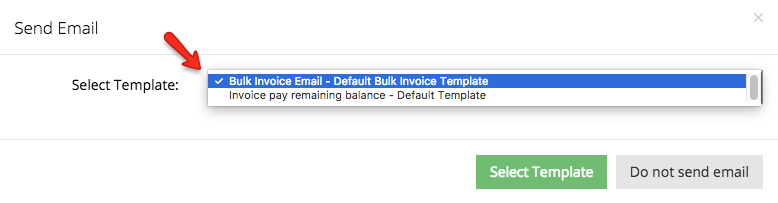
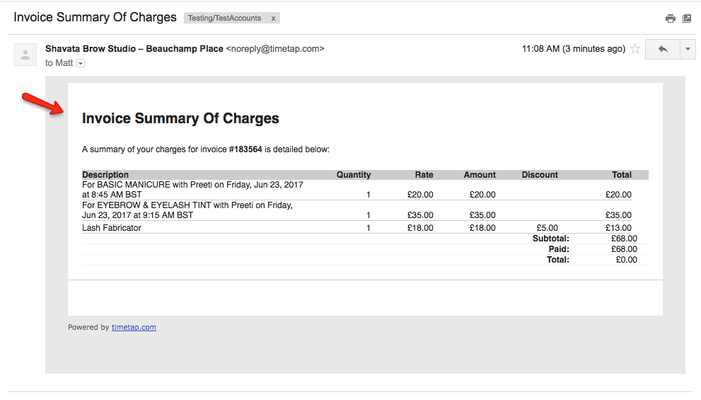
The first template is a Summary of Charges, and is the basic template to use if a client just wants a copy of their invoice:
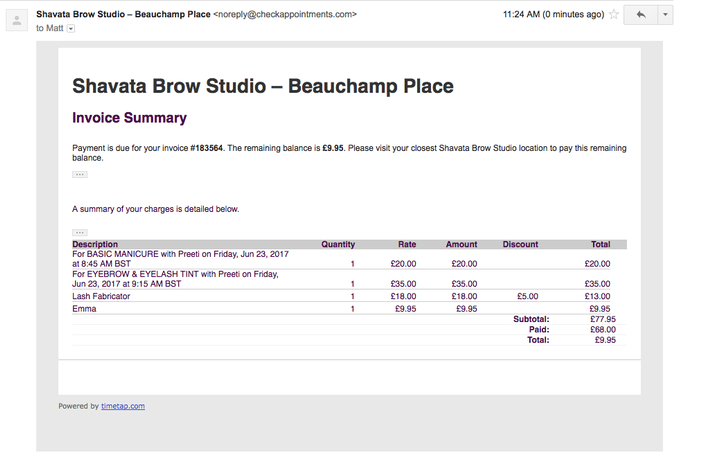
Use the Invoice remaining template if the client owes money towards the invoice:
After selecting the template you want to use from the list, click the green "Select Template" button:
Next you'll see a screen where you can edit the template before sending it. You shouldn't need to make any changes here, unless the client wants the invoice sent to an email address other than the one listed on their profile, or if there's a note or description you want to add that isn't otherwise added on another portion of the invoice. Note: We recommend not making any changes to the invoice body itself, as the layout and data tags (%" "%) are specially designed to pull data from the system and format it to readable print.
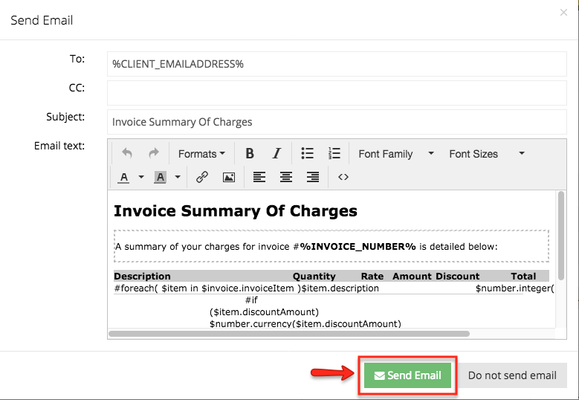
After you've reviewed the template, click the green "Send Email" button to send the invoice.
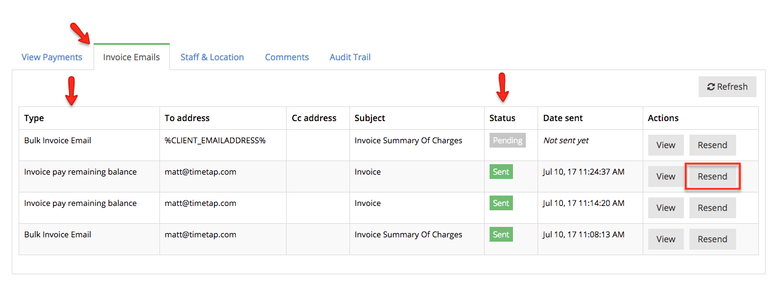
You can review the status of the email or re-send it if needed, under the Invoice Emails tab toward the bottom of the Invoice Detail screen:
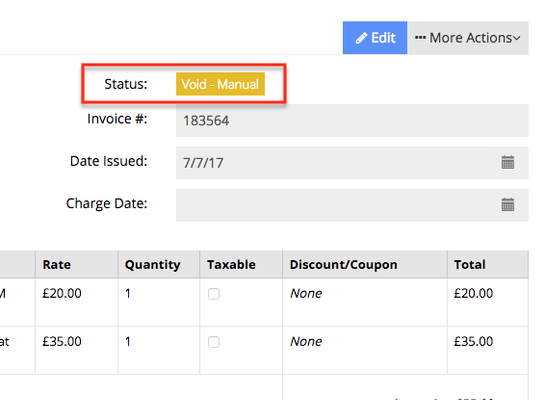
To Void an invoice, click "More Actions" in the upper-right-hand corner, and select Void Invoice:
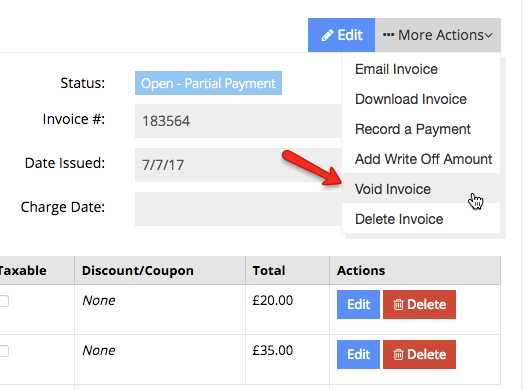
Clicking here will change the status of the invoice to "Void - Manual":
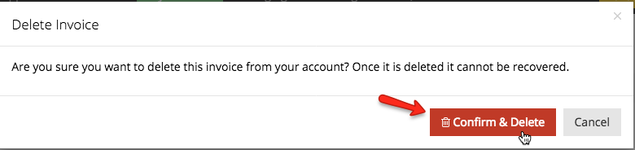
To delete an invoice, click "More Actions" in the upper-right-hand corner of the Invoice Detail screen, and select "Delete Invoice":
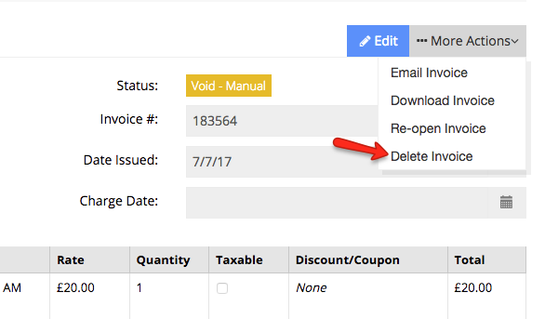
A confirmation box will appear asking you to confirm the deletion. Click Confirm & Delete to delete the invoice from the system: