| Anchor | ||||
|---|---|---|---|---|
|
Schedule tabs
of your Class Profile
is where you can view and manage all of the existing schedules and session dates
that are assigned to each of your staff.
I'll go through each of these in detail on this page of our documentation site, but first, I want to touch on the difference between the Recurring Schedule and Schedule tabs:
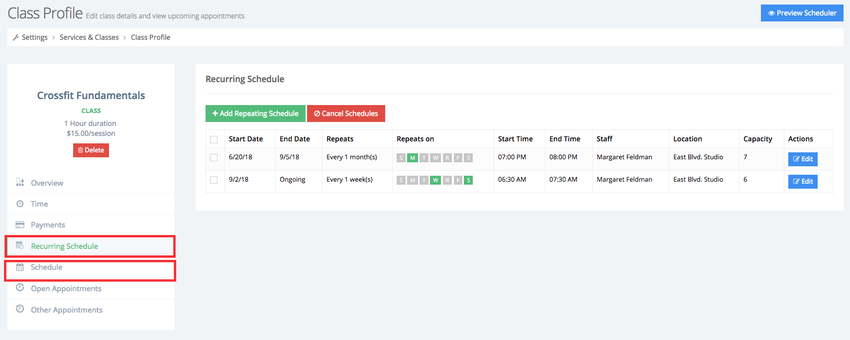
So, you see the two sections, but what's the difference between them? Glad you asked:
Recurring Class Schedule: this section details any schedule you've set up for the class that re-occurs| Table of Contents | ||||||||||||||||||
|---|---|---|---|---|---|---|---|---|---|---|---|---|---|---|---|---|---|---|
|
Recurring Schedule vs Schedule

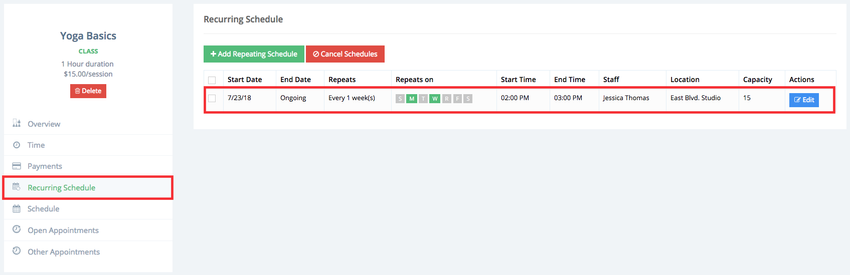
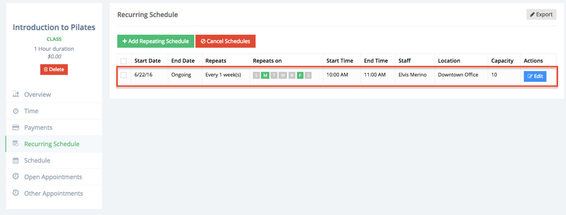
Recurring Class Schedule: this section details any schedule you've set up for the class that repeats over time. This could be a class that meets on the first Monday of every month or a class that meets every week on Wednesday and Saturday (as seen in the first line item on the screenshot above).
The schedule
set here will then
populate the individual sessions found under the Schedule tab.
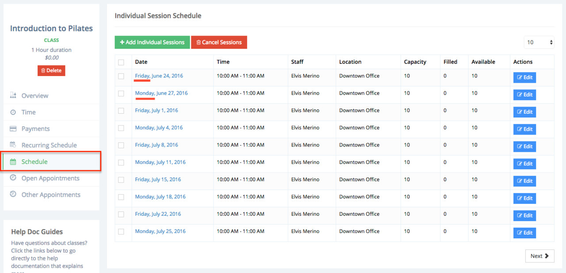
Schedule: these are the specific individual meeting dates and times for your classes.
I wanted to clear that up from the get go on this documentation page so that there isn't any confusion with the terminology. If you do have any questions, please feel free to contact our support team and we'd be happy to answer them.
Okay, now onto adding, editing, and managing your class schedules ![]() !
!
In this section we'll go through how to:
Add a new schedule for a class thatThis list will include both sessions that are generated from a Recurring Schedule above and individual sessions that are added directly from this page.

Add a new repeating schedule
This section covers how to:
class sessions held every week on Monday & Wednesday at 2:00pm)
Add a new schedule for a class that repeats on a monthly basis (e.g.
class sessions held every
first Tuesday of the month at 12:00pm)
If you still have questions about how to add repeating schedules for your class after reading through this guide, don't hesitate to reach out to our support team and we'd be happy to answer them for you.
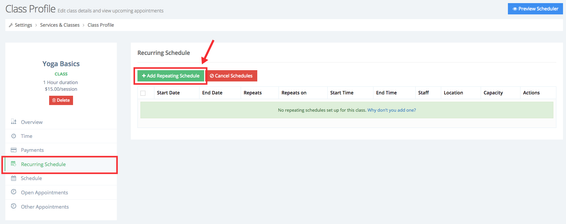
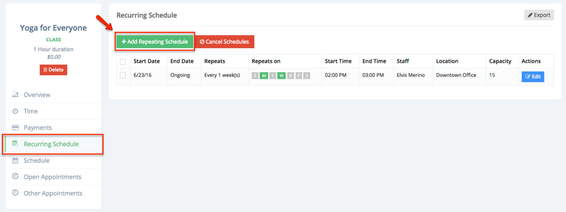
Let's say that you have a class that you want to set up sessions for every Monday and Wednesday at 2:00pm starting July 23rd, 2018 and continuing indefinitely. This is easy to do by clicking the "Add Repeating Schedule" button from the Recurring Schedule tab of your Class Profile:

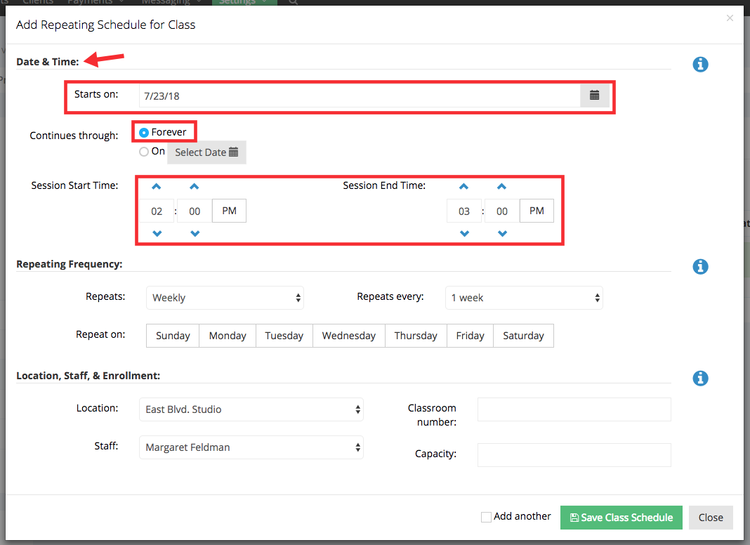
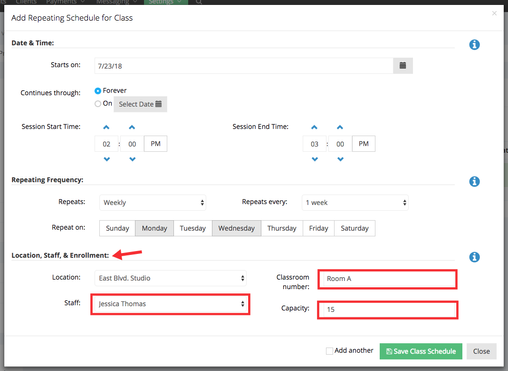
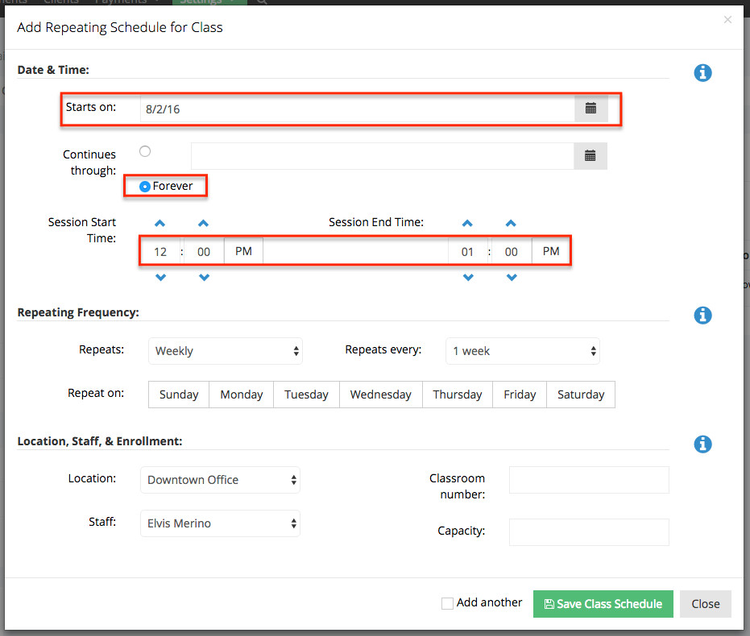
This will bring up the "Add Repeating Schedule for Class" window where you will first fill out the information in the "Date & Time" section. This includes the date range that the class schedule will repeat over (in this example 7/23/2018 through Forever) and the time of day that the sessions will take place (2:00pm - 3:00pm):
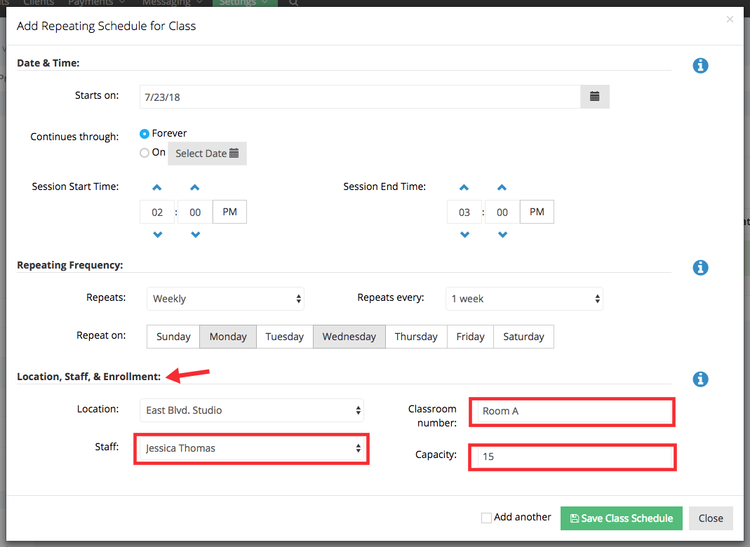
Next, you'll want to fill in the details around how frequently the class will repeat. In this example, I will set the repeating frequency to weekly and for it to repeat every 1 week on Mondays and Wednesdays:

Finally, I'll set the information for who will be leading the class, how many clients can book in per session, and a room number (if any) where the class will be held at the location. Whichever staff member I select to lead the class will determine whose schedule the class schedule gets placed on; this will block that staff person off from being able to accept service-based appointments at that time.
In this example, I'm going to be putting the class on staff member Jessica Thomas' schedule, set the capacity to 15 (which means 15 clients can register for any given session that the class meets), and say that the Yoga Basics class will happen in Room A:
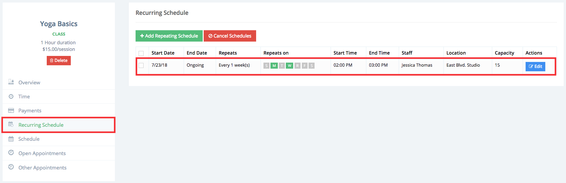
Now that I've got all the information for the weekly repeating schedule entered on the Add Repeating Schedule form, can press the "Save Class Schedule" button at the bottom of the window and see the new repeating schedule in the "Recurring Schedule" tab:
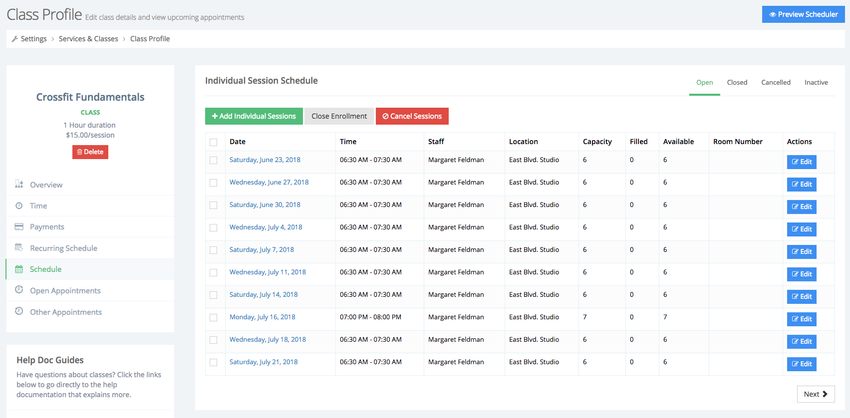
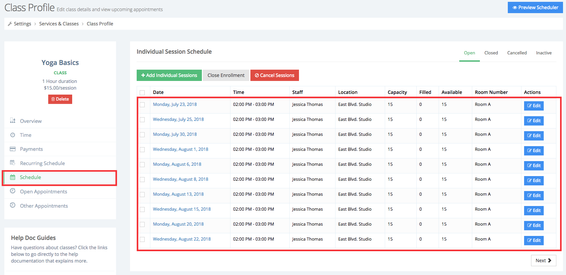
In the "Schedule" tab I can see the sessions that that schedule created. You'll notice that the class take place only Mondays and Wednesdays at 2 p.m:

Make sure you click the blue "Preview Scheduler" button at the top of my class schedule, to see how the scheduling looks from the perspective of the client
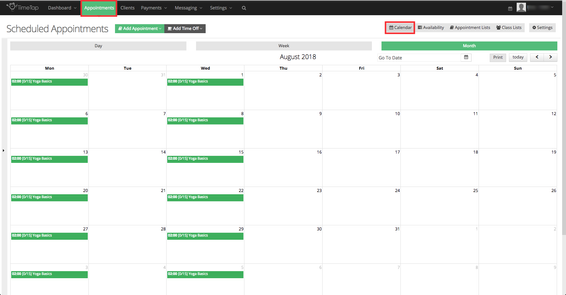
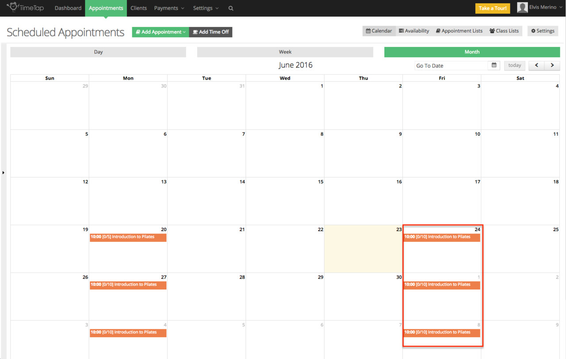
I'll also see all the scheduled class sessions under the "Appointments" tab of my account. We've reached a good point where it would be a good idea to learn how to filter classes in your calendar view, read our documentation here.
Hopefully that gives you a good idea of how to add a weekly repeating schedule for your class. If you have any questions, please reach out to our support team and we'll get you an answer as soon as possible.
Let's say you have a class that you want to schedule to repeat at 12:00pm on the first Tuesday of every month, starting August 2nd and continuing indefinitely. To get started adding this class schedule, click the "Recurring Schedule" tab then select Add Repeating Schedule:

To setup a new recurring schedule for a class that repeats on a weekly basis, go to the Recurring Schedule tab of the class profile and select the Add Repeating Schedule:
This will bring up the Add Repeating Schedule for Class panel where you will first fill out the information in the Date & Time section. This includes the date range that the class schedule will repeat over (in this example 7/23/2018 through Forever) and the time of day that the sessions will take place (2:00 PM - 3:00 PM):

Next, you will fill in the details around how frequently the class should repeat. In this example, the repeating frequency is set to weekly, every 1 week, and only on Mondays and Wednesdays:
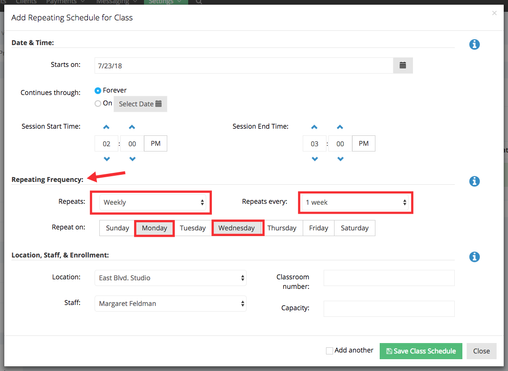
Finally, set the information for who will be leading the class, how many clients can book in per session, and a room number (if any) where the class will be held at the location. Whichever staff member you select to lead the class will determine whose schedule the class schedule gets placed on; this will block that staff person off from being able to accept service-based appointments at that time.
In this example, the class is assigned on staff member Jessica Thomas' schedule, the capacity is set to 15 (which means 15 clients can register for any given session that the class meets), and the class will happen in Room A at the East Blvd. Studio location:
Now that all the information for the weekly repeating schedule is entered on the Add Repeating Schedule for Class form, select the Save Class Schedule button at the bottom of the panel to confirm that schedule. Once saved, you can see that new repeating schedule in the Recurring Schedule tab:
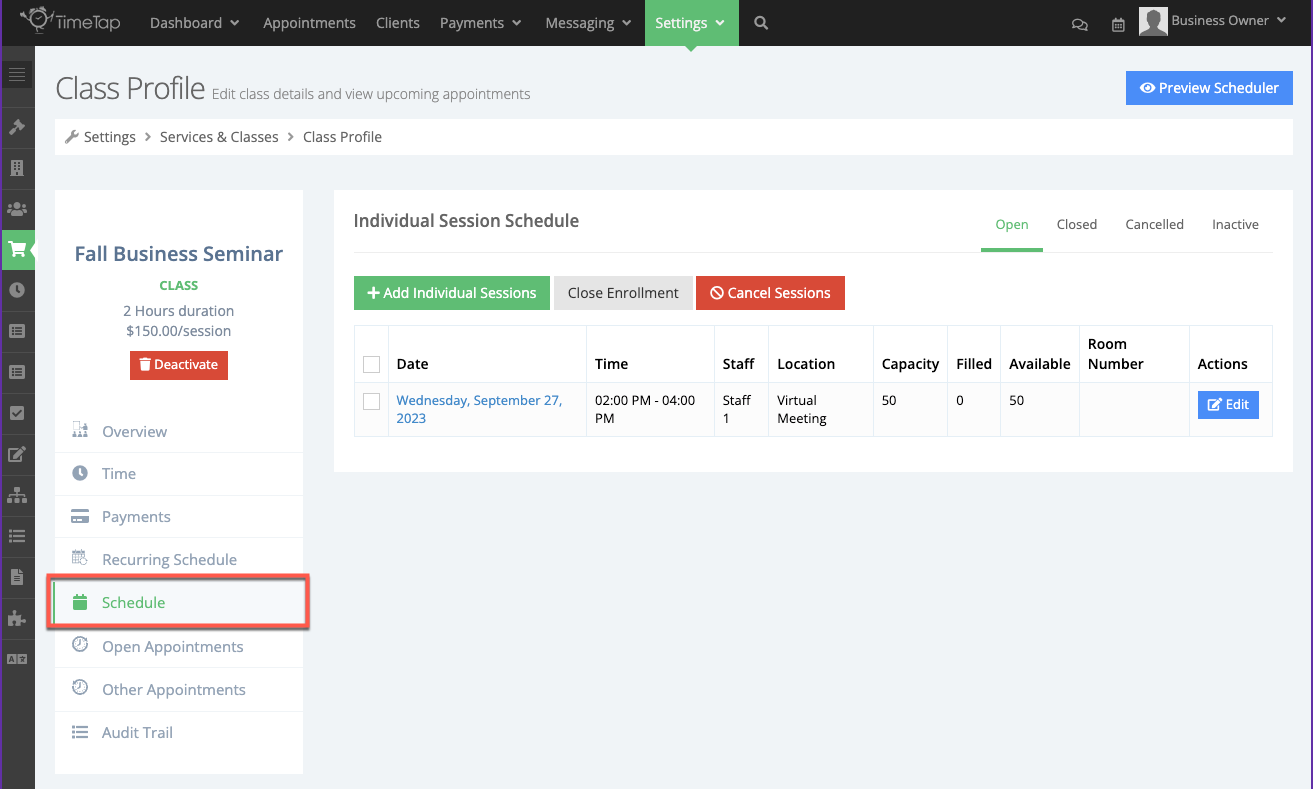
The individual sessions that the repeating schedule created can be viewed in the Schedule tab. The Individual Session Schedule confirms that the class takes place only Mondays and Wednesdays at 2 PM:
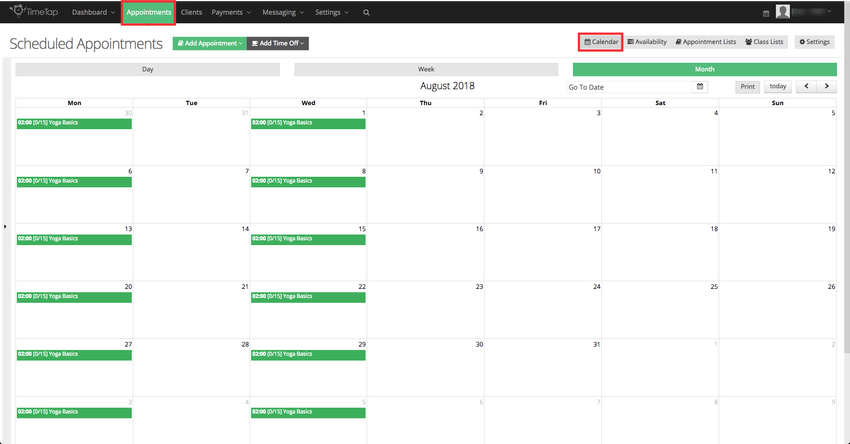
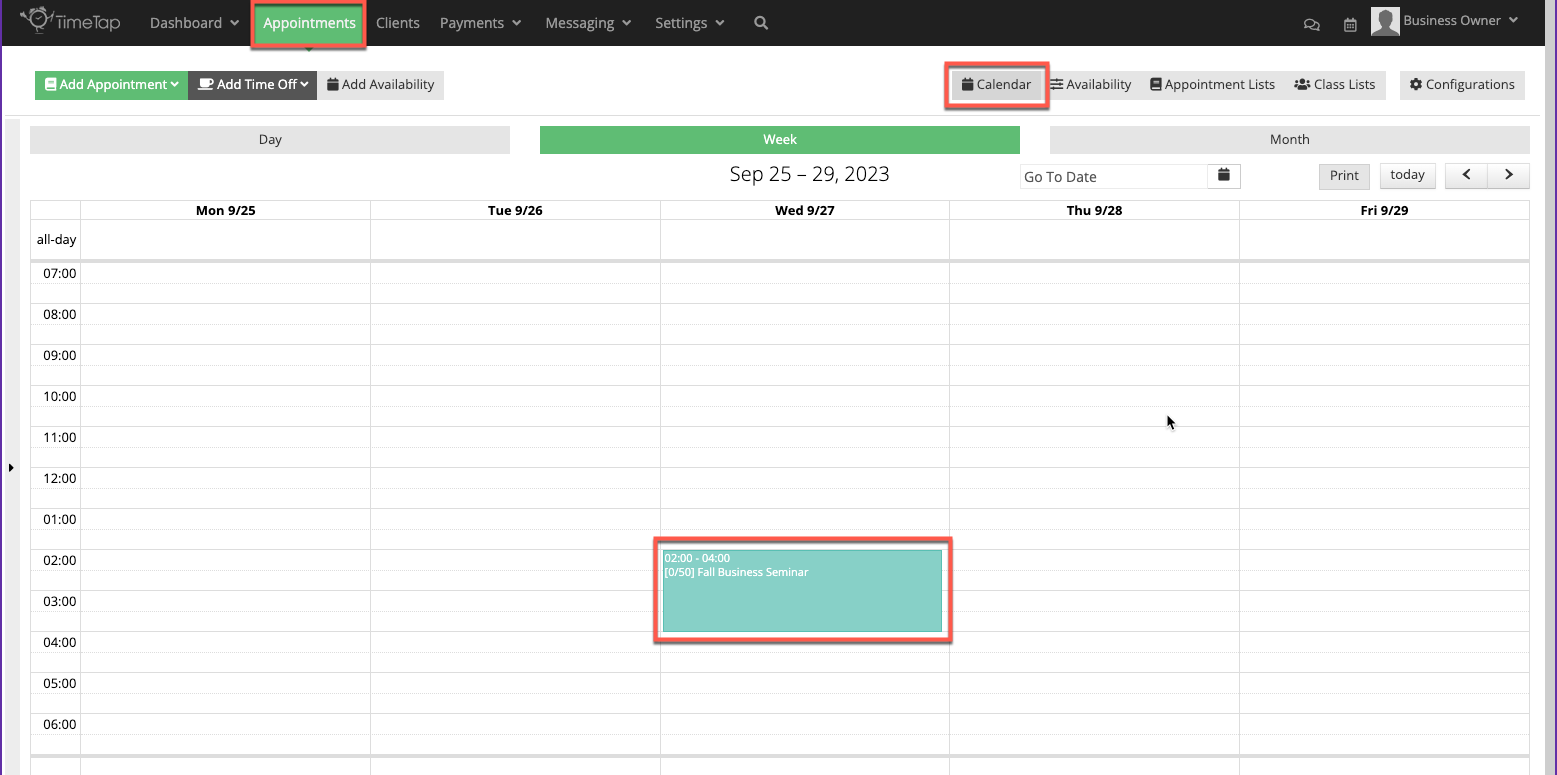
You can also see all the scheduled class sessions on the Calendar page of your Appointments tab.
| Info |
|---|
You can use the blue Preview Scheduler button at the top of the class profile to quickly check how that classes scheduling looks from the perspective of the client on your booking site. |
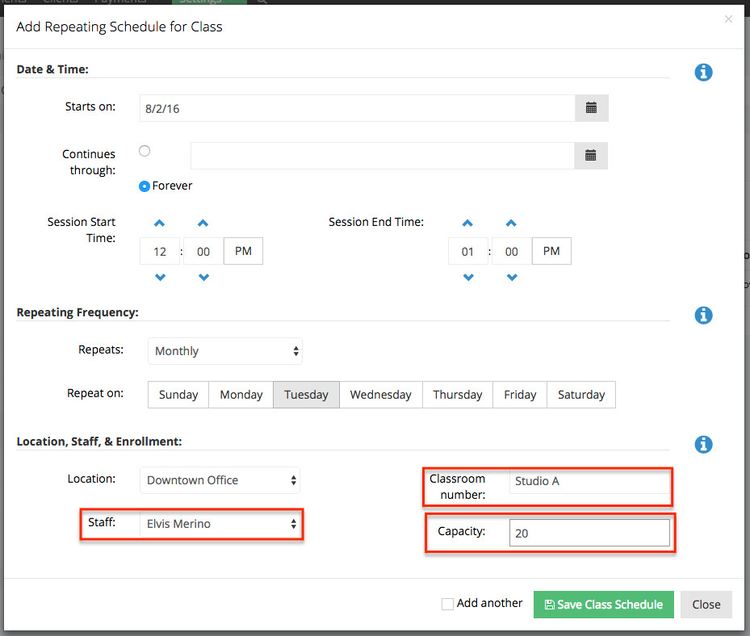
To setup a new recurring schedule for a class that repeats on a monthly basis, go to the Recurring Schedule tab of the class profile and select the Add Repeating Schedule:
This will bring up the Add Repeating Schedule for Class panel where you will first fill out the information in the
Date & Time
section. This includes the date range that the class schedule will repeat over (in this example 8/
2/
2016 through Forever) and the time of day that the sessions will take place (12:
00 PM - 1:
00 PM):
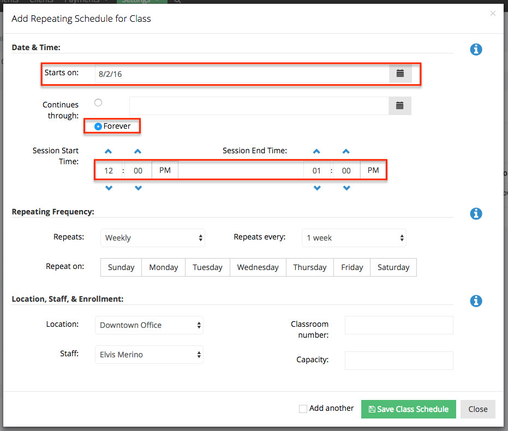
Next, you
will fill in the details around how frequently the class will repeat. In this example,
the repeating frequency is set to monthly and for it to repeat on Tuesdays:
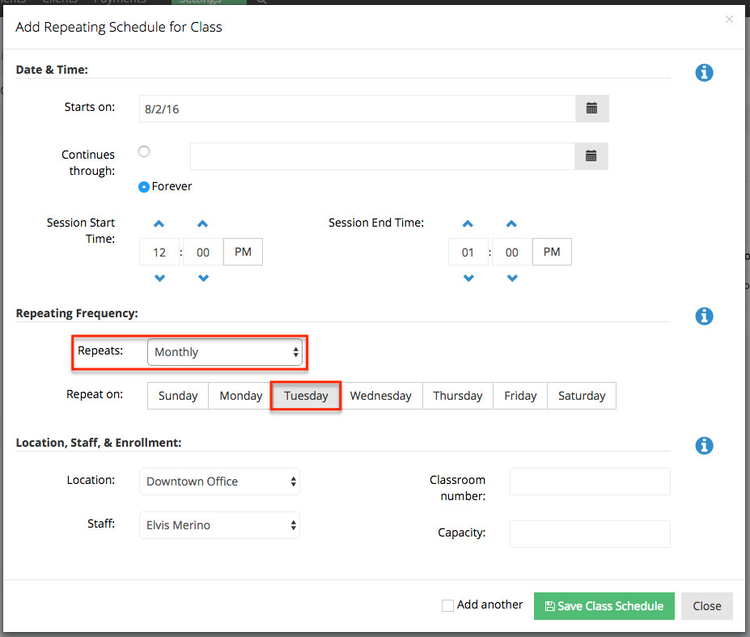

Since August 2nd was selected (which is the first Tuesday in August) as
the start date and
the repeating frequency was set to "Monthly", TimeTap will automatically know that
this
schedule should repeat Monthly on the first Tuesday. If
August 9th was selected instead as the start date (which is the second Tuesday in August)
, then it would repeat on the second Tuesday of the month.
Finally,
set the information for who will be leading the class
, how many clients can book in per session, and a room number (if any) where the class will be held at the location. Whichever staff member
you select to lead the class will determine whose schedule the class schedule gets placed on; this will block that staff person off from being able to accept service-based appointments at
that time
.
In this example,
the class is assigned on staff member Elvis
Merino’s schedule,
the capacity is set to 20 (which means 20 clients can register for any given session that the class meets), and
the
class will happen in Studio A at the Downtown Office location:

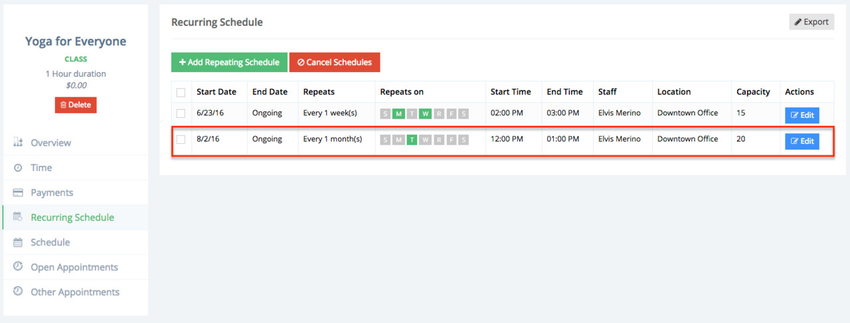
Now that
all the information for the monthly repeating schedule is entered on the Add Repeating Schedule for Class form,
select the
Save Class Schedule
button at the bottom of the
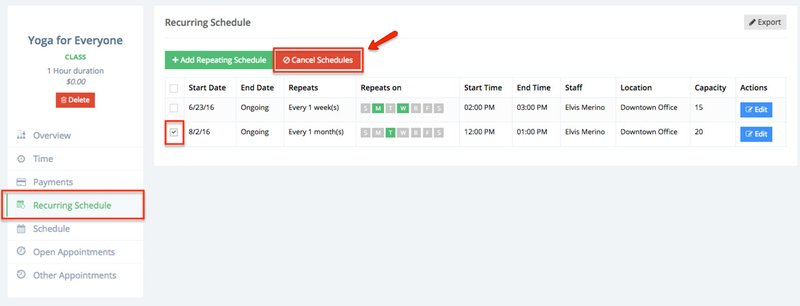
panel to confirm that schedule. Once saved, you can see that new repeating schedule
in the
Recurring Schedule
tab:

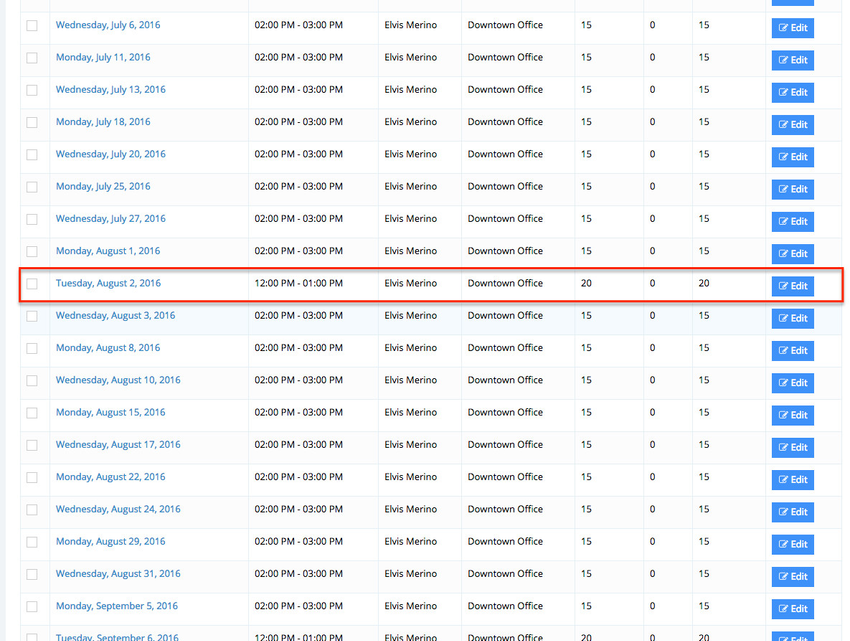
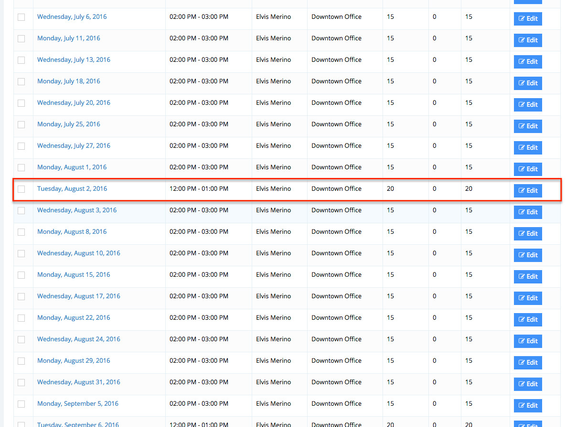
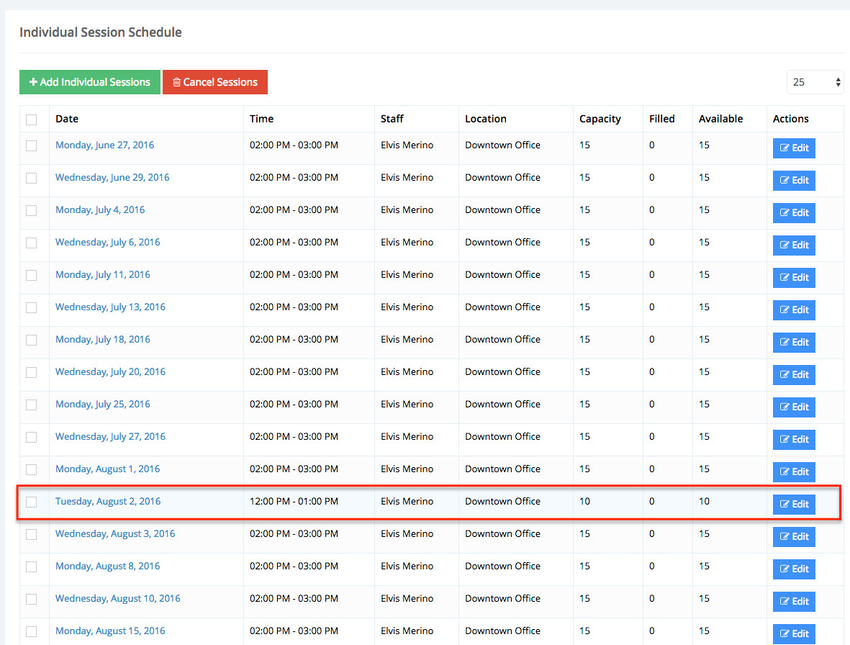
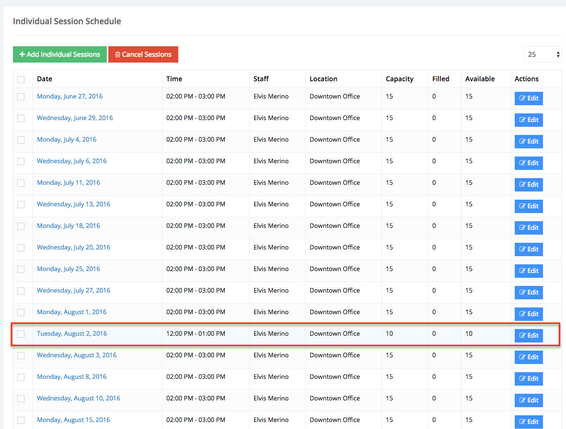
The individual sessions that the repeating schedule has created can be viewed in the Schedule tab. The Individual Session Schedule page confirms that the class take place on first Tuesday in August
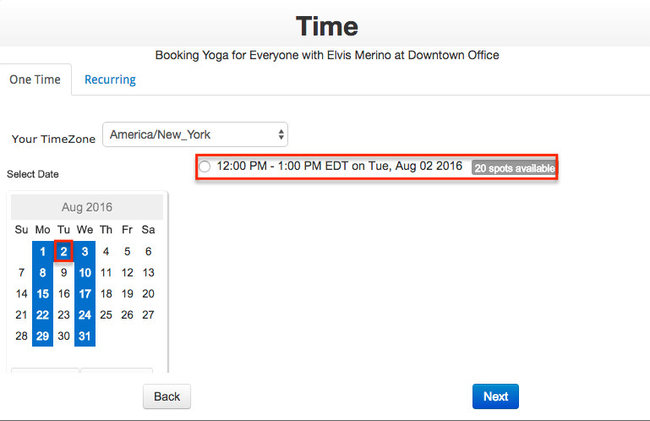
If I click the blue "Preview Scheduler" button at the top of my class schedule, I'll be able to see how the scheduling looks from the perspective of the client:
And if I go to the Appointments menu on my TimeTap Back Office login, I'll see the same thing in my monthly calendar view:
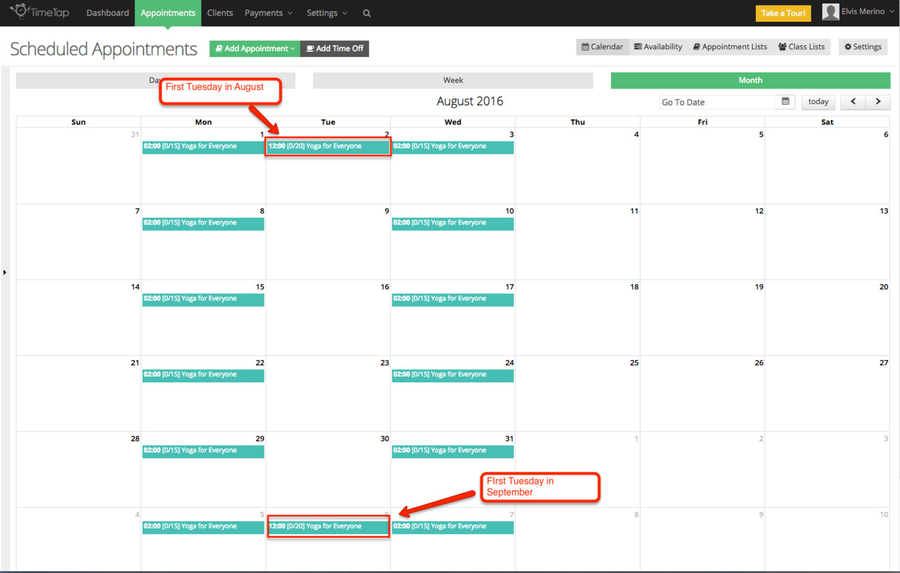
at 12:00 PM:
You can also see all the scheduled class sessions on the Calendar page of your Appointments tab.

Reviewing the schedule for your class from both the client's perspective on your
booking site as well as
from the Calendar in the Backoffice can help to
confirm that your schedule was added properly.
At this point, you can only create class schedule to repeat on a weekly or monthly basis
in the manners described in the sections above.
| Info |
|---|
You can use the blue Preview Scheduler button at the top of the class profile to quickly check how that classes scheduling looks from the perspective of the client on your booking site. |
After setting up a repeating schedule for a class, you may need to come back at a later date and make some changes to that schedule. For instance,
you may need to:
Increase or decrease the max capacity of clients that can register for any given session within the repeating schedule
Make it so the schedule repeats on more days of the week than originally selected
Extend the end time for the repeating schedule
Switch the schedule from one staff member's schedule to another
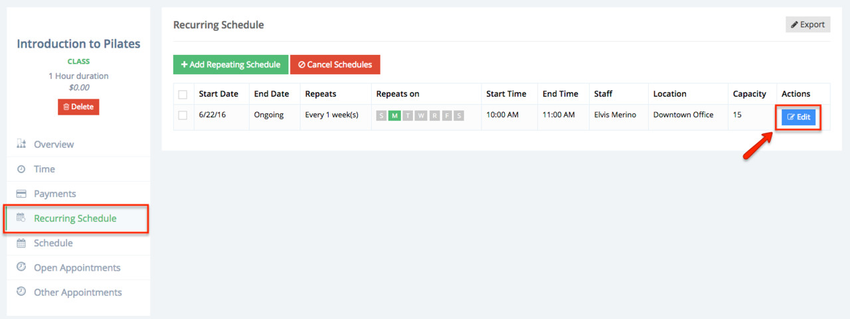
All of these actions can be performed by
selecting the
Edit
button to the right of your existing class
schedule
on the Recurring Schedule tab.
For example, imagine that you want to reduce the maximum number of attendees for your class from 15 to 10 due to space constraints. Additionally, you plan to add a Friday morning session in addition to the existing Monday one.
To make this change,
select the
Edit
button to the right of my repeating class schedule listing in the
Recurring Schedule
tab
:

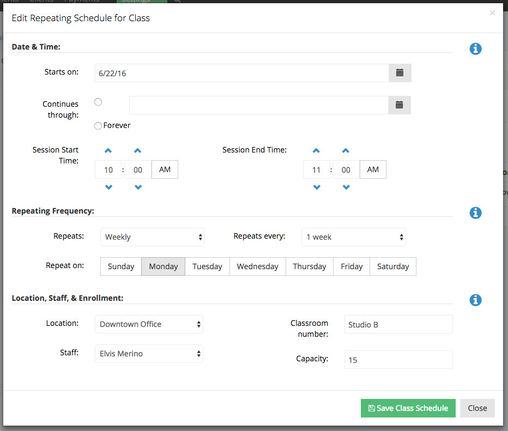
This will bring up the Edit Repeating Schedule for Class
panel with the current
schedule configurations (notice that it is only set to repeat on Mondays and the capacity is listed as 15):
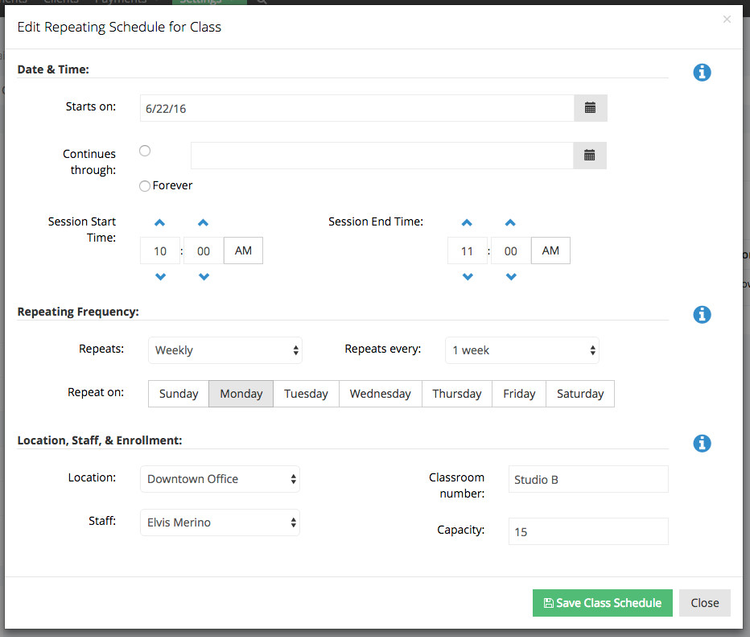
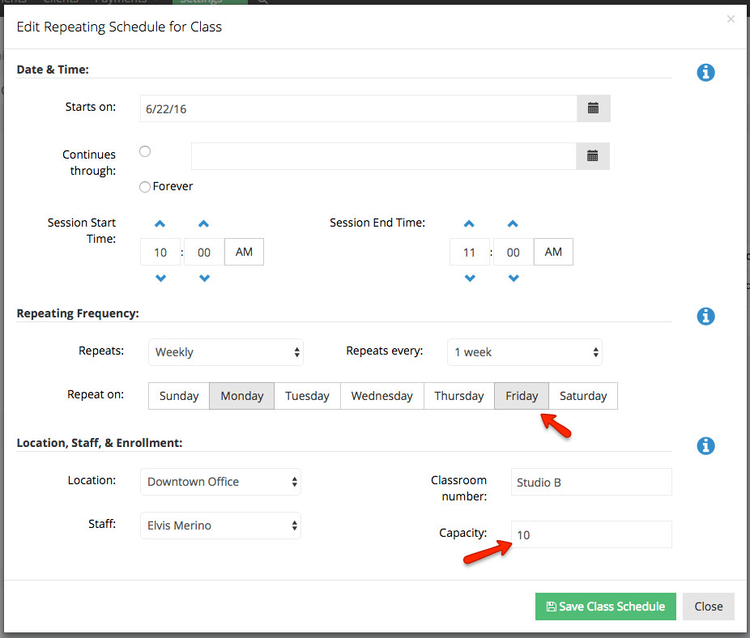
In this window,
you can select an additional day of the week under the
Repeating Frequency
section to indicate that the class schedule should repeat on both Mondays & Fridays. Then
you can update the capacity from 15 to 10 under the
Location, Staff, & Enrollment
section
:

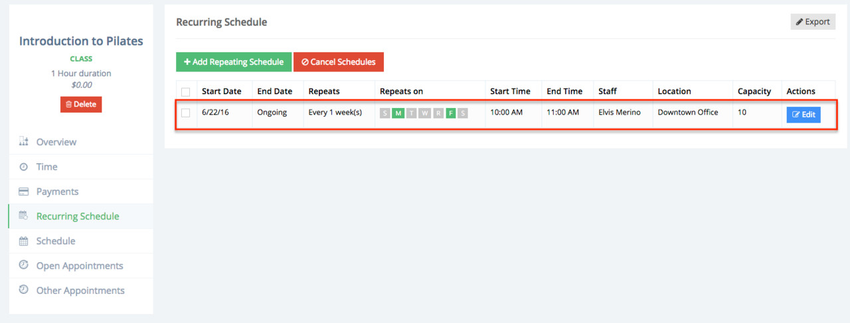
Once
you’re finished making those changes,
select the
Save Class Schedule
button at the bottom of the
panel to
confirm those changes to
the class schedule.
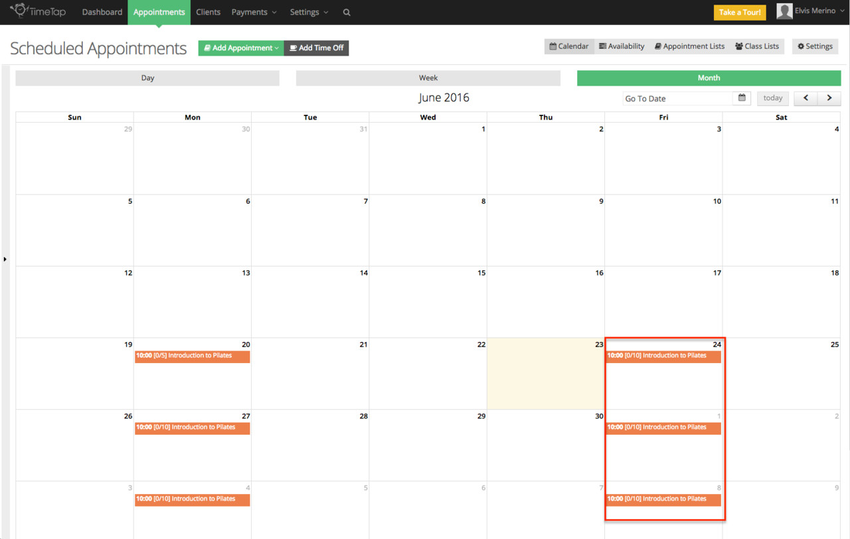
If I go to the Schedule tab I will be able to see the individual sessions created by updating the recurring schedule. Notice that the class now takes place on Monday and Fridays at 10:00 a.m:

From here, if you want to check that your schedule was properly edited, I recommend clicking the blue "Preview Scheduler" link in the top right of the Class Profile which will direct you to your mini website. From there, you can click through your scheduler to make sure that your class updates are appearing properly.
You can also see the new sessions that were scheduled under your Appointments menu on your main account Calendar:
If you have any questions about making edits to your existing class schedule, please contact our support team and we'll be happy to answer them for you.
As I mentioned before I recommend that you read our documentation on how to use the calendar filters to better display your class sessions.
You will then see the updated schedule on the Recurring Schedule tab of the class profile:
You can confirm the changes made to the recurring schedule by reviewing the Individual Session Schedule. Notice that the class now takes place on Monday and Fridays at 10:00 AM:
You can also see the new sessions that were scheduled under your Appointments menu on your main account Calendar:
| Info |
|---|
You can use the blue Preview Scheduler button at the top of the class profile to quickly check how that classes scheduling looks from the perspective of the client on your booking site. |
Add an individual session
While some classes meet on a consistent, repeating basis, others may meet on a more
This is true for us at TimeTap. Every once in a while we will host webinars for a new feature we release or just a general explanation of how to use the application. This isn't something we do every week but on a more sporadic basis.
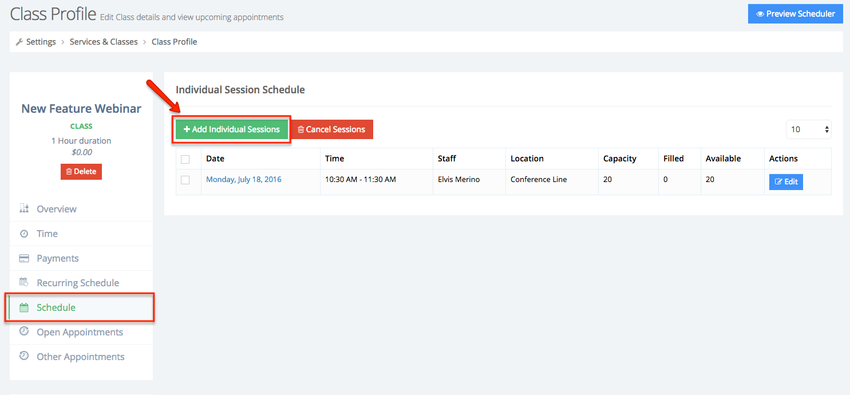
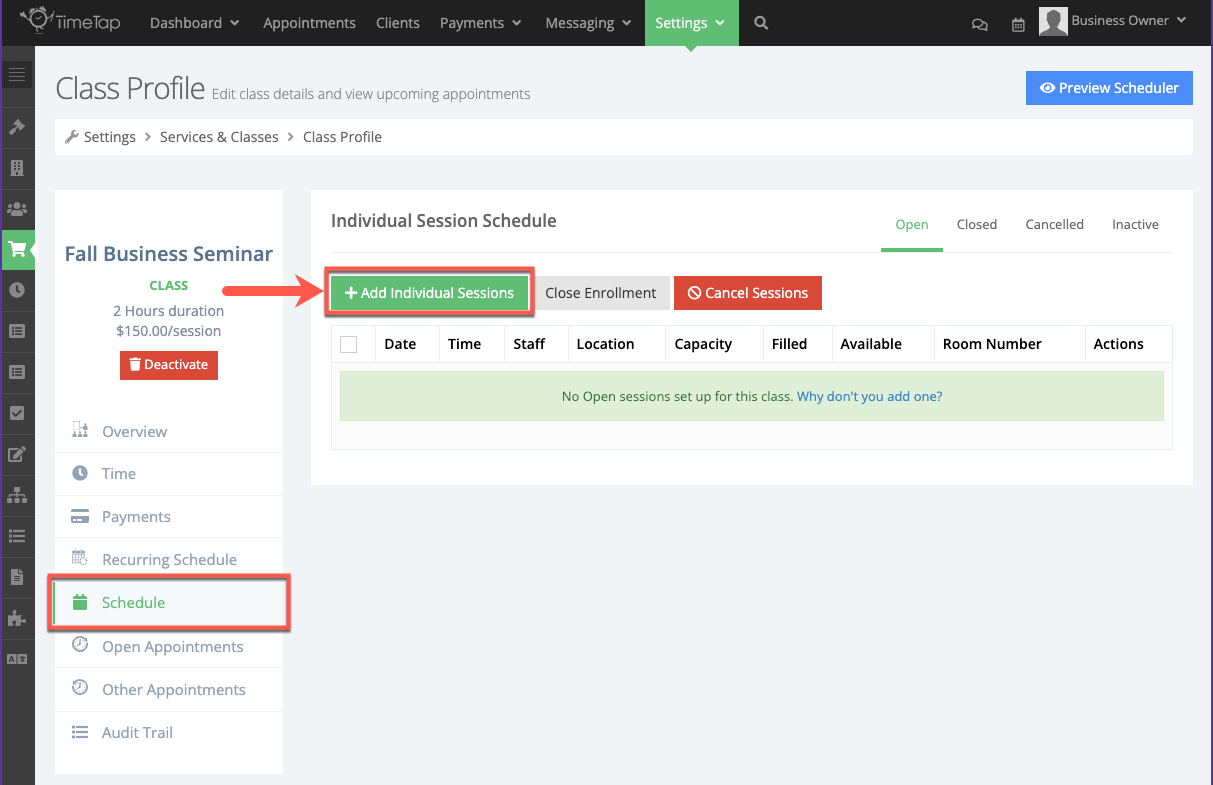
Let's say that we plan to host a webinar on August 5th at 3:30pm Eastern. In order to add this one time class session for the webinar to our account, I'll want to press the "Add Individual Sessions" inside the Schedule Tab all while in the Webinar's Class Profile:
This will bring up the Add Class Session screen where I can put in the date, time, staff lead, & max capacity for the class session. When adding an individual session you are given the added option to hide the Additional Guests Option on the scheduler. Once I've filled in on the required fields, I can press the button to "Save Individual Session" at the bottom of the window:
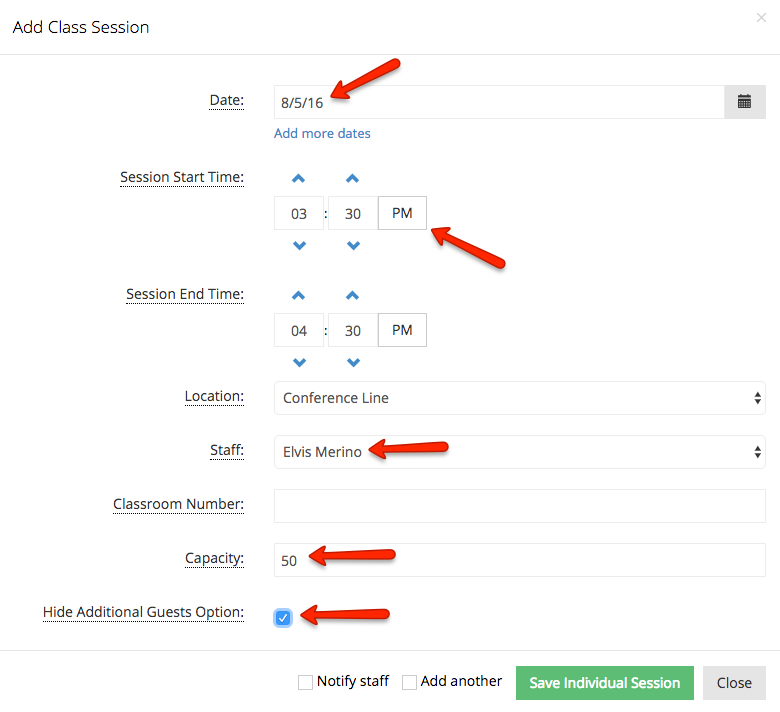 Please note that at anytime if you want to show the Additional Guests Option on the scheduler you can go back through the class profile, go to that specific class and edit that class by unchecking the box labeled "Hide Additional Guests Option."
This will add the one time instance of the class to my scheduled Individual Class Sessions list:
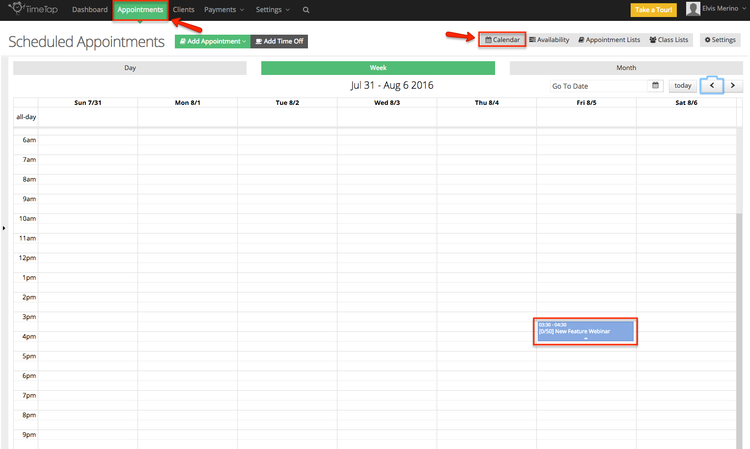
I can click the blue "Preview Scheduler" button in the top right of the Class Profile screen to quickly look at the booking flow from my clients' perspective to make sure it looks alright. I can also click on the "Appointments" menu from TimeTap's back office view to see the class session on my calendar for August 5th:
Have questions about adding individual class sessions to your account? Send them over to our support team and we'd be happy to get you an answer.
irregular basis.
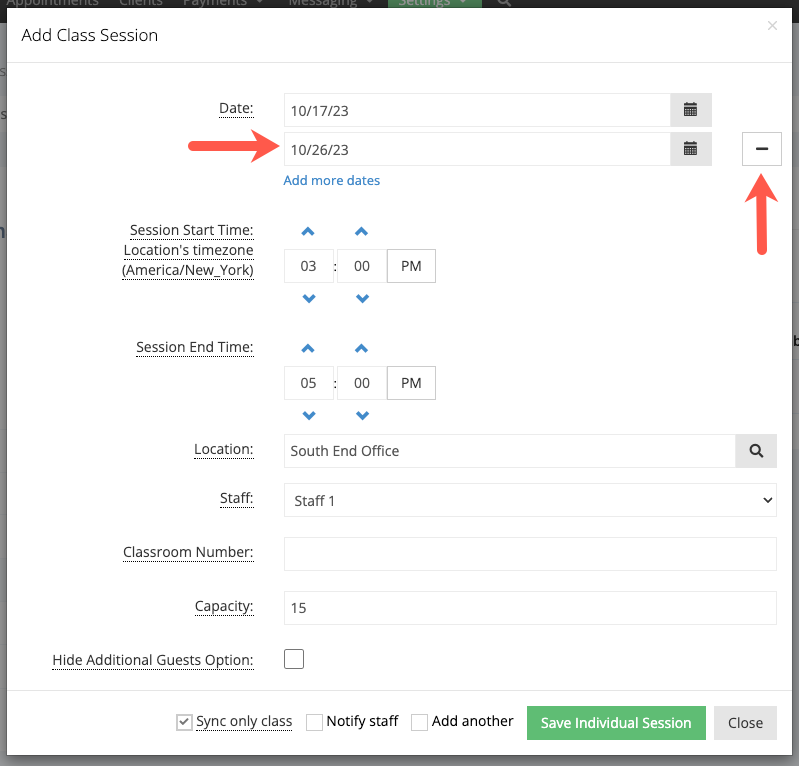
In order to add a one time class session, select the Add Individual Sessions button in the Schedule tab:
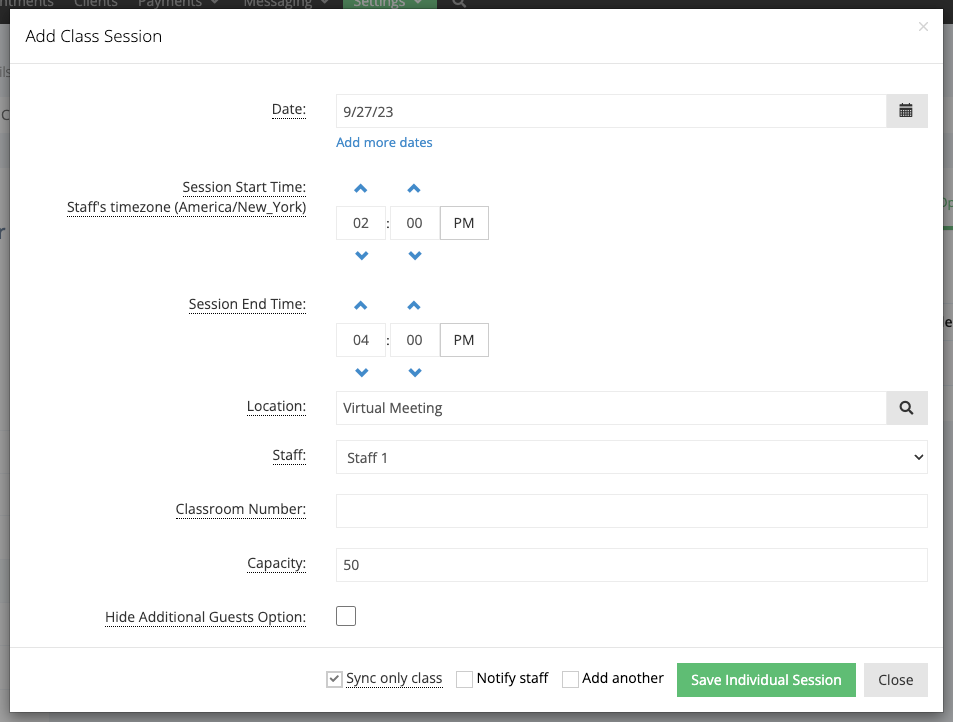
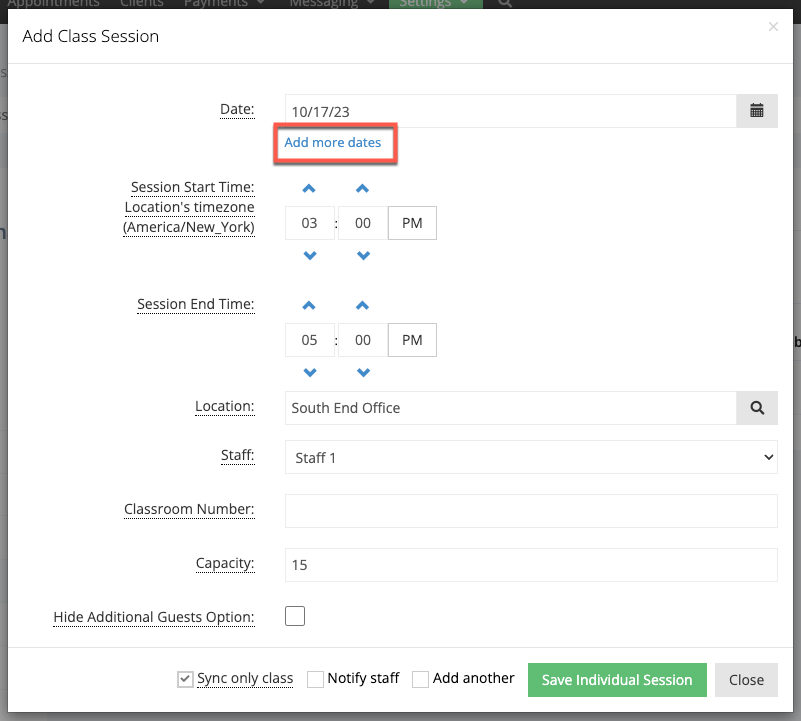
This will bring up the Add Class Session panel where you can put in the date, time, staff lead, & max capacity for the class session:
Individual Session Specific Settings
Hide Additional Guests Option: If you have the Additional Guests setting enabled for your account (Settings > Client Information), then you are given the added option to hide the Additional Guests option for this session on the scheduler by enabling the Hide Additional Guests Option checkbox. If you want to show the Additional Guests option for this class session again on the scheduler at a later time, you can go back through the class profile, go to that specific class session and edit that session by unselecting the Hide Additional Guests Option checkbox.
Sync only class: By default, TimeTap will always sync an event to your external calendar that represents the overall class session, which displays the name of that class, the currently scheduled capacity count, and the max capacity for that session. You have the option to also have individual appointments sync for each attendee in that class session.
Sync only class → selected: Only the default overall class session event is synced to your external calendar. No individual attendee’s appointments are synced to the external calendar when this setting is selected.
Sync only class → unselected: Each individual attendee’s appointments is synced to your external calendar, along with the default overall class session event.
Once you’ve filled in the required fields, select the Save Individual Session button at the bottom of the panel to add the one time instance of that class to the Individual Session Schedule:
You can also select Appointments from the top menu in the Backoffice to see the scheduled class session in the Calendar view:
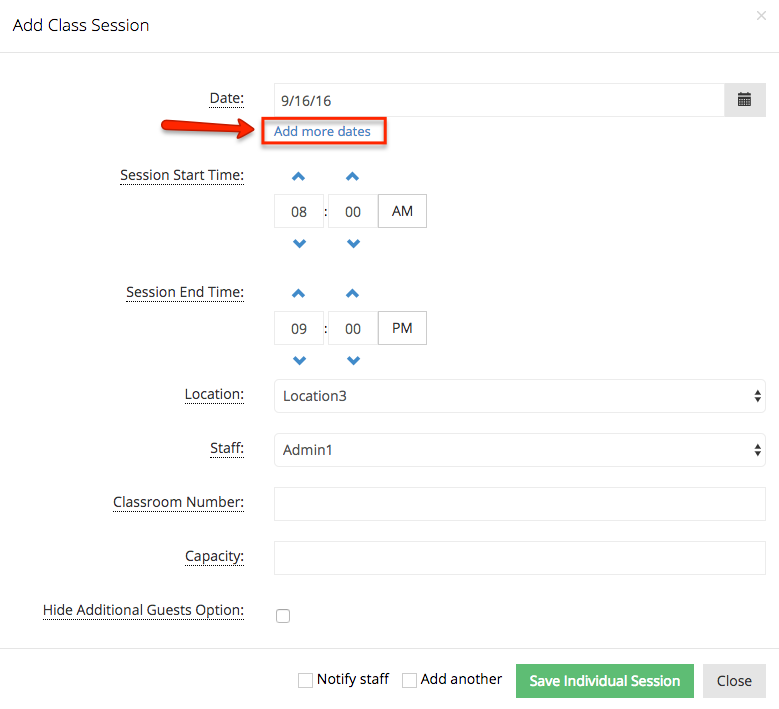
When creating a new session for your class, you have the option to add more than one day at the same time block. A common use for this feature would be if you have a class that meets at
9 AM on different days of the week, or month.
On the Add Class Session
panel,
select Add more dates
just below the Date
field:
An additional Date
field will appear that you can use to select another date:
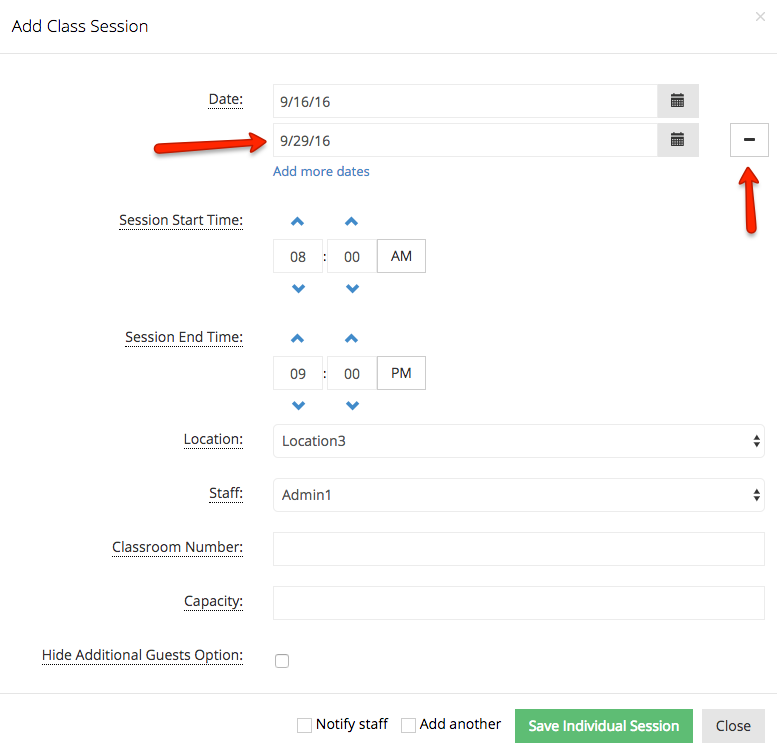
The [–] button to the right of the
new date field can be used to remove
that additional
field.
Once you've completed the form,
select Save Individual Session
to confirm those sessions.
You can make edits to
both one-off individual class sessions
and to individual class sessions that are part of a repeating class schedule.
To do this, simply find the individual class session that you want to
make an adjustment to in the Schedule tab of that class profile and use the Edit button beside that session.
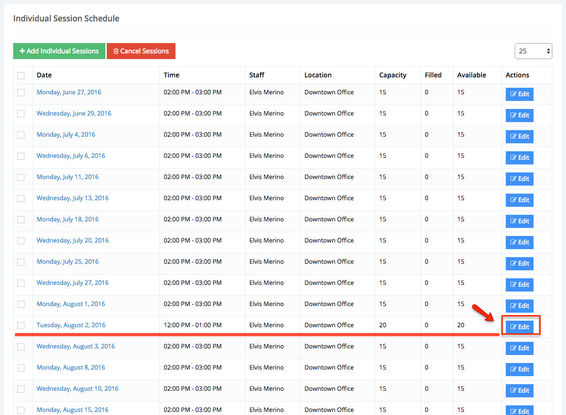
In this example, let's say that you have a repeating class schedule that
is set to
occur every Tuesday at 12:00
PM, but there is one Tuesday session in August where you will have to have your class in a smaller space, so you want to reduce the capacity for that class down from 20 to just 10.
To
make this adjustment,
go to the Schedule tab of
the class
profile and find
that session among your
Individual Session Schedule list:


Select the blue
Edit
button to the right of the session to bring up the
Edit Class Session
panel:

On the Edit Class Session
panel,
change the capacity
from 20 to 10:
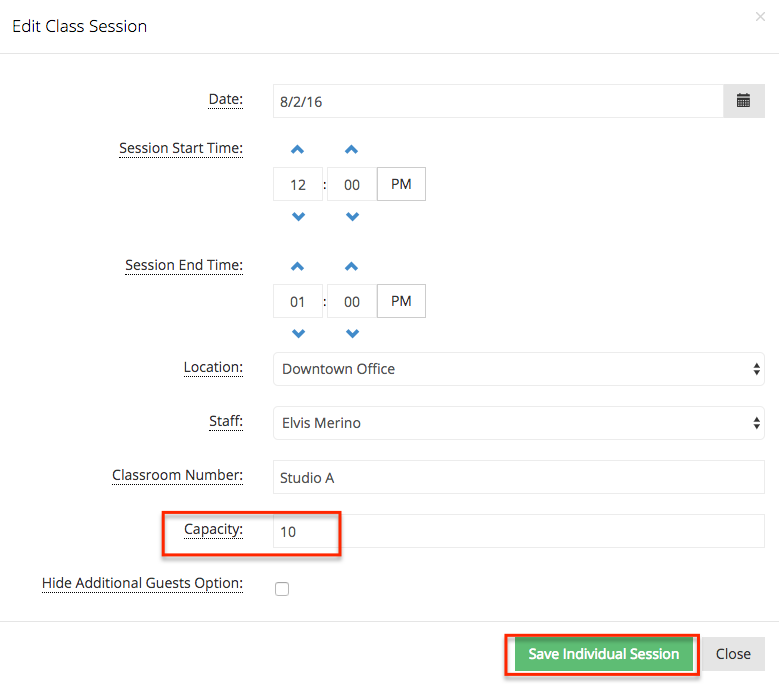
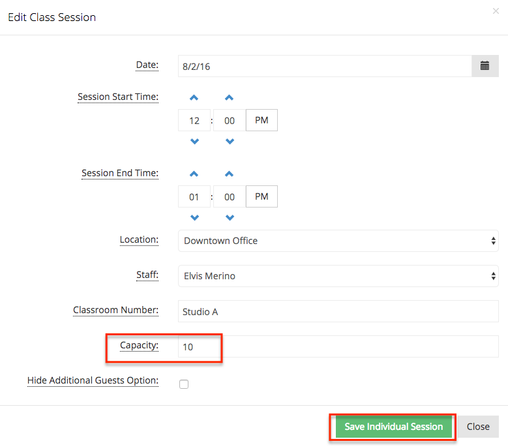
Changing the capacity in the screenshot above represents just the change needed for this example. If
you instead needed to change the start time from 12:
00 PM to 4:
00 PM,
you could do that
Once I press save, the Session will be updated on my Individual Class Sessions table:
Again, if I had had any clients registered for this class, I could have also sent out an Appointment Changed/Rescheduled email to all the registered clients in the session.
with this process as well.
Select the Save Individual Session button and that session will be updated on the Individual Sessions Schedule:
By canceling an existing repeating schedule for a class or an existing class session, you remove it from being available for booking as well as cancel any appointments for clients that registered for the cancelled class sessions.
Cancelling a repeating schedule
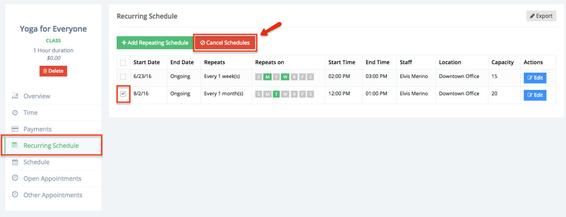
You can cancel an entire repeating schedule (and all the individual sessions that are within that repeating schedule) by going to the
Recurring Schedule
tab of the
class profile, selecting the checkbox next to the repeating schedule you wish to cancel, and
selecting the red
Cancel Schedules
button at the top of the
Recurring Schedule table:
This will bring up a
panel where you can select whether or not you want to send out the Appointment Cancellation email to any clients that registered for any sessions that fell within the repeating schedule you're canceling:
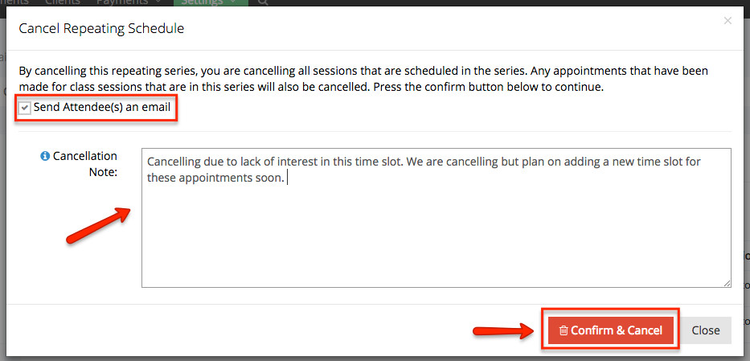
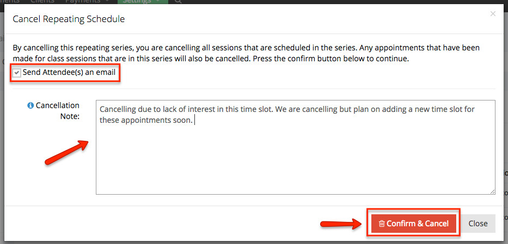
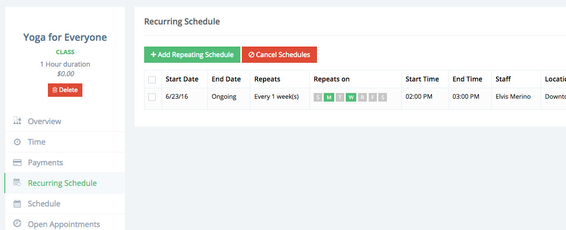
By
selecting Confirm & Cancel
, the repeating schedule will be removed, the cancellation emails will be sent out (if you selected to send them out), and the individual session dates for the repeating schedule will be
cancelled as well:

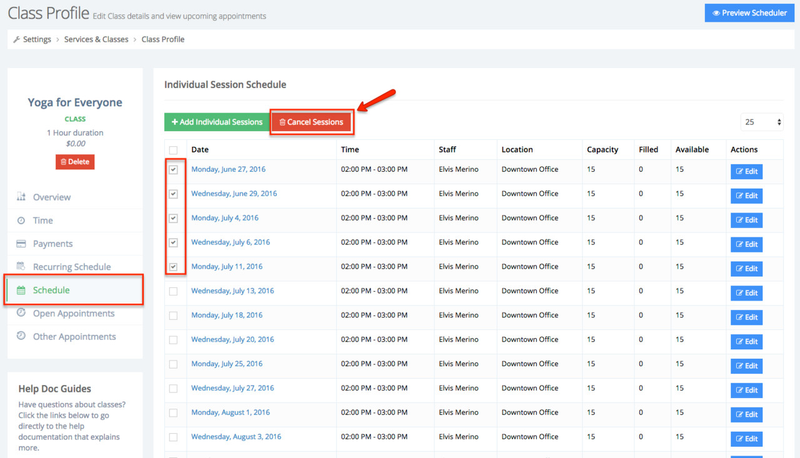
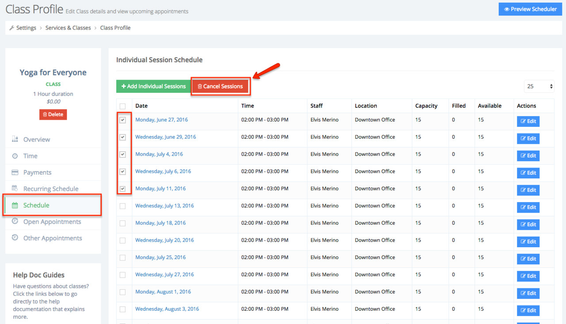
Cancelling individual class sessions
You can also make cancellations on a session by session basis by following a similar flow
on the
Individual Sessions Schedule
table of the
Schedule
tab within the
class profile. To do this,
select the checkbox beside each session you want to cancel and
then select the
Cancel Sessions
button at the top:
When cancelling a session where there are already clients registered,
you will be prompted
whether or not
to send out the Appointment Cancellation email to the clients who are on the attendees list.
You can add in

a cancellation note to be sent with that cancellation email:
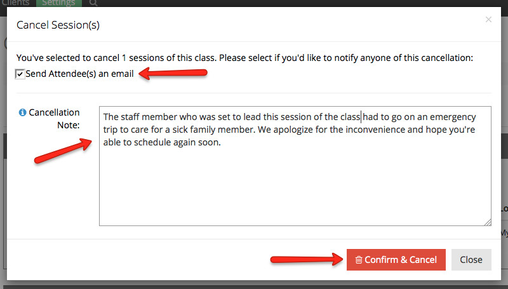
After selecting Confirm & Cancel
, the class session will no longer be available for anyone to book, the cancellation email will go out to any clients who were on the attendees list (should you have elected to send it), and the session will no longer be visible on
the Individual Session Schedule.