| Anchor | ||||
|---|---|---|---|---|
|
the times when staff are offering availability at that location. A location profile is made up of eight tabs:
Overview: View and edit the overall details for this location (like Location Name and Address)
Location Availability: View the availability of the staff member offering services at this location
Class Recurring Schedule: View all the existing repeating class schedules taking place at this location
Class/Course Individual Sessions: View all the individual class/course sessions taking place at this location
Course Sets: View all of the course sets scheduled to take place at this location
Status colour Green title BUSINESS PLAN FEATURE Open Appointments: View all the open appointments booked at this location
Other Appointments: View all appointments booked at this location with the status of No Show, Cancelled, or Completed
Audit Trail: View the changes that have been made to the Overview section for this location
In this documentation, we'll cover everything found under the Overview
and Open/Other Appointments tabs including:
| Table of Contents | ||||||||||||||||||
|---|---|---|---|---|---|---|---|---|---|---|---|---|---|---|---|---|---|---|
|
We cover how to use and customize your staff's availability at a location under a separate documentation page that goes in depth about adding, changing, and removing your availability.
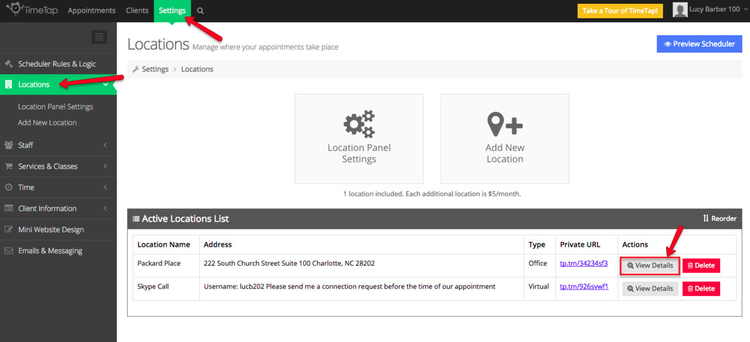
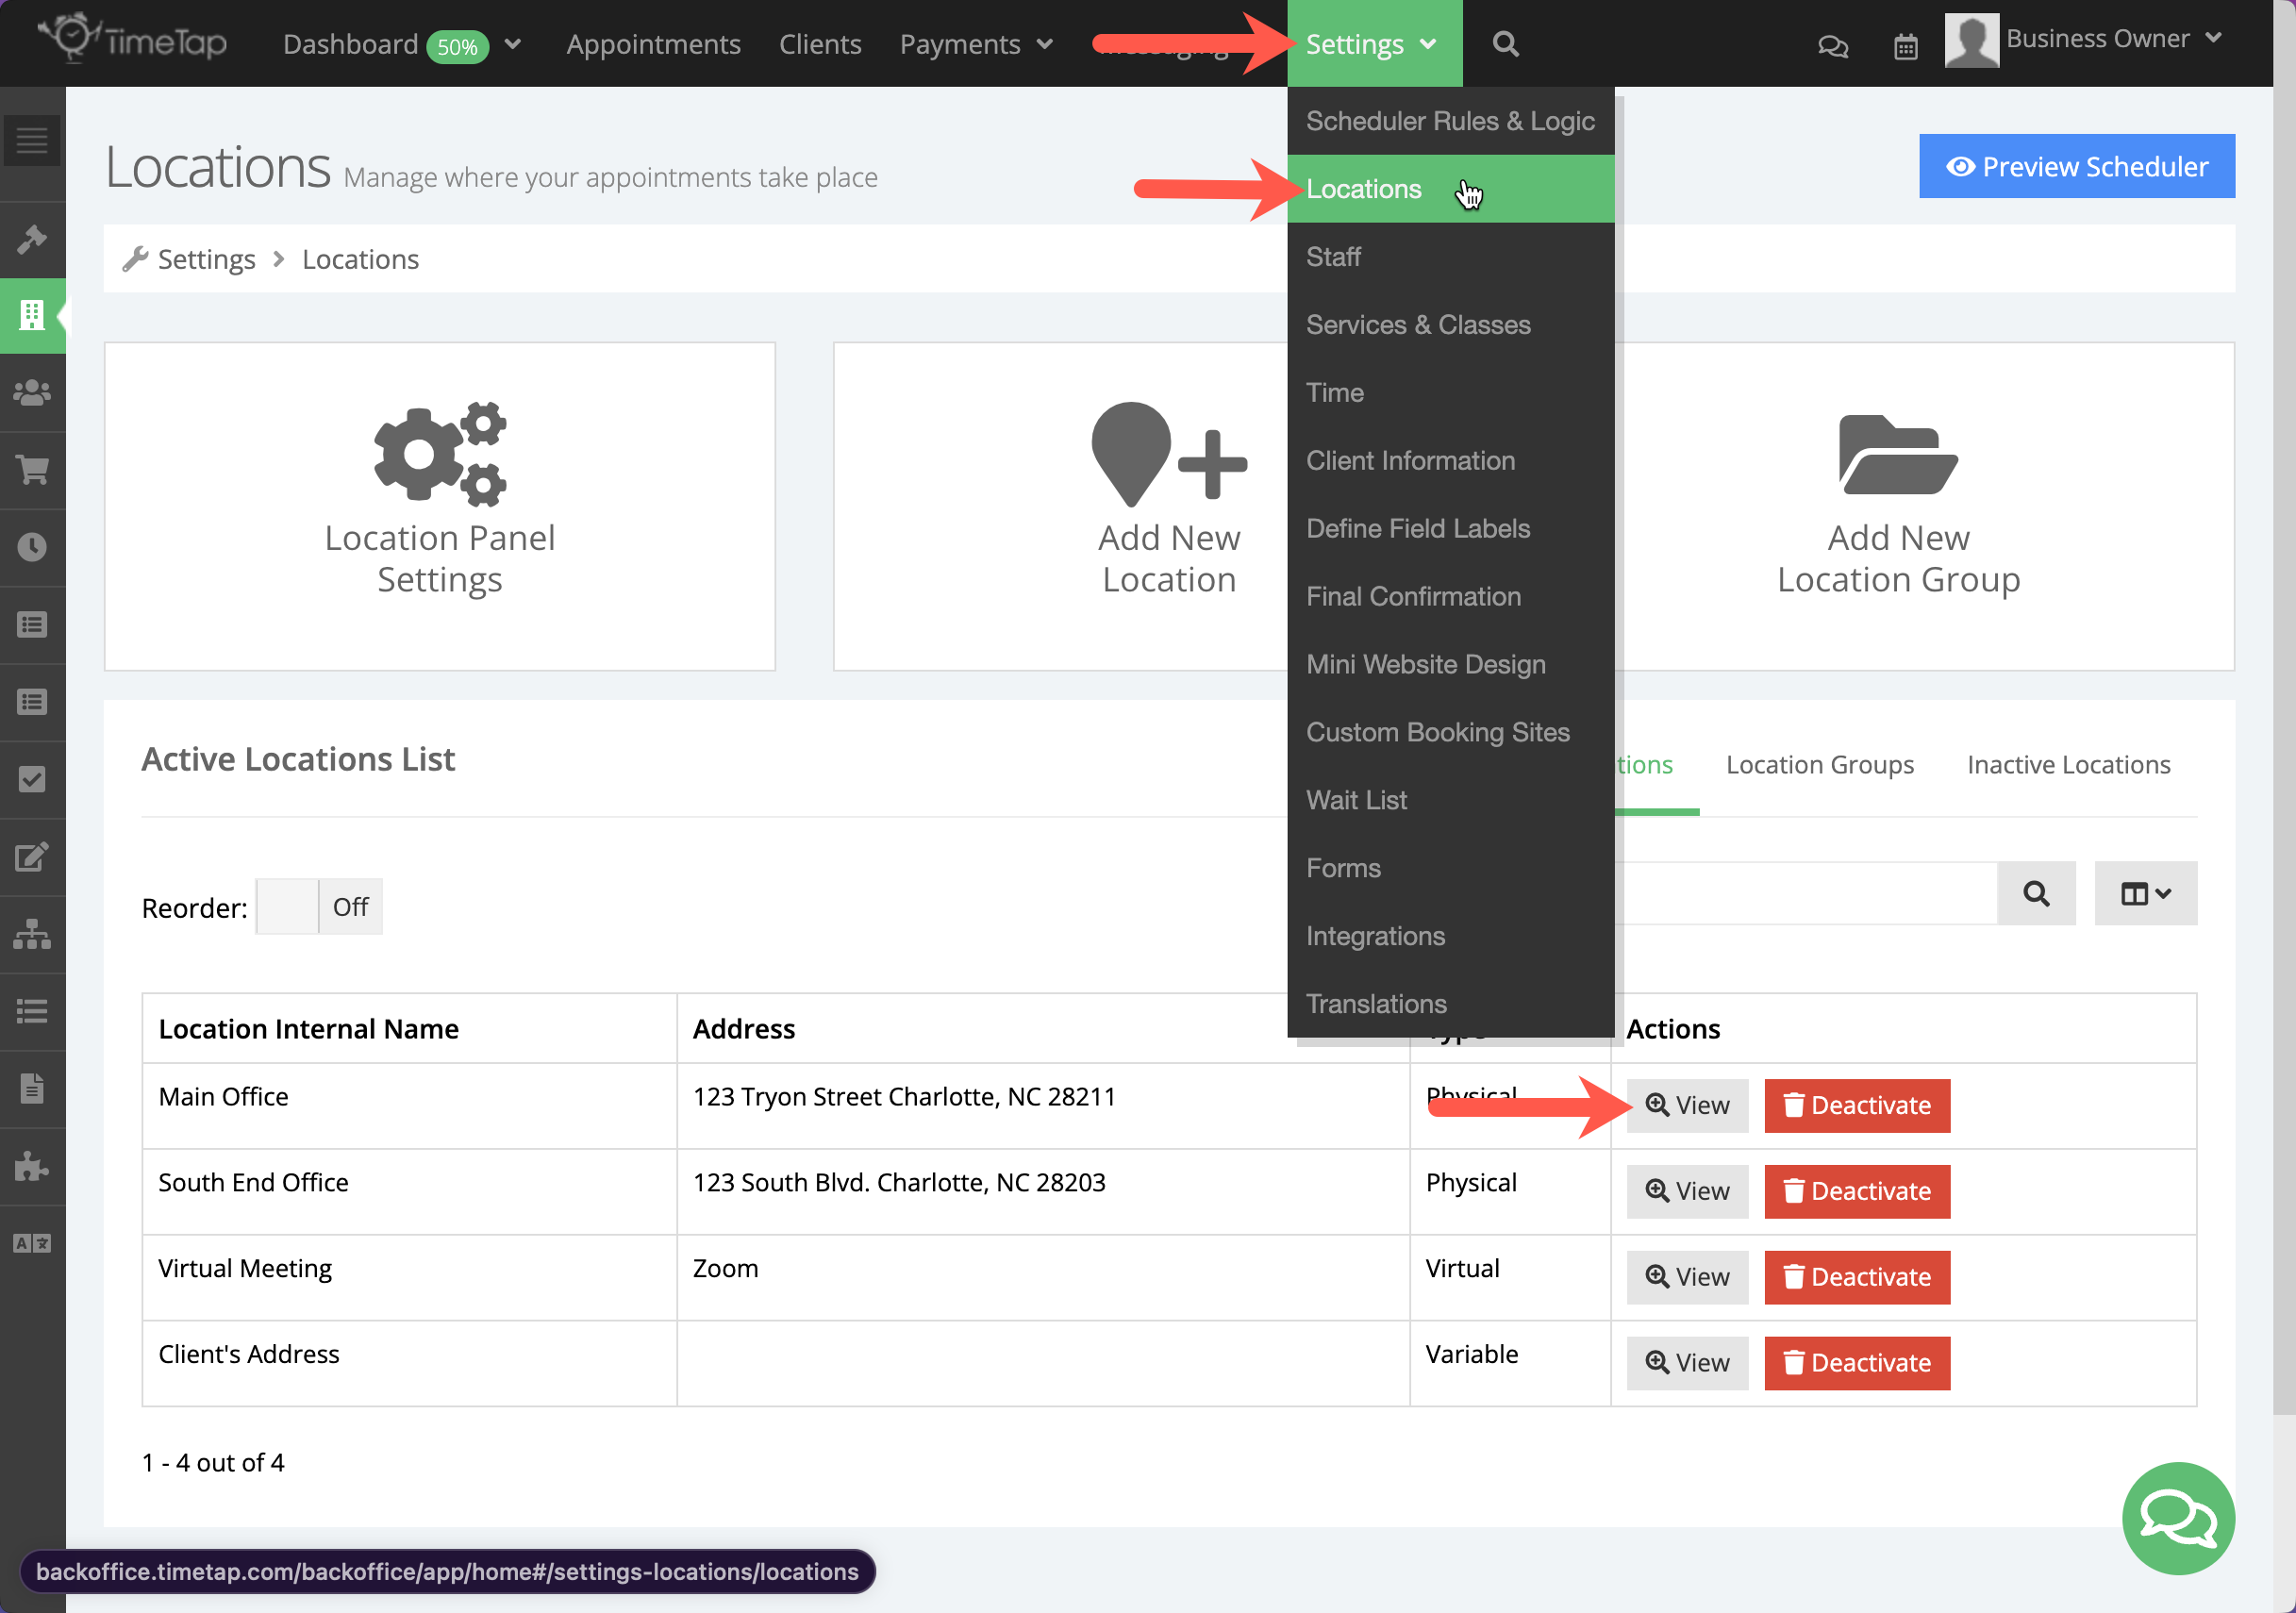
You can access a location's profile by going to
Settings → Locations and clicking
View
to the right of the location
in the list.
Clicking
View
will open up the
location's profile
in
Your Location Profile will open up to
the
Overview
tab
The next tab on your Location Profile is your Service Availability tab. As mentioned above, we discuss how to configure and manage your location's service availability in the next piece of documentation. For now, we'll just say that if you want a quick view of a Location's availability for service based appointments, visit the Service Availability tab in the Location Profile.
The last tab is your Class Schedule tab. This will compile the schedule for all classes that have been assigned to the location.
As mentioned on every other documentation page in the Settings menu, there is a quick link to your mini website to test out any changes you make by clicking the blue "Preview Scheduler" button in the top right. This way after tweaking your location details or customizing your location availability, you can quickly click through your scheduler to make sure that everything looks alright.
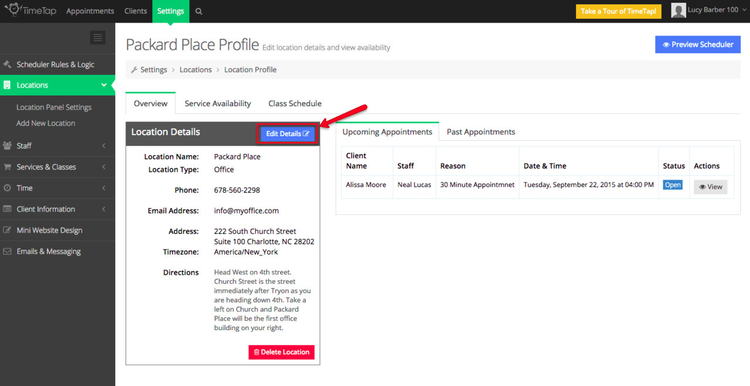
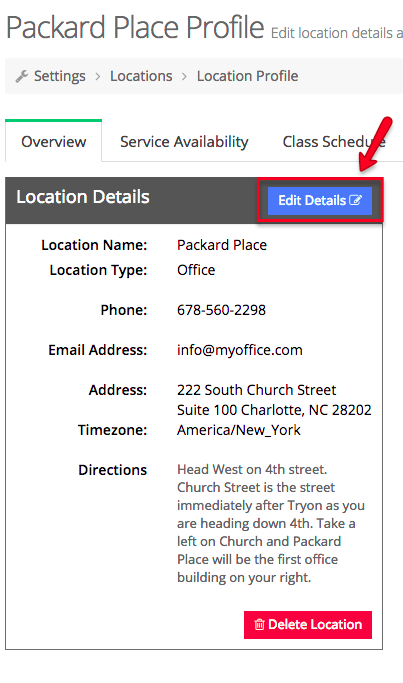
If you open up your location profile by going to Settings → Locations and clicking the "View Details" button to the right of your Location's name, you'll enter into your Location's Profile. On your Location's Profile, you'll see all the different details about your location that you can edit in the "Location Details" box on the left hand side of the "Overview" tab:
These details include: location name, location type, phone number, address, timezone, and directions. To edit
.
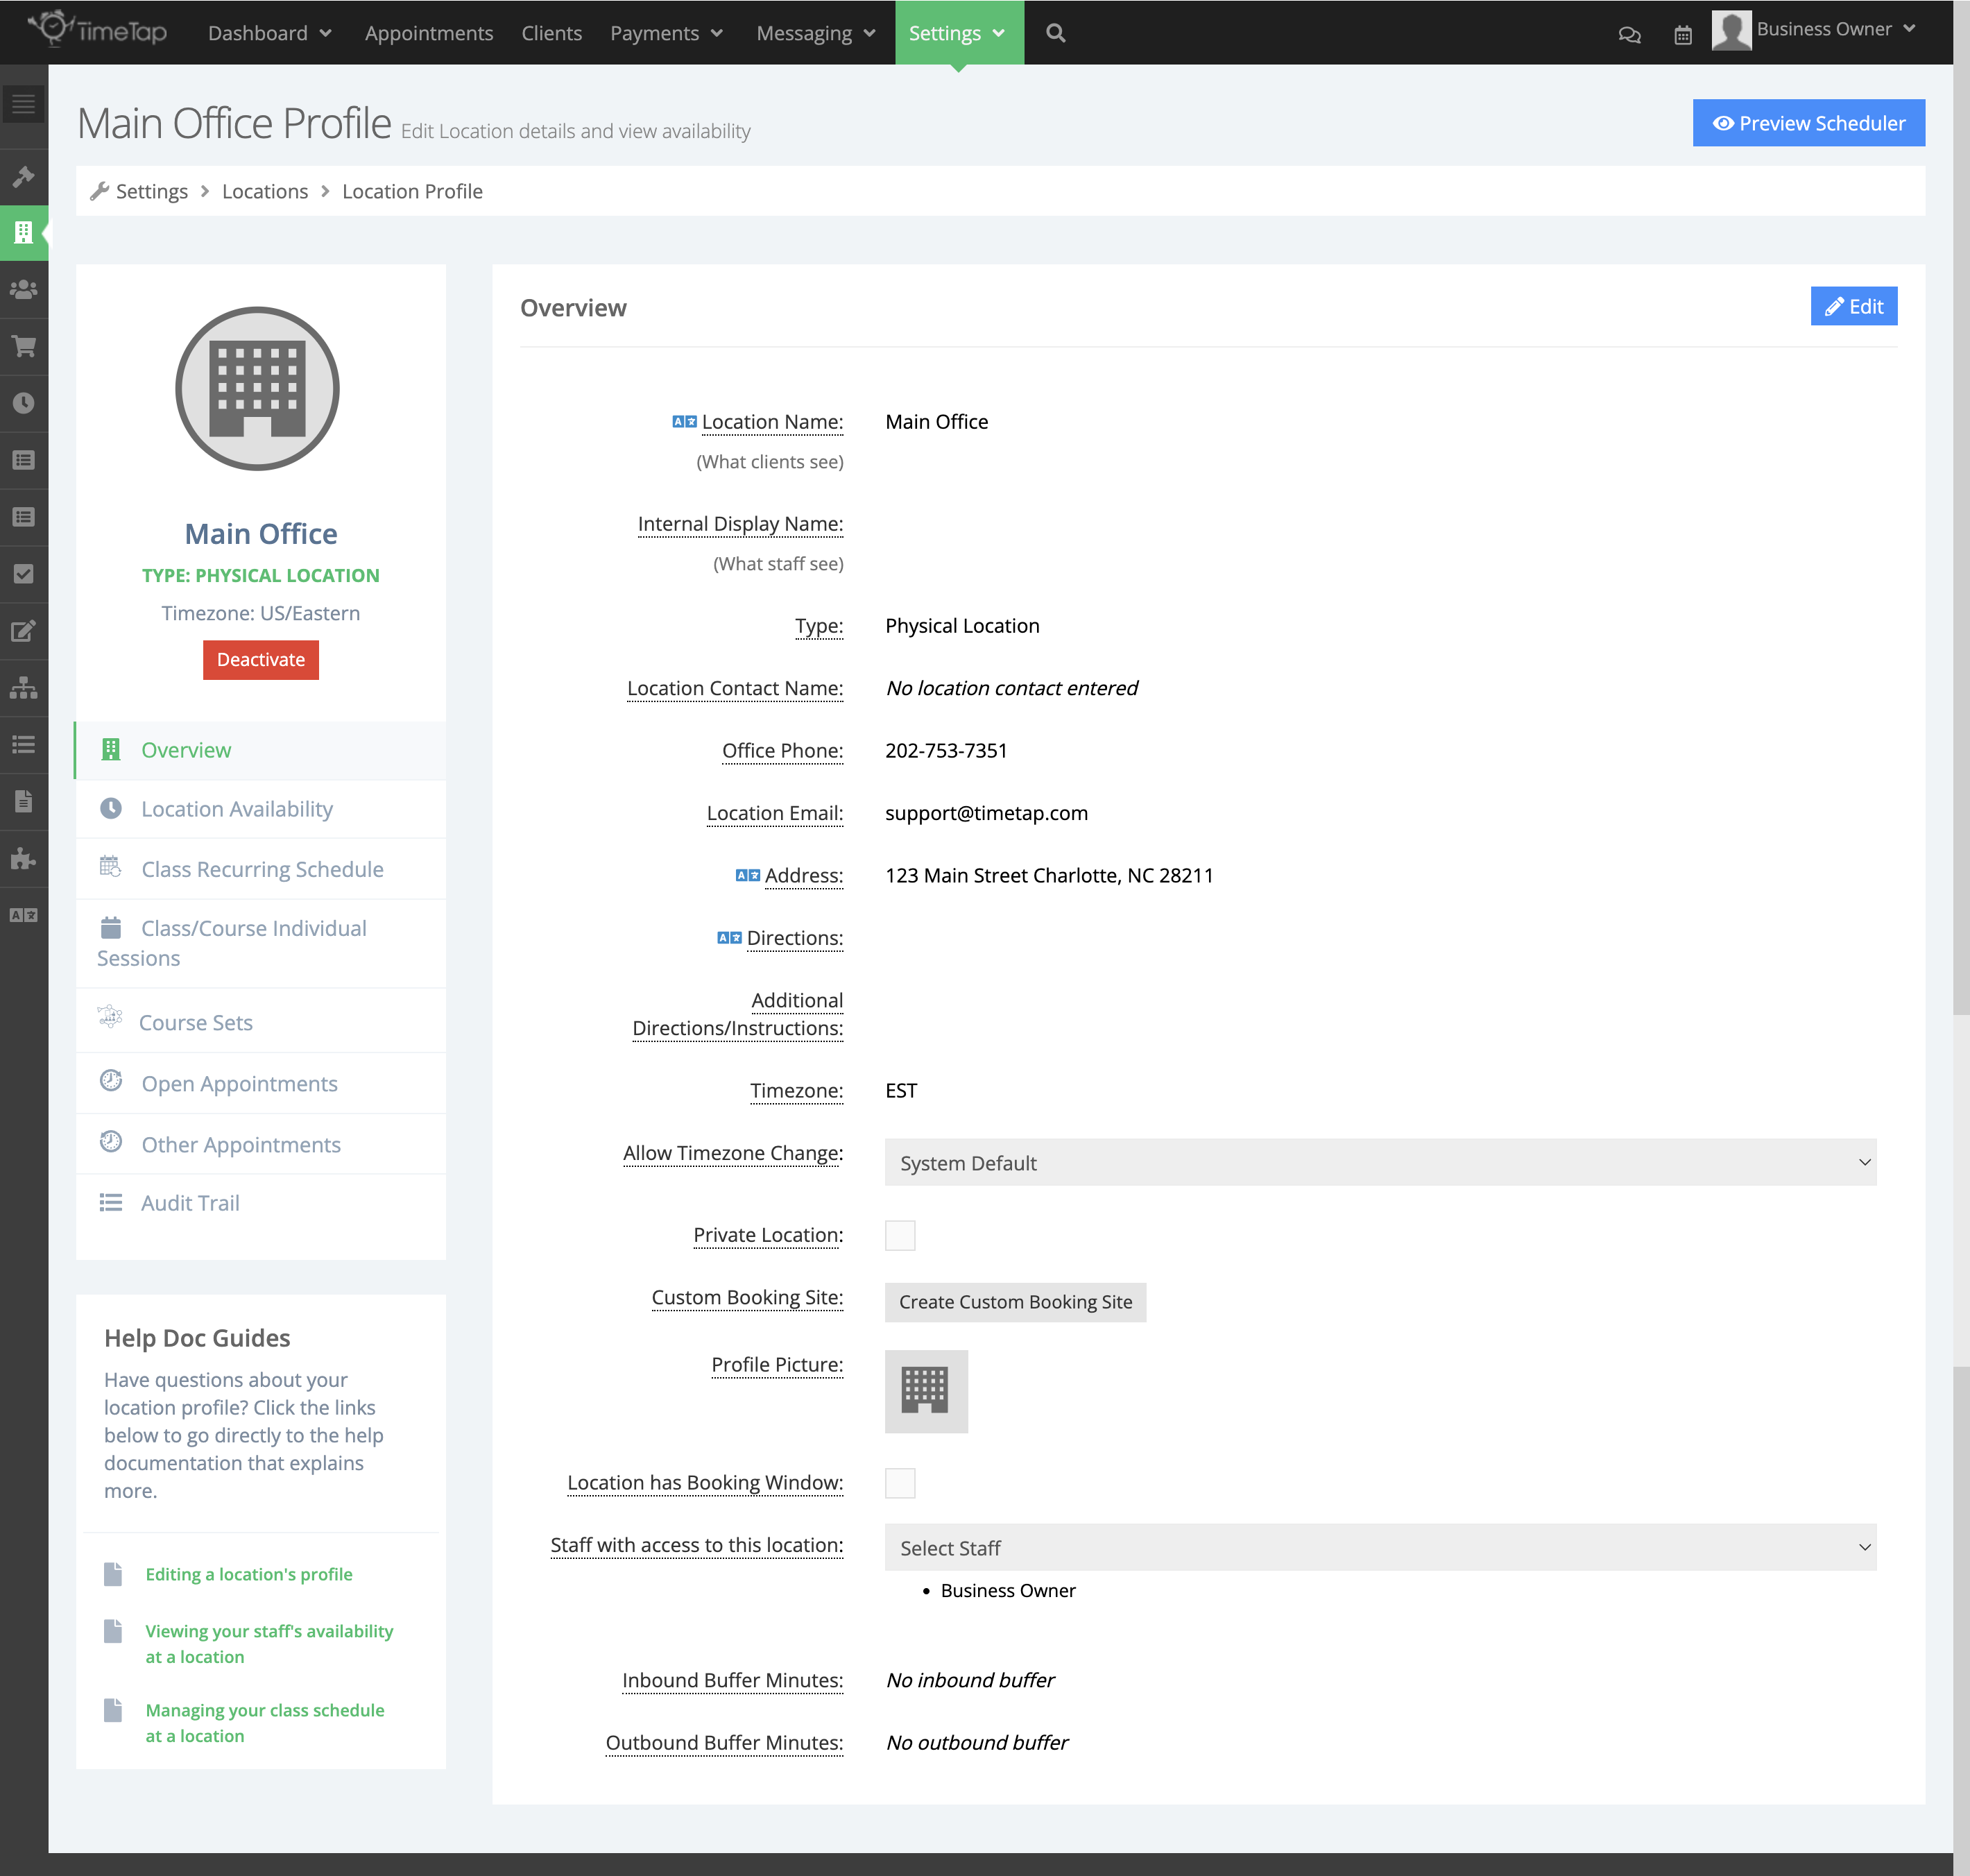
The Overview page of a Location Profile is where you can find and update all of the main details for that location.
To change any of these items, click
Edit
in the top right of
that section
.
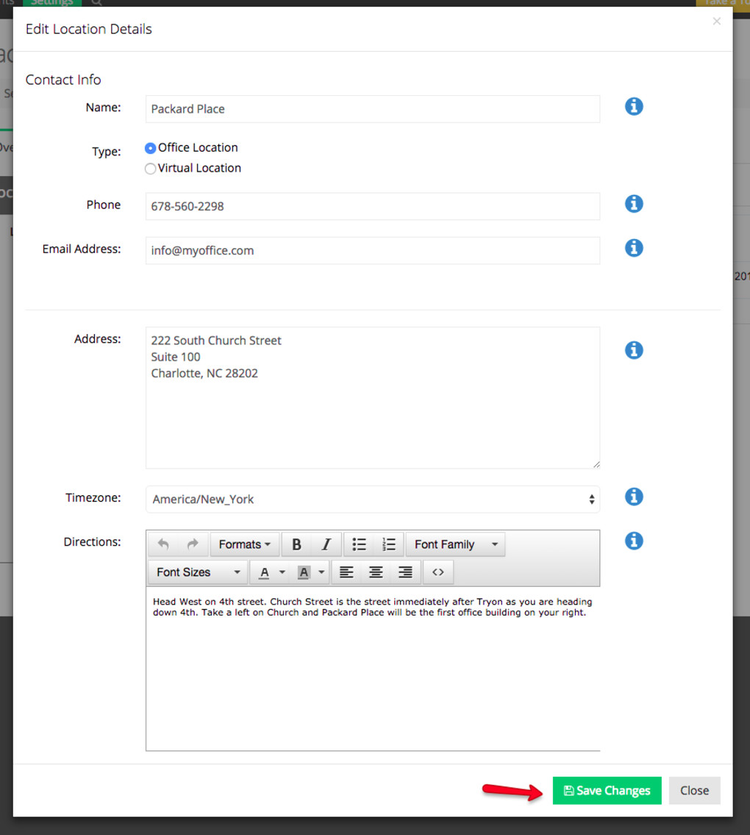
This will bring up the Edit Location Details window where you can make changes to the different aspects of your location. These different aspects include the items listed above. Here's a description of each so you know what you're changing:
Once you you've clicked Edit you will be able to change the following:
Location Name: This displays to clients as the name of where the appointment will be held. It can be included in your email templates or on your appointment saved message
wherever the
%LOCATION_NAME%
tag is used
Internal Display Name: This is the location name that staff will see when they login to the back office. This allows you to give a little more description to the location when your staff are selecting without having to have the same info display to clients. If this field is blank, we will use the name entered in the Location Name field
Type:
Physical Location: where you meet face to face with your clients, like an office building
Virtual Location: a non-physical meeting space, like a phone call or Zoom
Variable Location: indicates that the location where the appointment takes place is different for each appointment. If you travel to your clients' homes or office, this is the option you want to select
Location Contact Name: If you have a main contact for this location, then that information can be included for internal reference when viewing this profile
Office Phone: This phone number can be added to your email templates or to your appointment saved message using the tag %LOCATION_OFFICEPHONE%
Location Email
:
You can put an email address
here to be cc'd on your email templates by
adding the tag %LOCATION_EMAIL% tags to the CC field of a messaging template
Address (for
Physical Locations) or Description (for
Virtual/Variable Locations):
the information put in this field will display to your clients underneath
that location name
in your scheduling flow. It can be included in your email templates with the tags %LOCATION_ADDRESS% or %LOCATION_DESCRIPTION% (these tags are interchangeable, so if you use %LOCATION_ADDRESS% it will pull up whatever was entered in either the location address or description field for the location
)
Directions: If you choose to include Directions on your location profile, these directions will show up by default in the New Appointment Emails as well as the Appointment Edited/Rescheduled Email that clients receive. They show up underneath the location address toward the bottom of the email message. You can also embed them
in the
Final Confirmation page Saved Messages using the tag %LOCATION_DIRECTIONS% (Settings > Final Confirmation)
Additional Directions/Instructions: If there are additional or alternate directions that you want to show to your clients in your email notifications, you can fill those in this field and include them in your email templates using the tag %LOCATION_INSTRUCTIONS2%
Timezone: If your location is in a different timezone than your main business, you can set that here for this individual location so appointment times display to clients in that location's timezone
Allow Timezone Change: Choose to allow clients to change the timezone, not change timezones, or not display the timezone at all when they are booking appointments for this location
Private Location: By selecting this checkbox, this location will only be shown on the booking site links that are set to show private locations and in the Backoffice when staff are scheduling appointments for clients.
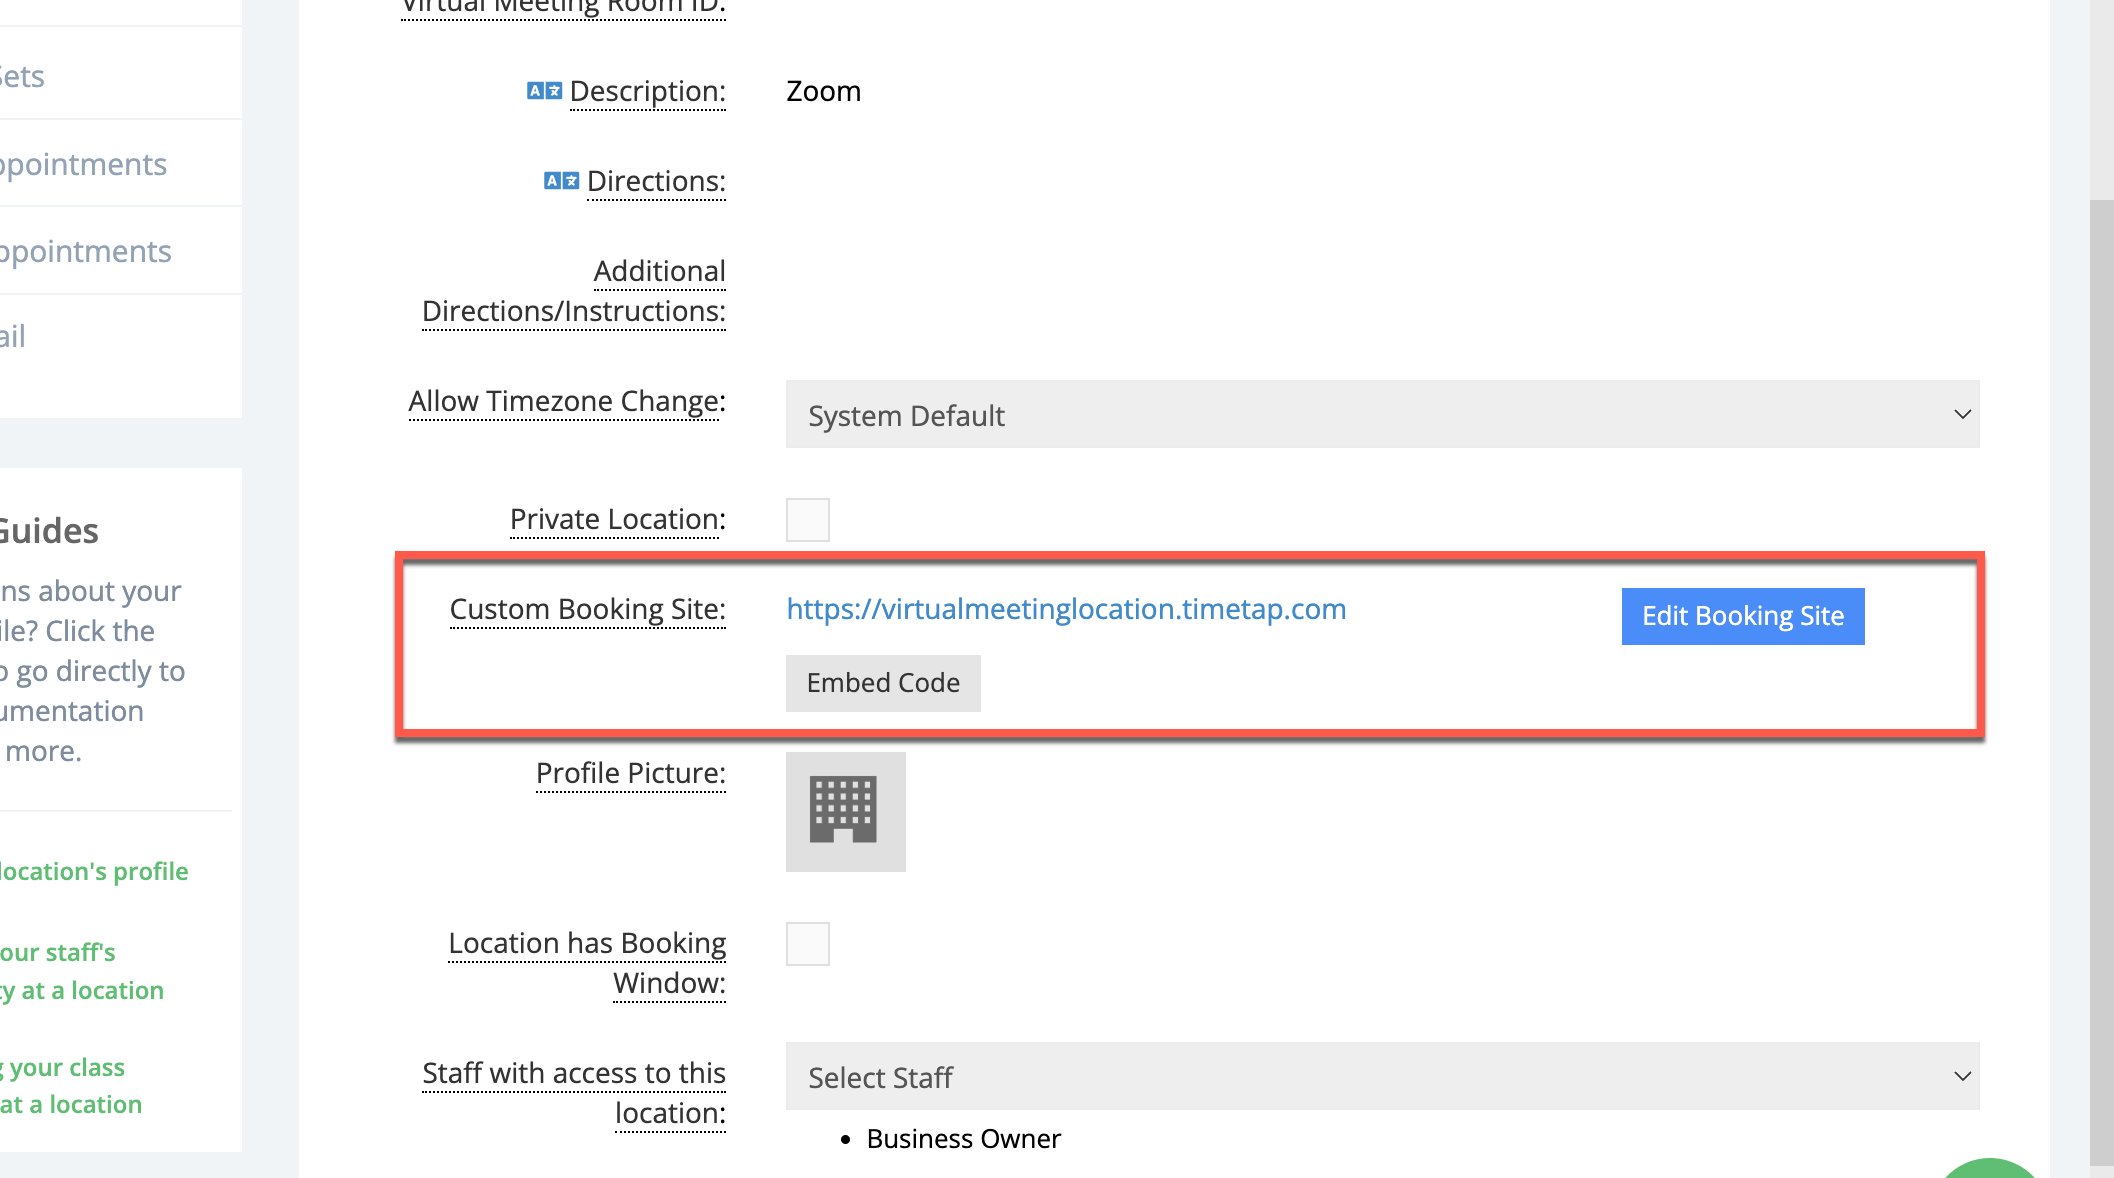
Custom Booking Site: Easily create a booking site specifically for this one location. When a booking site is created from within a Location Profile, that site can only show any staff members that offers availability at that location and any services that are set to be offered at that location.
If you need to create a booking site that shows a different combination of staff or services than are typically offered when this location is selected on your Default Booking Site, then you will want to instead build a Custom Booking Site from scratch to have full control over the options offered through that scheduler (Settings > Custom Booking Sites > Add New Booking Site). Business accounts can also customize the URL/webhandle for booking sites instead of using the alphanumeric combination that is assigned upon creation. Business subscriptions also have access to the Customizations section of each Booking Site Profile (Settings > Custom Booking Sites > View) where other items like the Panel Flow, Welcome Text, and Logo can be changed for that specific scheduler.Status colour Green title BUSINESS PLAN FEATUREs
Profile Picture: You can upload a profile picture for this location, which will be visible as your clients are going through your scheduler and select a location
Location has Booking Window: If you only want clients to be able to see and book at this location on your scheduler between certain dates, select this checkbox and enter the start and end dates in the Booking Begins/Ends On fields that will appear below after this option is enabled. This is not the same as Location Availability - you can think of Location Availability as the date and time that appointments can be scheduled for, whereas the Location Booking Window decides the dates when clients can actually see that availability on the scheduler to schedule their appointment. Once outside the dates in this booking window, that Location will no longer be visible on your booking sites.
Staff with access to this location: This field will show a list of any staff members who have access to see this location when logged into the Backoffice
Inbound Buffer Minutes:
: If you travel between locations and want to have some time upon arriving at this location to get setup before your appointment, put the time in minutes in this field. You can read more about how to utilize this feature here.Status colour Green title BUSINESS PLAN FEATURE Outbound Buffer Minutes:
: If you travel between locations and want to have some time when leaving this location to get your bags packed and get to your car, put the time in minutes in this field. You can read more about how to utilize this feature here.Status colour Green title BUSINESS PLAN FEATURE
The following are not editable but appear in the Overview tab:
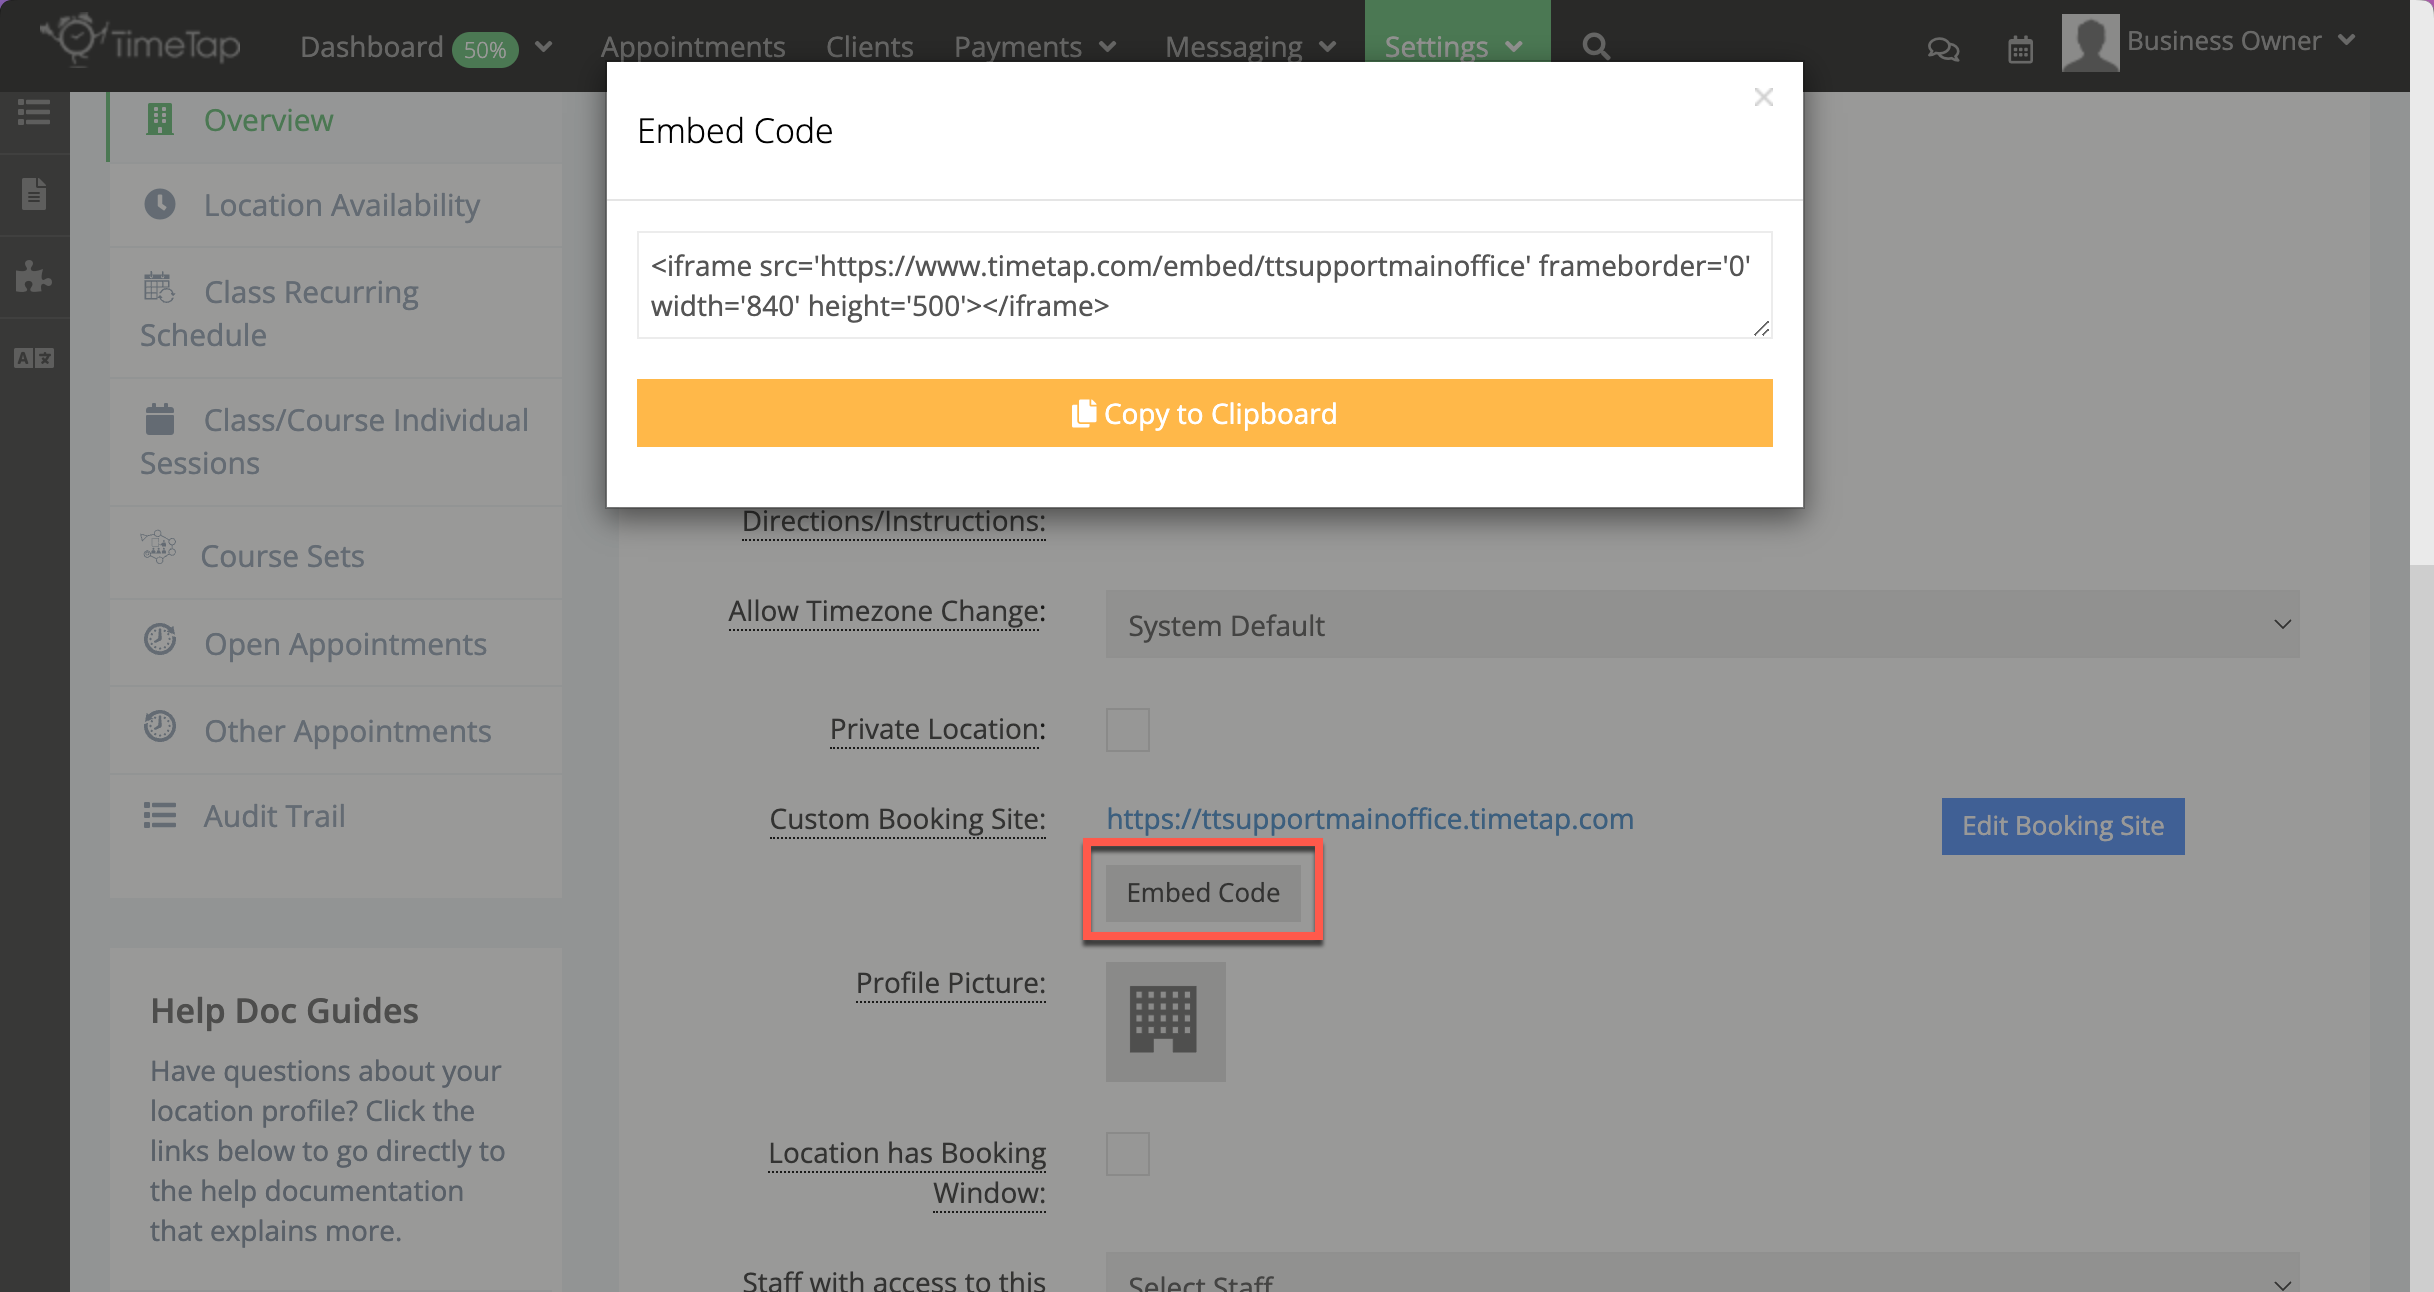
Embed Code: This the code that will allow you to add your scheduler to your website or Facebook profile.
Once you are done making changes, press the "Save
" button at the bottom of the screen.
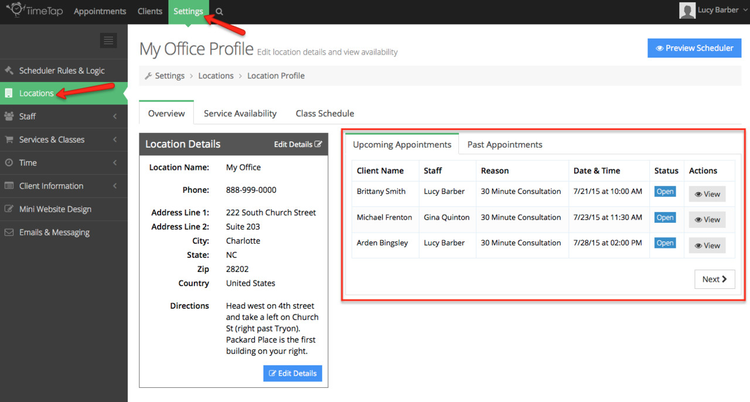
On the right hand side of the Location Profile Overview tab, you'll see your Upcoming & Past Appointments table:
The appointments that will display in your Upcoming Appointments tab are all those listed in either Open or Checked In status. All the appointments that display in the Past Appointments tab have been marked either Completed, No Show, or Cancelled.
| Info |
|---|
You’ll find the Preview Scheduler button in the top right corner of most of the Settingspages in the Backoffice that can be used to access your Default Booking Site to test out any changes you make. After updating your location details or customizing your location availability, you can quickly click through your scheduler to make sure that everything looks as expected. |
Your services, your staff, and (as mentioned here) your locations all have something called a Custom Booking Site and Embed Code on their profiles. What are custom booking sites and Embed codes for these specific profiles?
Well your main scheduler on your mini website (also called the Default Booking Site) lists all of your staff, services, and locations that a client could possibly book. The Default Booking Site will show the general availability for any locations, staff, or services/classes/courses that are not set as private.
When creating a custom booking site from within a location, staff, or service profile, a client would only see that service to book, that staff to book with, or that location to book their appointment at (depending on which URL they're visiting).
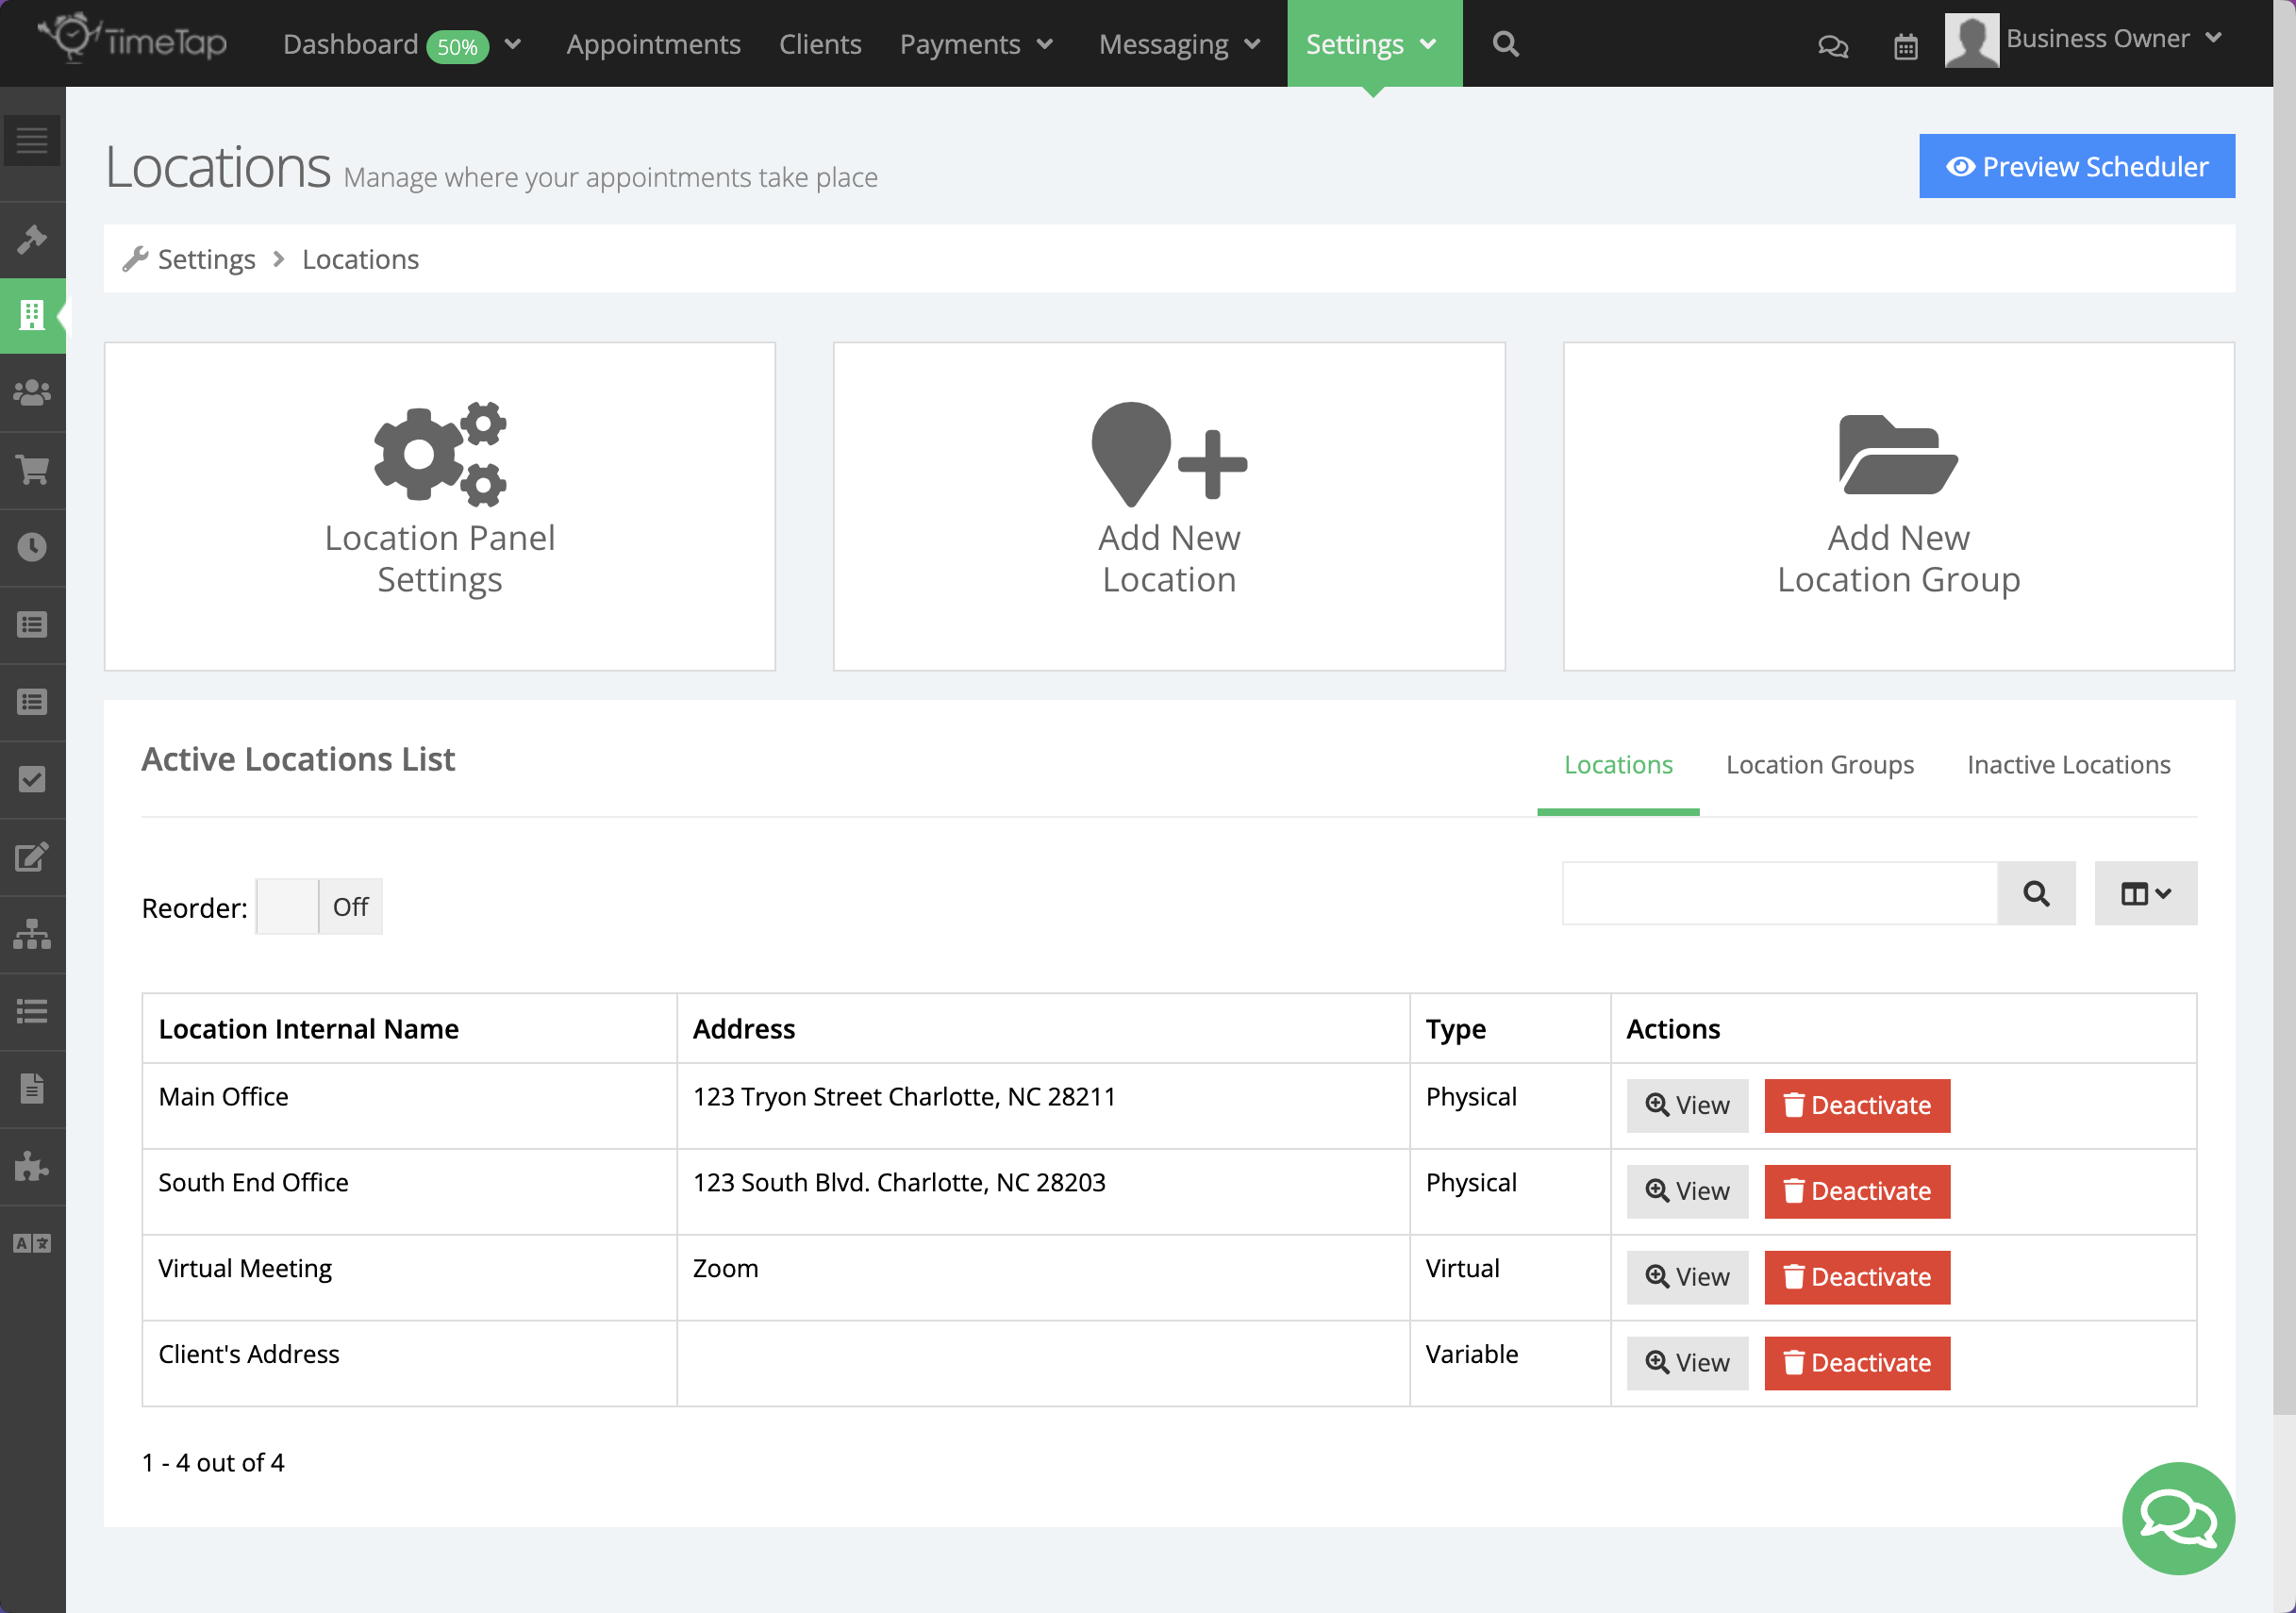
For example, four locations are set up on Locations list below. People could visit the main scheduling page and book at a physical office location (Main Office or South End Office), they could book a Virtual meeting, or the appointment could take place at their location.
If you know a user would only want to schedule Zoom call with you and you wanted to only provide them booking options at the Virtual Meeting location, then you could send them the custom booking site URL for the Virtual Meeting location. To do this, View the Virtual Meeting location profile and select the Create Custom Booking Site button. You will then be redirected to a new page where you can:
Assign an internal name to the Custom Booking Site (the name staff will see for this site in the Custom Booking Site list)
Choose the webhandle (the customizable part of the booking site URL clients will visit to get to this booking site)
Status colour Green title BUSINESS PLAN FEATURE Decide whether you want the Custom Booking Site to be public-facing yet or not (for example, if you are just staging it for the time being, you can leave it unchecked and decide to mark it as published when you're ready for it to launch)
You'll only need to create that Custom Booking Site one time - you can access it again under the Custom Booking Site field of the location profile. You'll also see quick links there to embed that specific URL, as well as edit the profile for the site you created (that would be where you can make the site public if you hadn't done that previously)!
Have more questions on embedding that Custom Booking Site? The process for embedding the private scheduler for a location is the same as embedding the main scheduler. Just the code you would use would be slightly different to accommodate for the fact that it is a private scheduler for just that location.
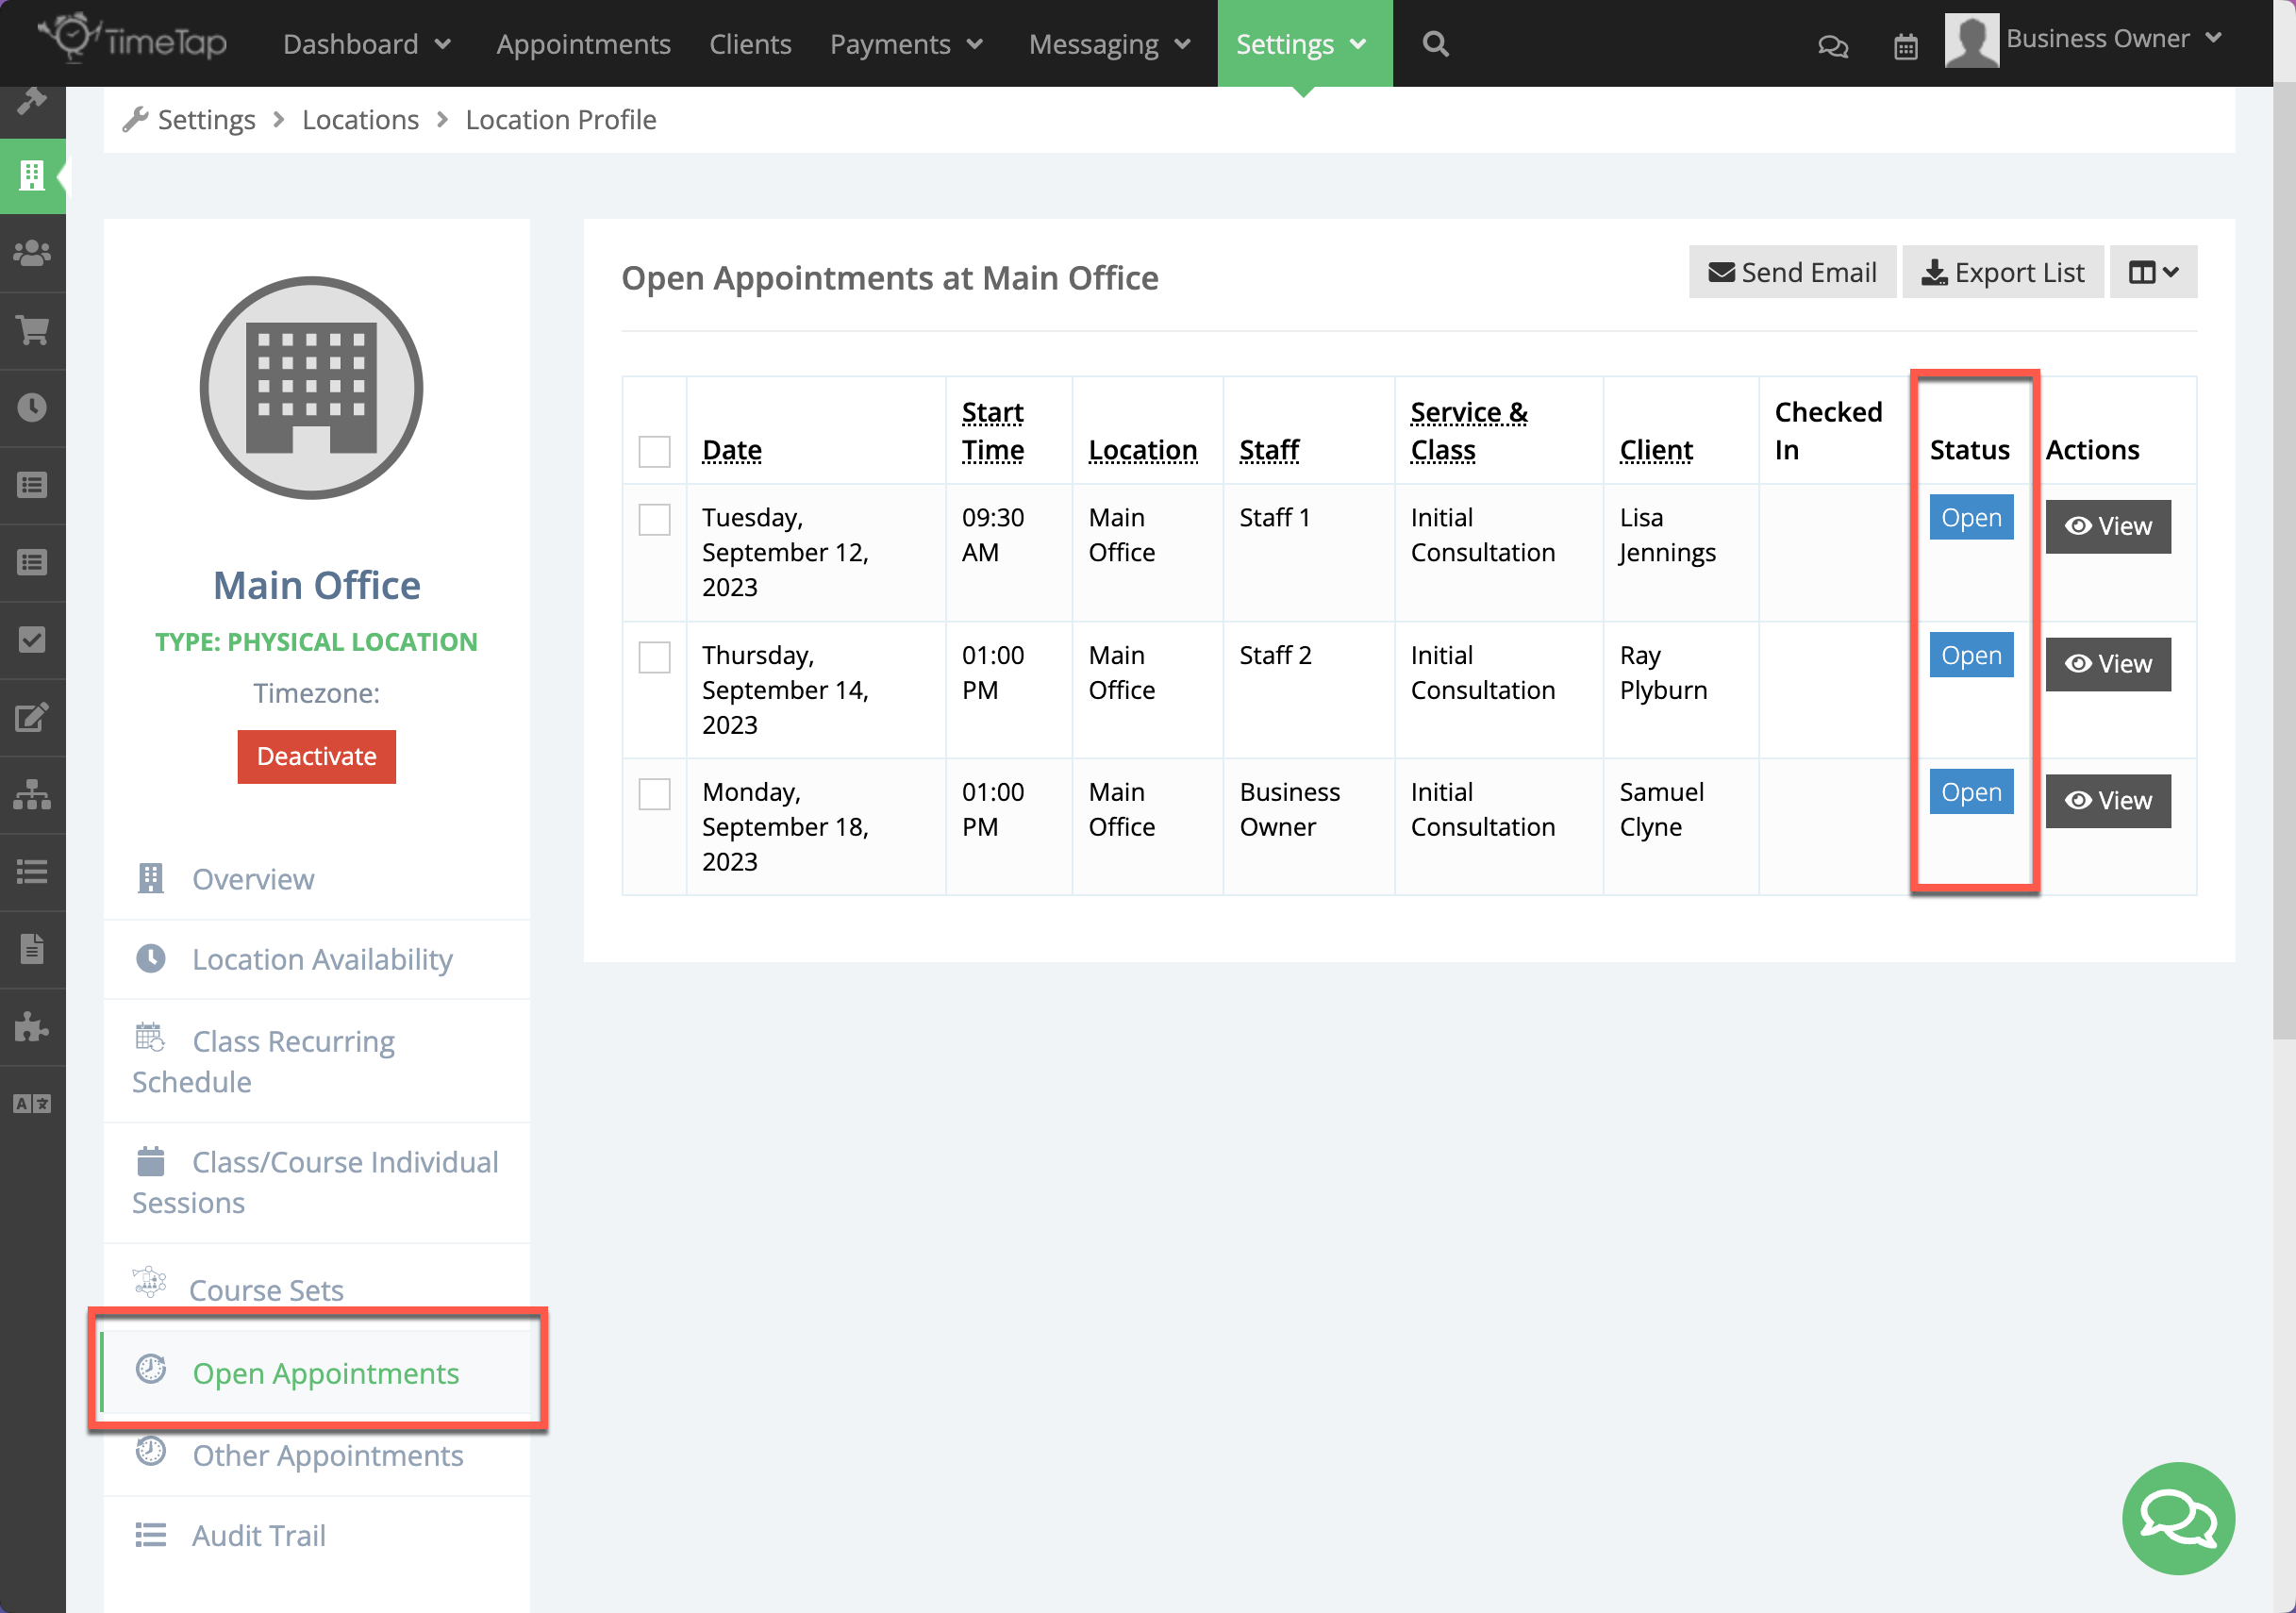
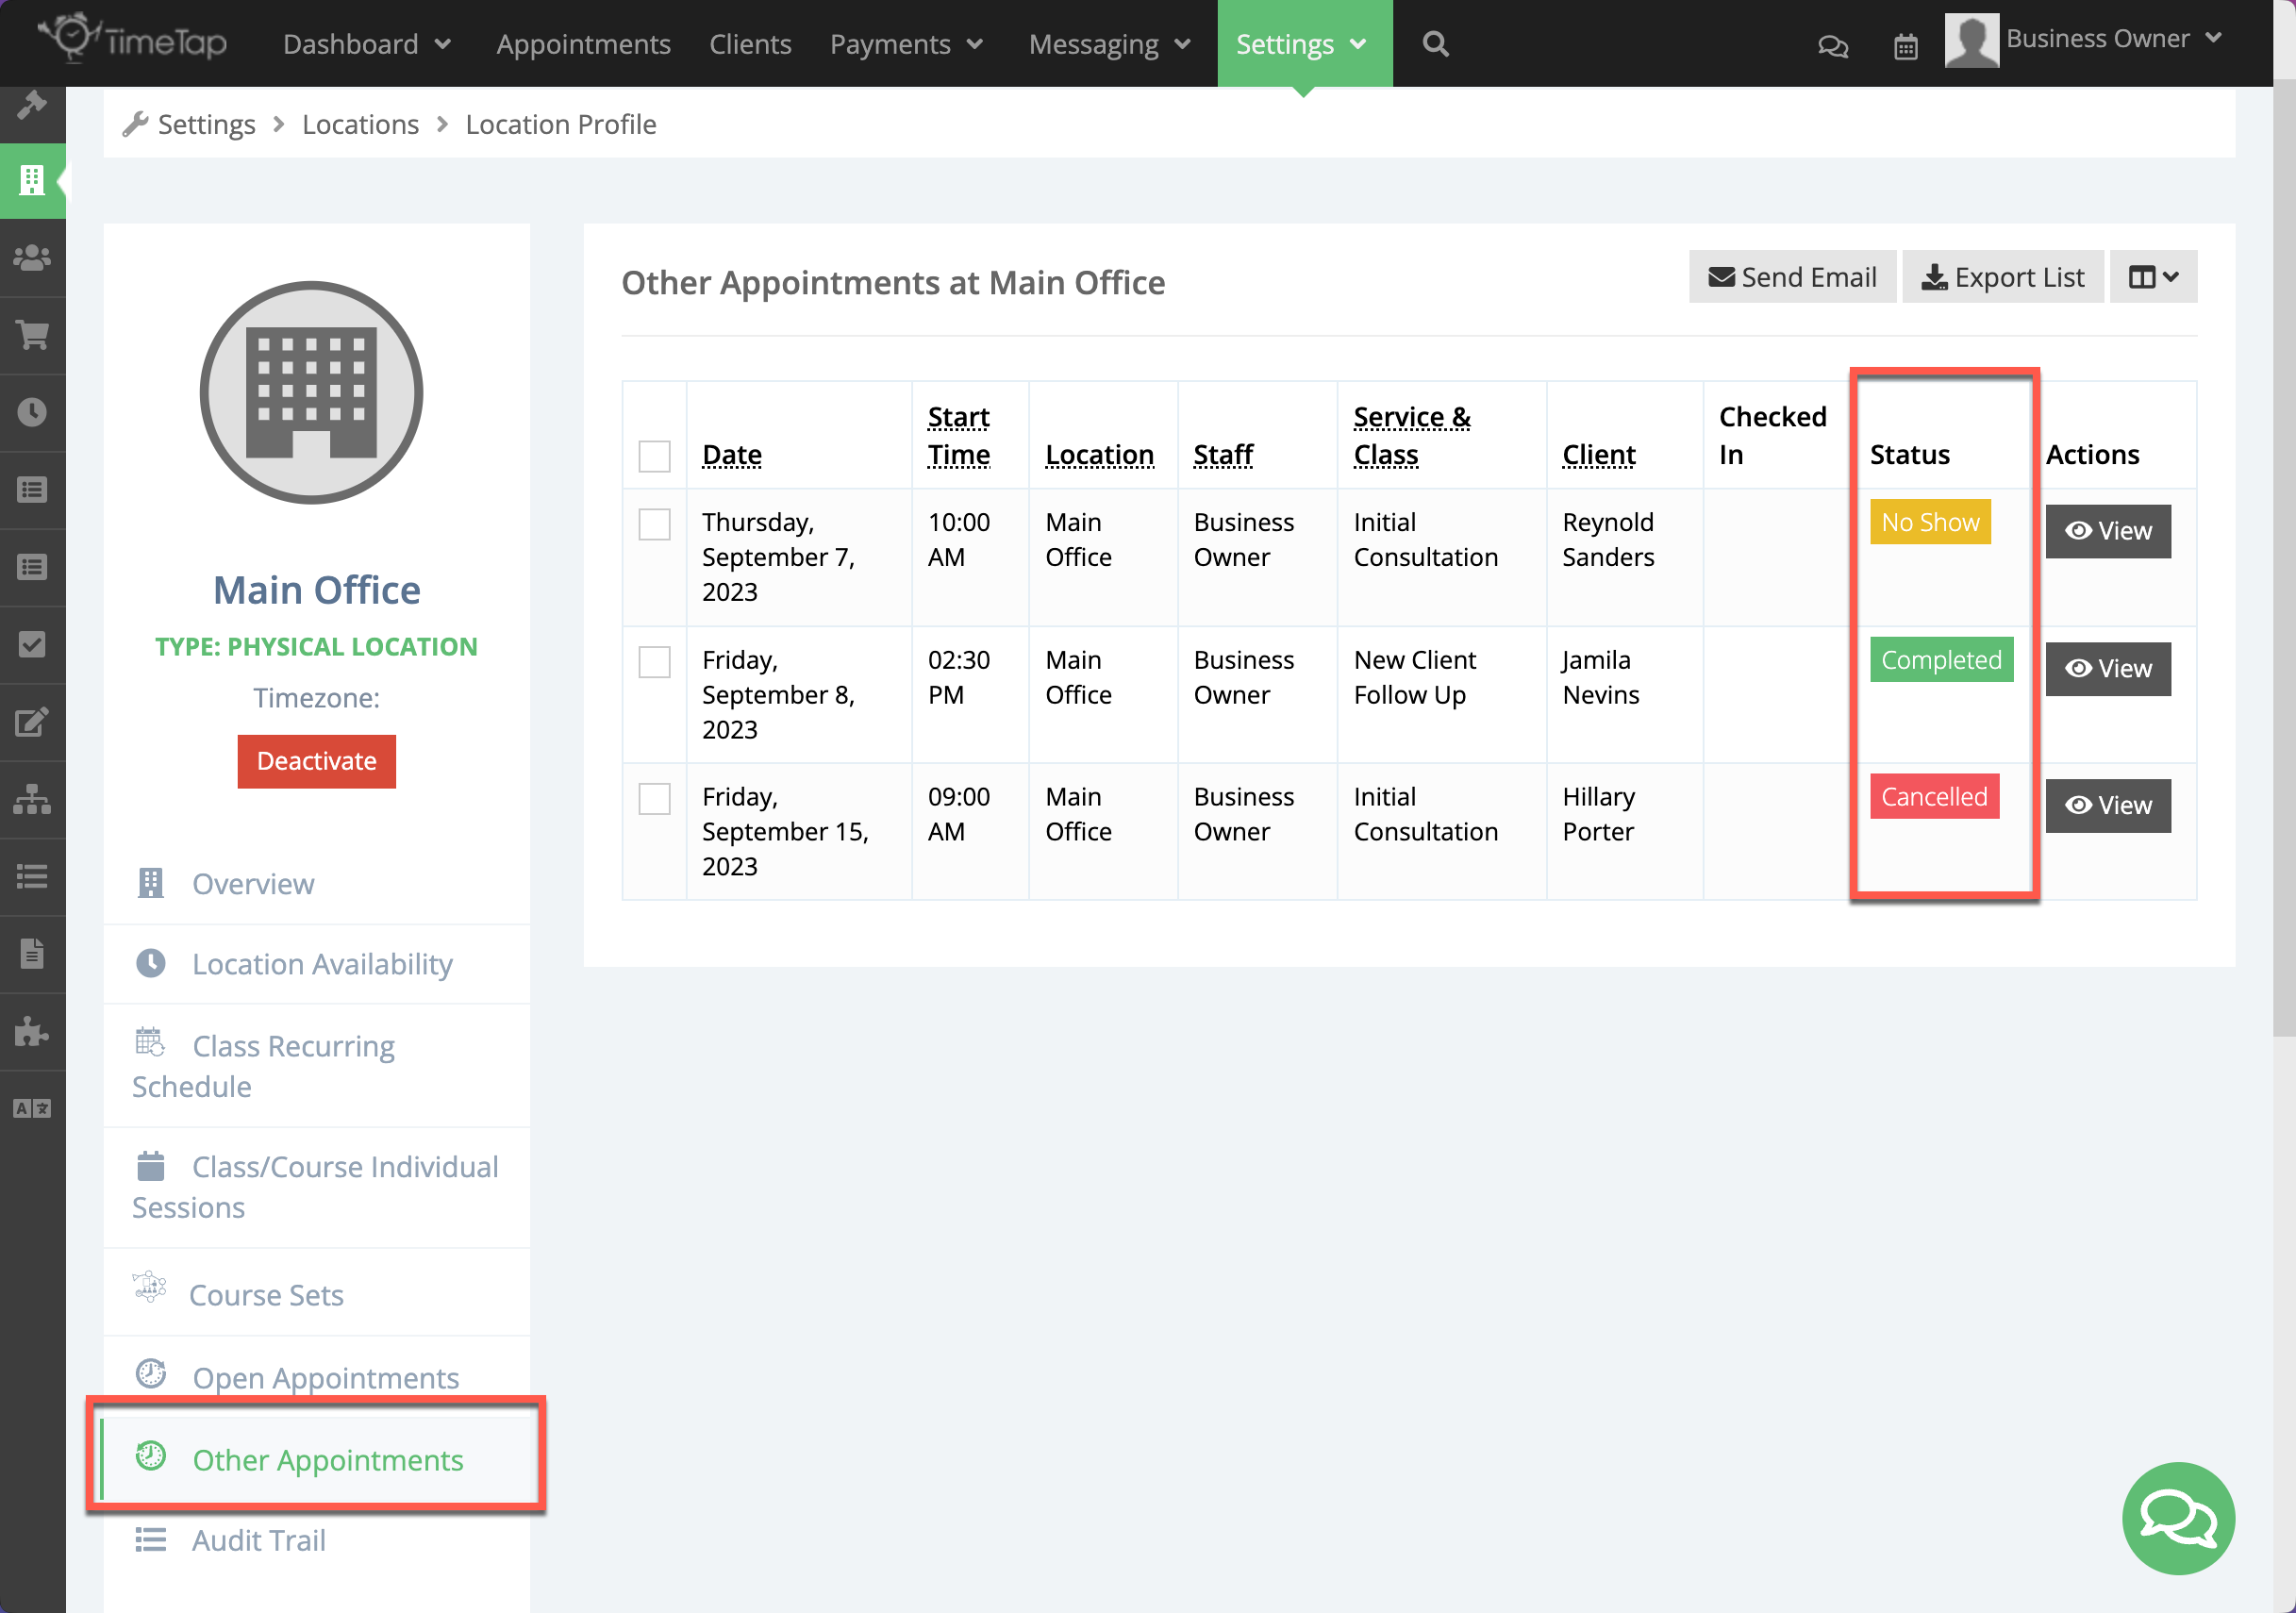
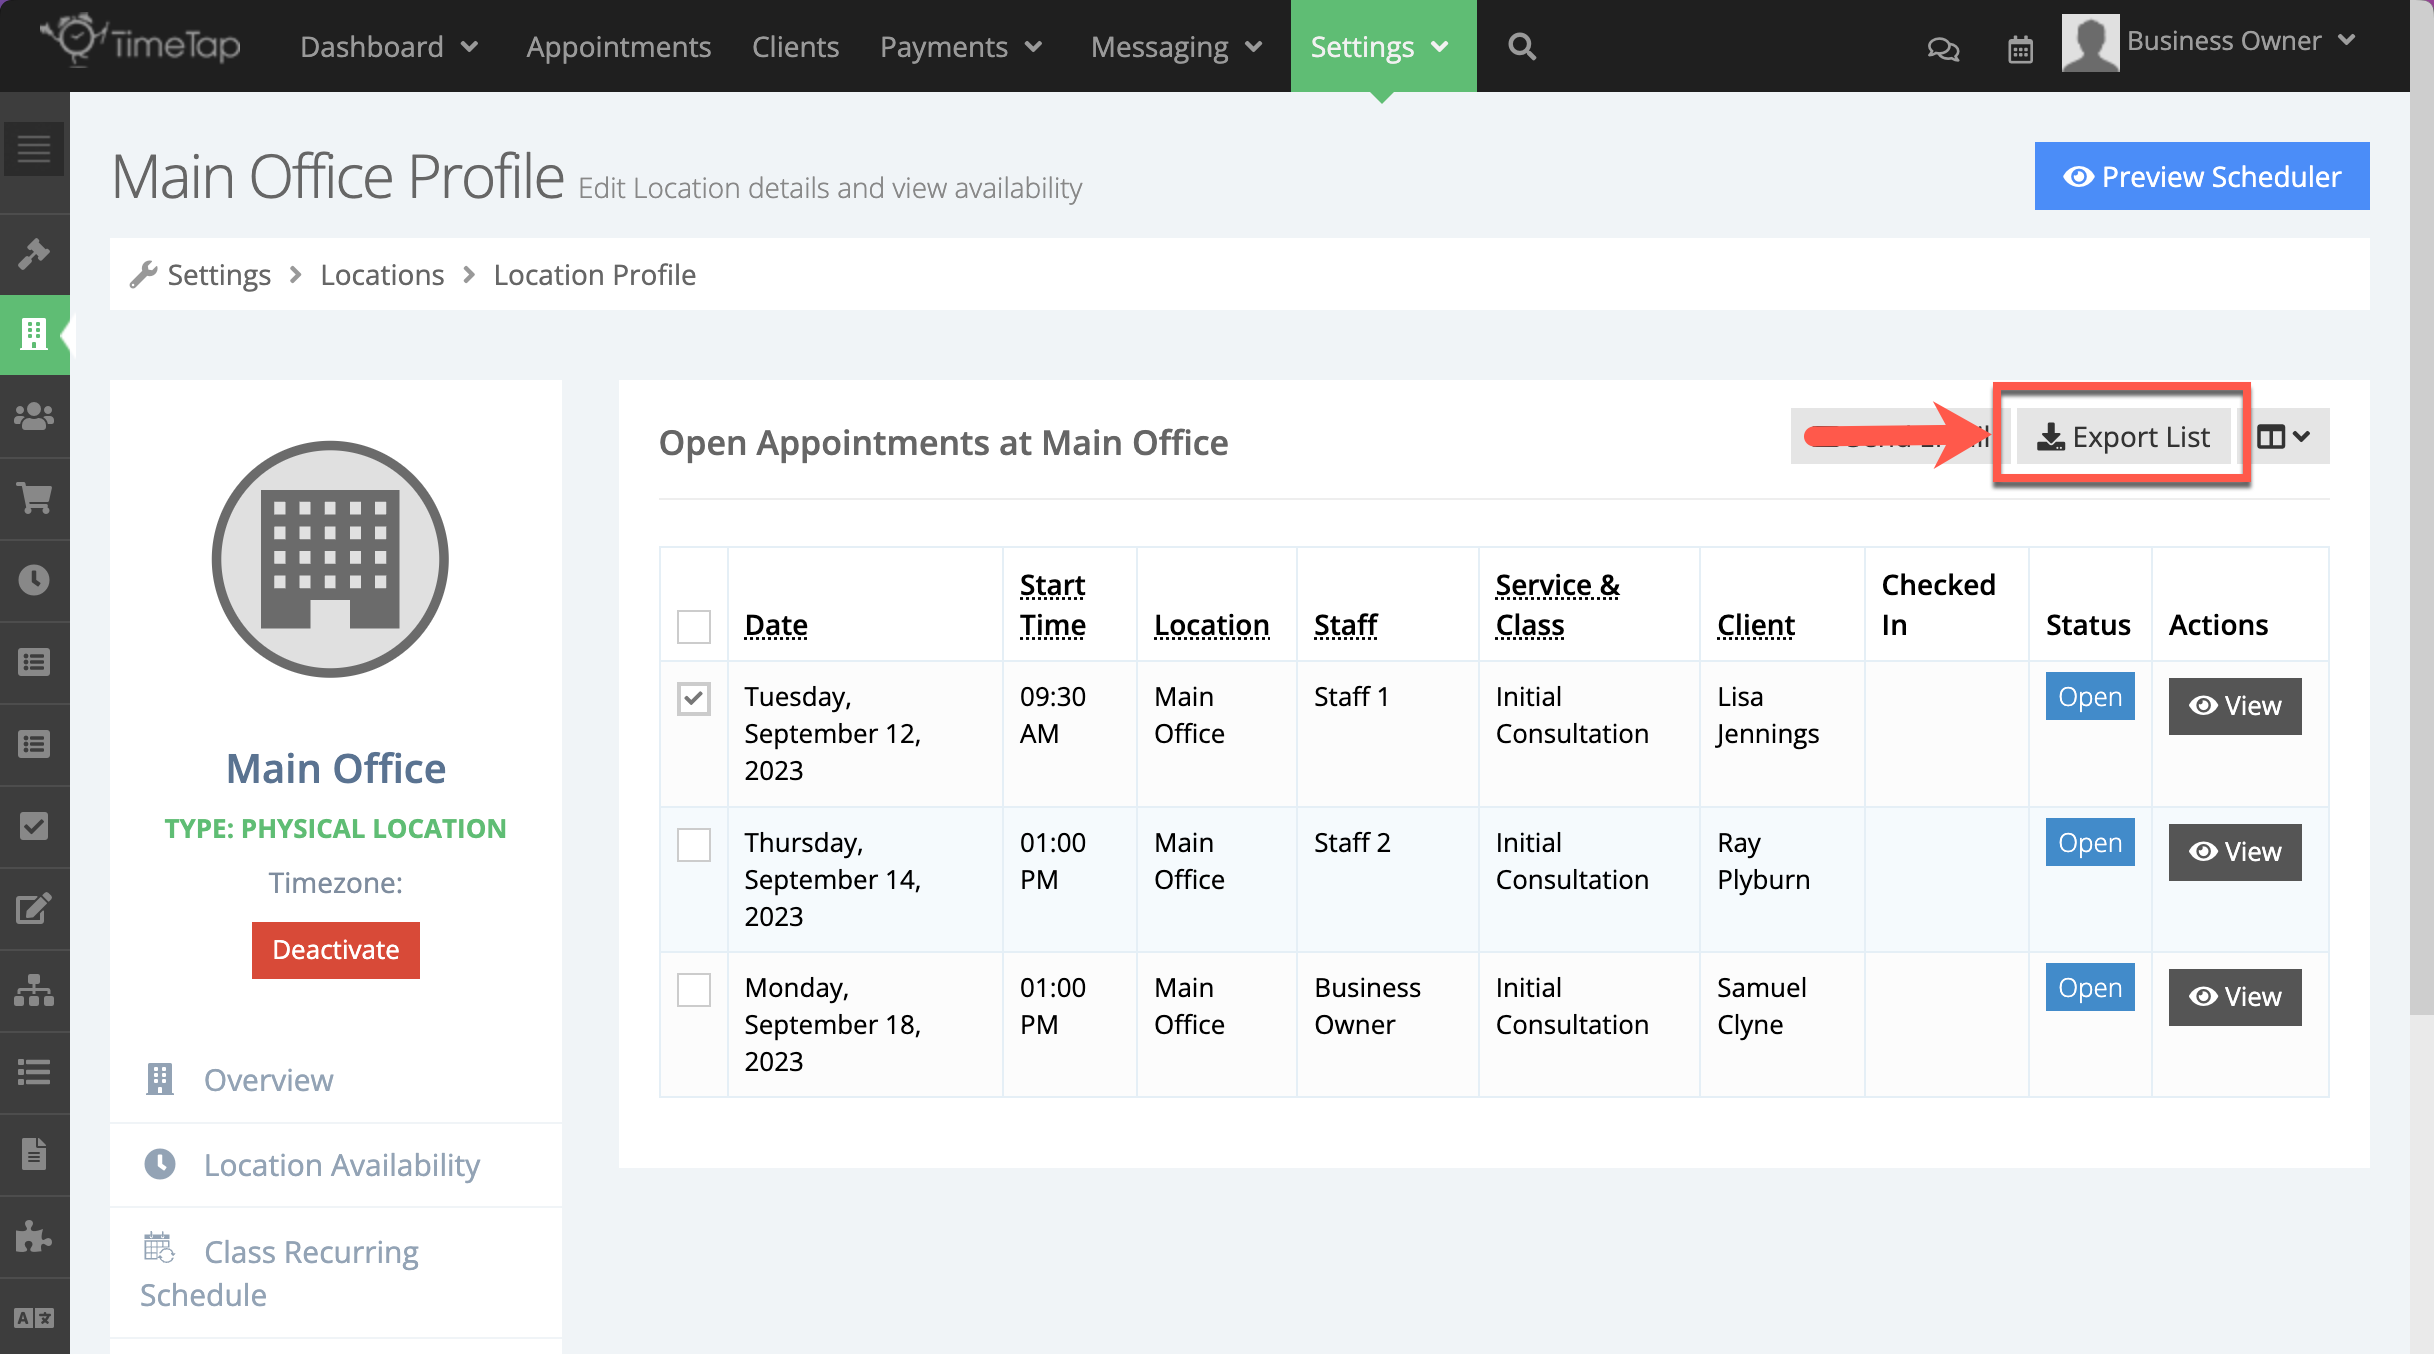
The Open Appointments and Other Appointments tabs will allow you to see upcoming and past appointments for that specific location.
Open Appointments: shows all appointments in an Open status at that location
Other Appointments: shows all appointments in a Cancelled, No Show, and Completed status at that location
You can see the full details for any appointment in the list by selecting View.
Emailing a client from the Appointments List
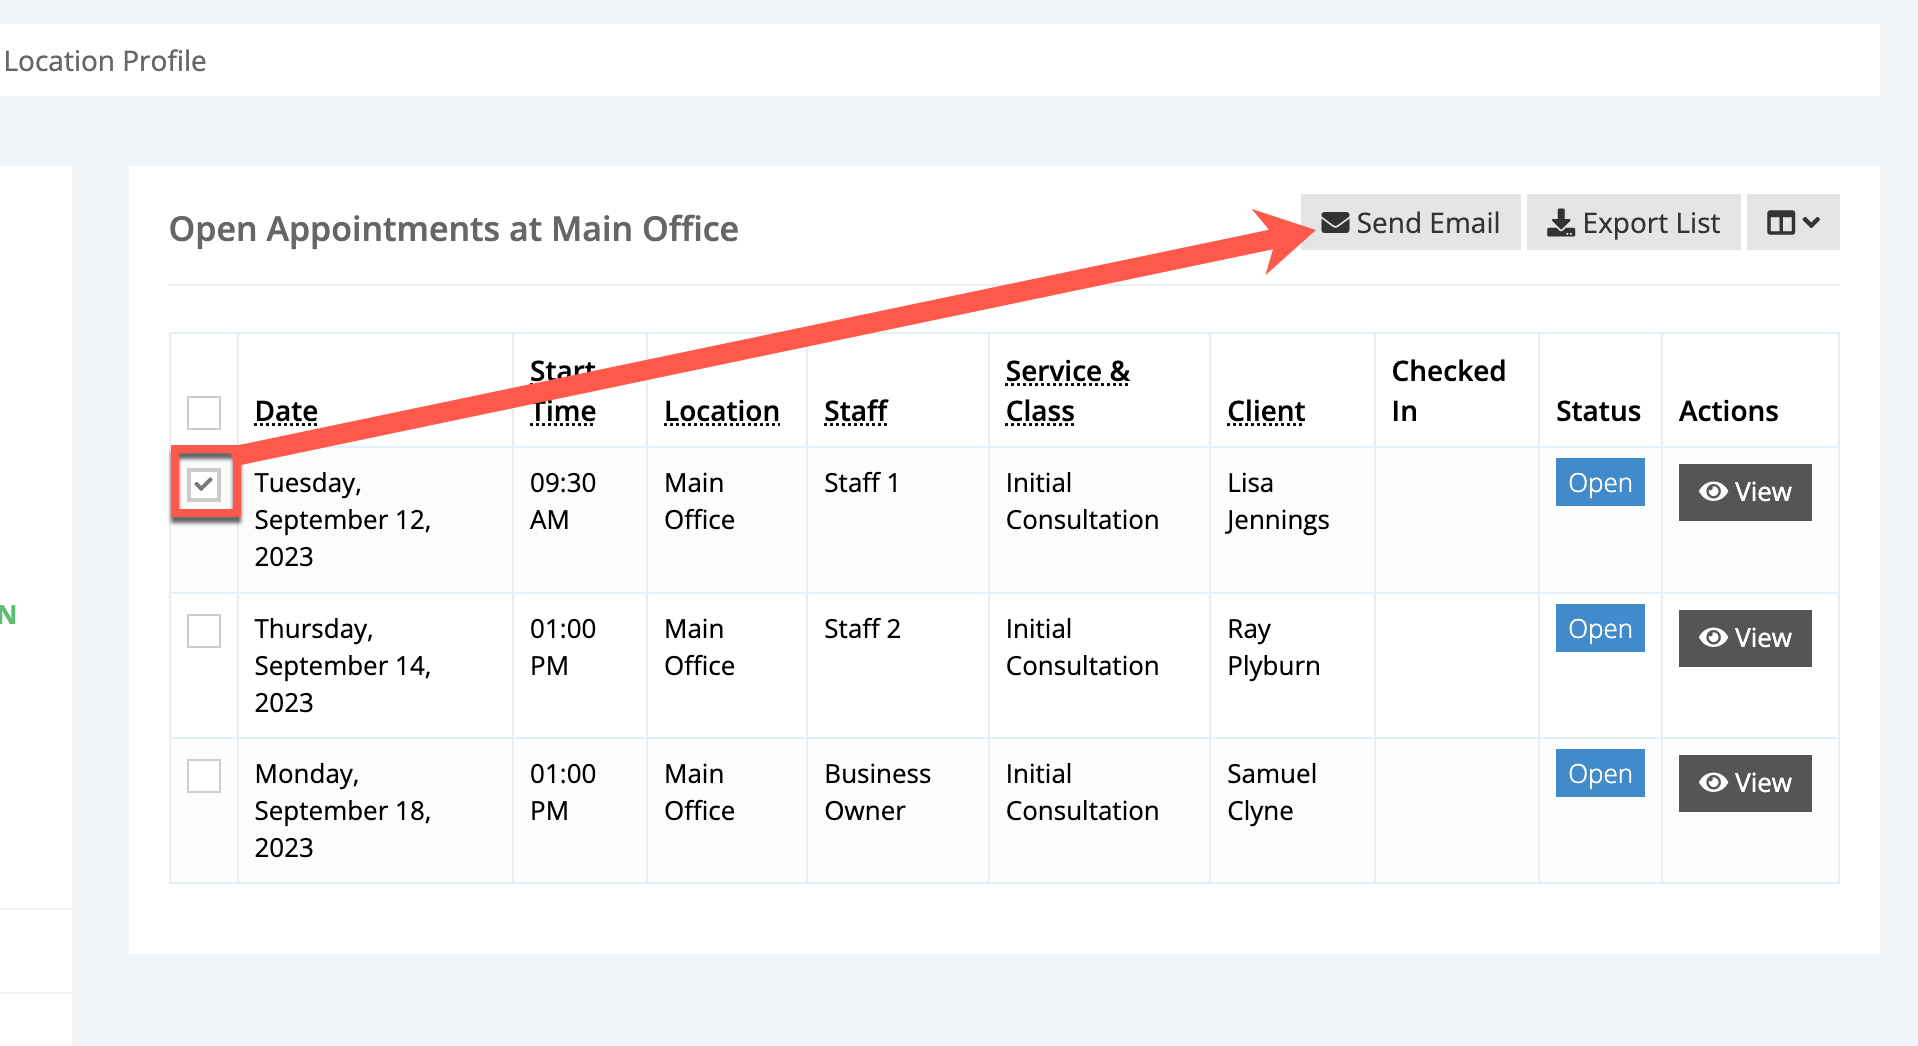
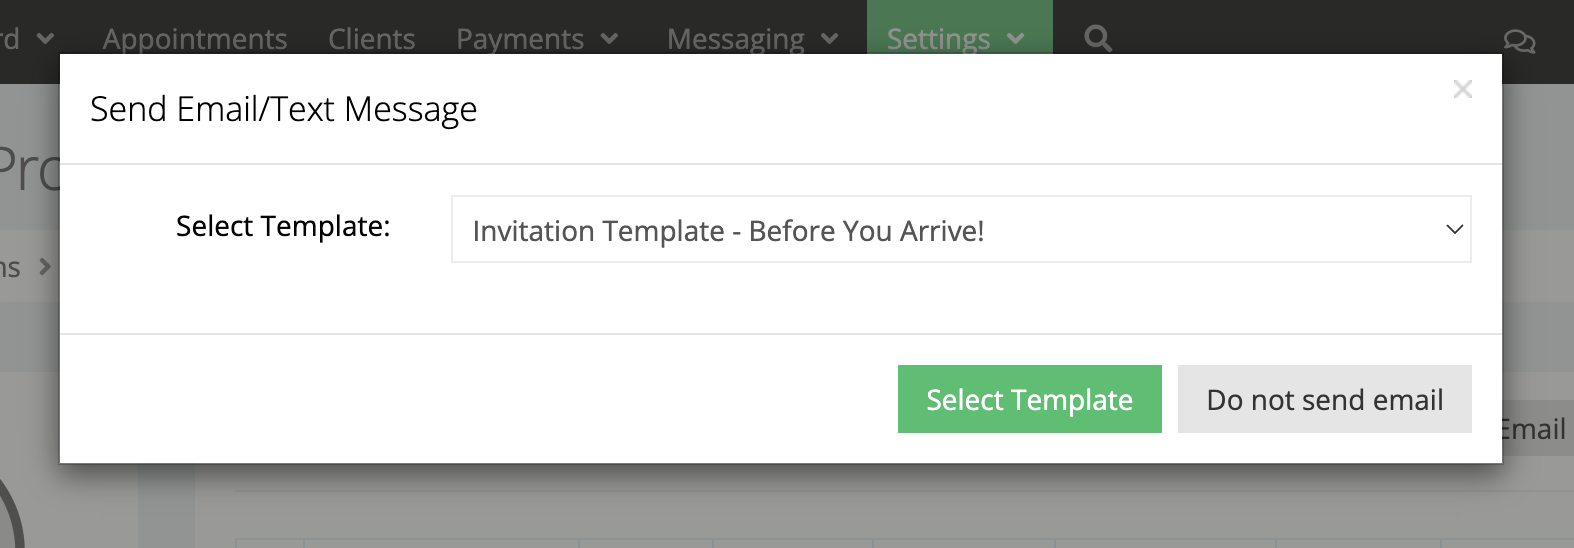
From these appointment lists, you can also send an email (Invitation Templates) to any client with an appointment at this location. To send an email to your client, choose an appointment by selecting the checkbox to the left of that option, then select Send Email.
This will open a new window where you can choose from some of your appointment or invitation templates. Once you've chosen the template, click Select Template.
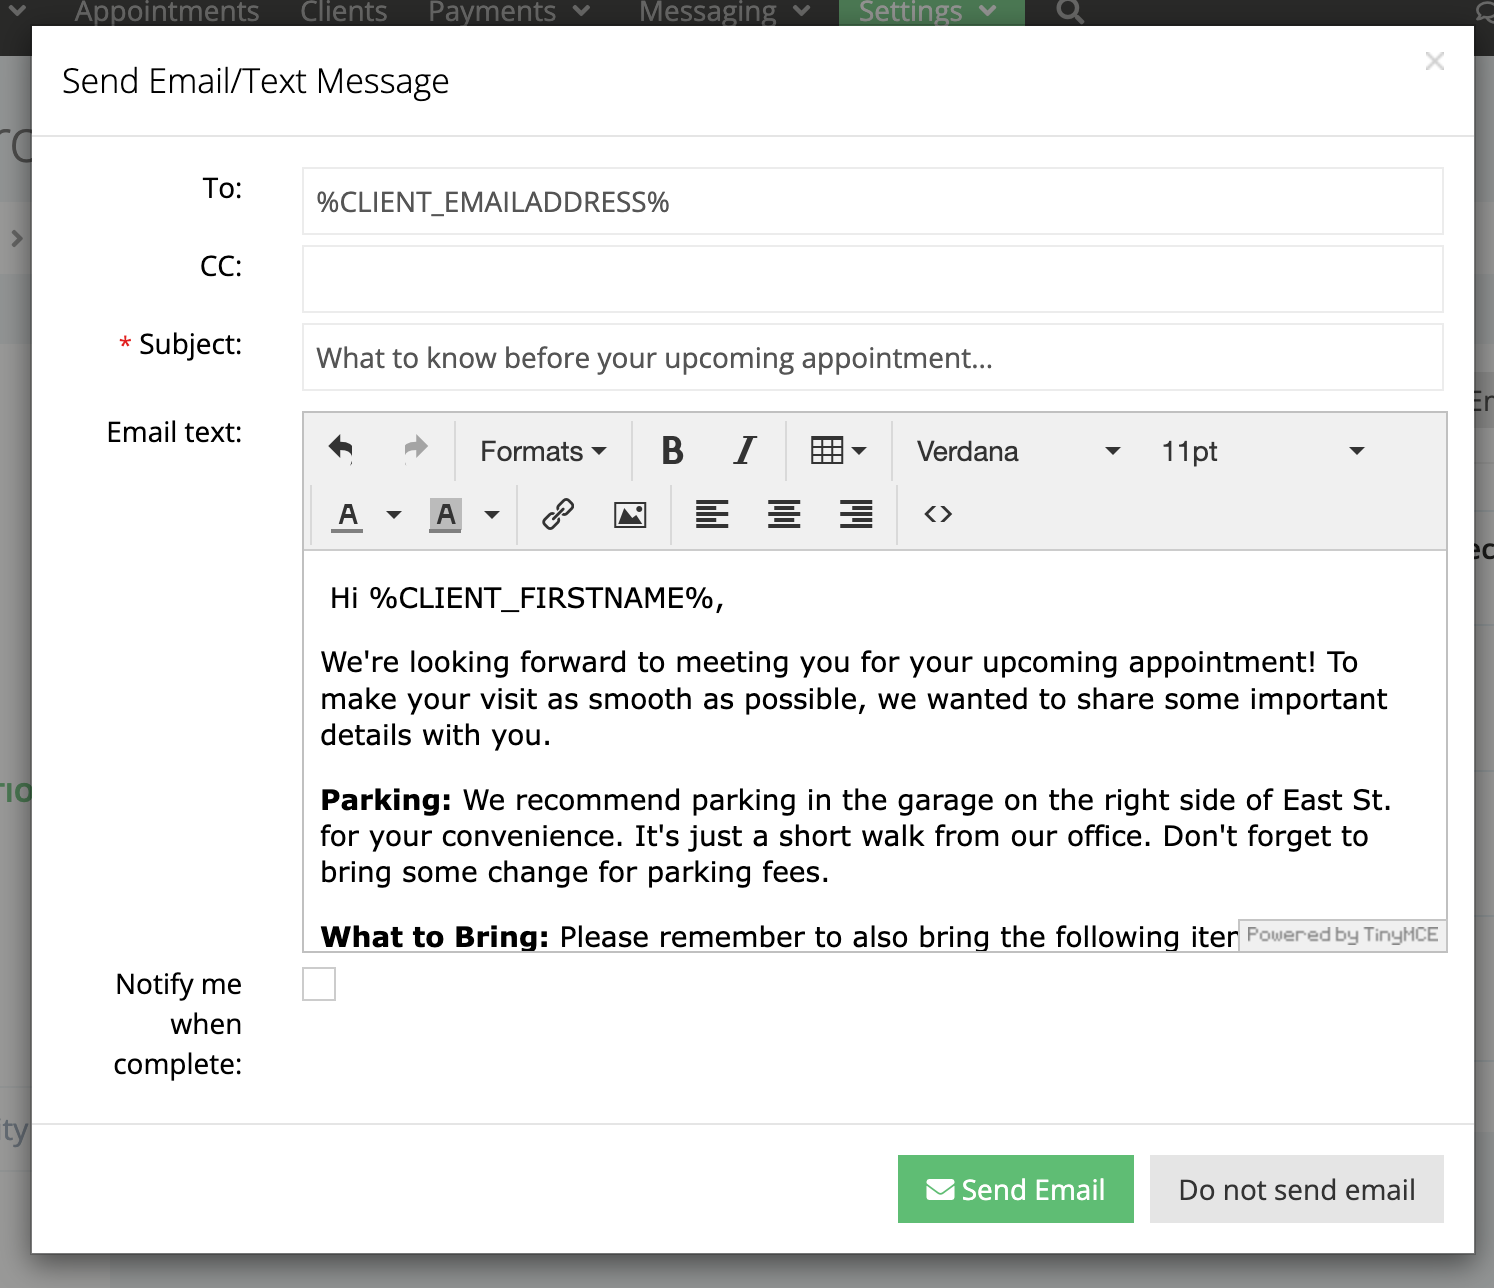
In the next window, you can make changes to the template you are about to send or simply click Send Email.
Exporting the Appointments List
You can also export a list of all appointments in one of these lists by selecting Export List.
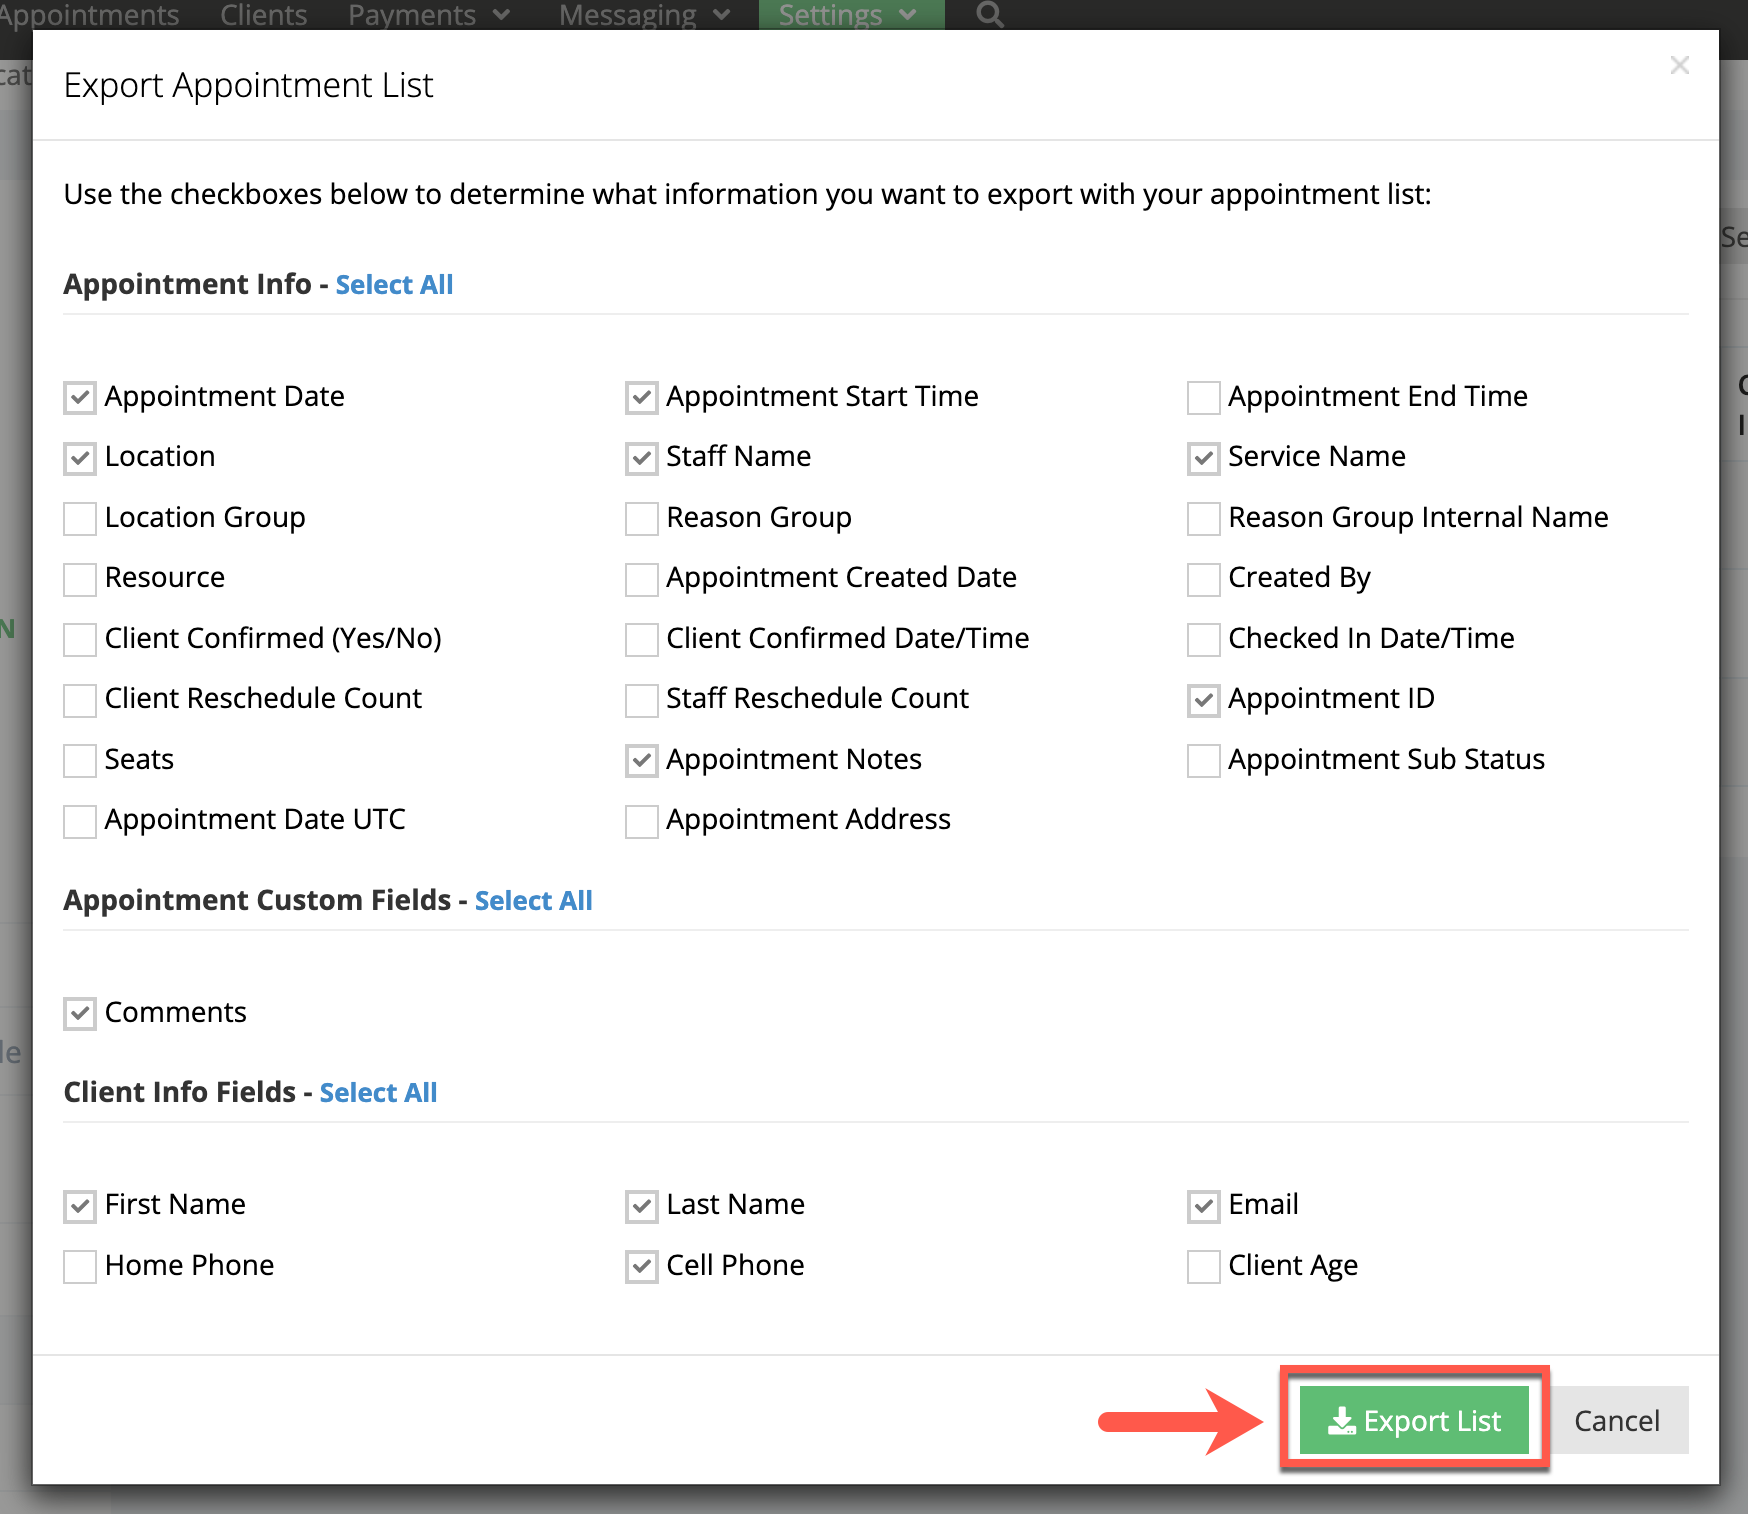
This will open a new panel where can choose which information should be exported in that report. Once you have chosen the information you want to include, select the Export List button and a .xls document will begin downloading to your computer.

.gif?version=1&modificationDate=1694203495093&cacheVersion=1&api=v2&width=374)
.gif?version=1&modificationDate=1694448337116&cacheVersion=1&api=v2&width=544)
