Adding Staff Availability Flow
- Lucy Barber (Deactivated)
- Elvis Merino (Unlicensed)
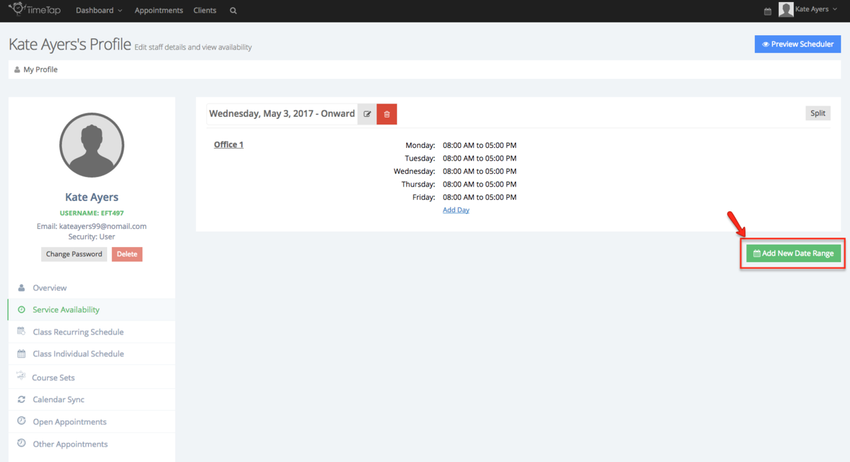
To add a new date range of availability, you'll want to go through the Add Staff availability flow. To get to the Add Staff Availability flow, click on the "Add New Date Range" button under the My Profile → Availability tab:
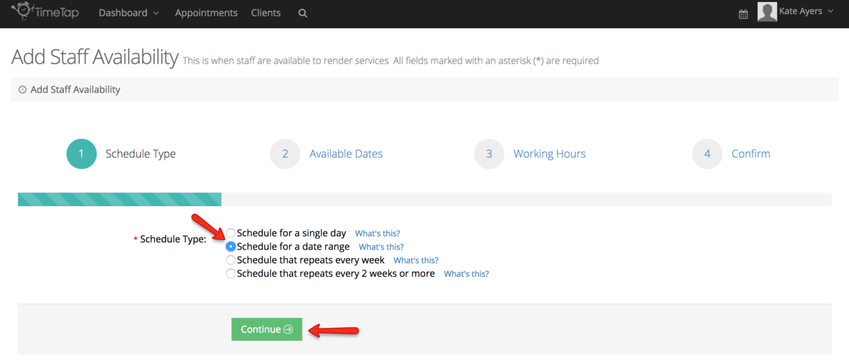
This will take you to the first screen of the Add Staff Availability flow where you will have to determine which path you want to take:

As you'll see in the schedule type options in the screenshot above, you can choose to add:
- Availability for a single day: this would allow you to setup availability for just 1 date in the future. Say you are only taking appointments on December 4th and don't want to add availability for appointments for any other date than that, choose this option to go through the add staff availability flow. Learn more
- Availability for a date range: this would allow you to set up availability for yourself for certain days of the week between 2 dates. So say between December 1st 2014 and December 31st 2014 you are available on Mondays and Tuesdays to take appointments, choose this option to go through the add staff availability flow. Learn more
- Schedule that repeats every week: this would let you set up availability for an indefinite period of time. You could always modify it later and put an end date on it. This is great if, say, it's November 2014 and starting on January 1st, 2015 your schedule changes for the new year. This schedule change will last until you feel like changing it again. Choosing the reguarly available schedule option will let you add in a schedule of availability that extends without an end date. Learn more.
- Availability that repeats every 2 weeks or more: this allow you to setup availabilty that repeats every 2 or more weeks or every month. This can be used in the case that you're available every other Monday and Wednesday.
Click on the links above to walk through the Add Staff Availability flow to add that specific schedule type.
Adding availability for a single day will set you up to add hours for one date that you're available to accept appointments. This is useful if you typically work just Monday through Friday but you are planning to be available for appointments one Saturday afternoon. It's also useful if you're not someone who has a regular schedule but is just available a few days of the month to have appointments.
To set up this type of schedule for appointments, select the schedule type "Availability for a single day" from the first page of the "Add Staff Availability" flow and click "Continue":

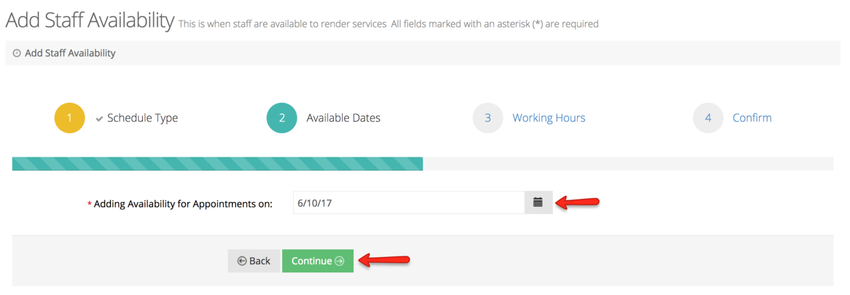
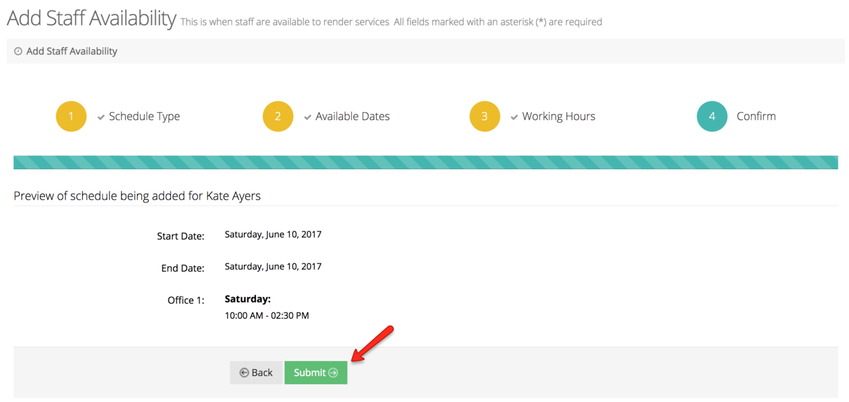
Next you'll choose which single date you are adding availability for. Let's say that you typically work Monday through Friday taking appointments but you are adding availability for a Saturday coming up in May where you'll be accepting appointments. Select that date and then click the "Continue" button:
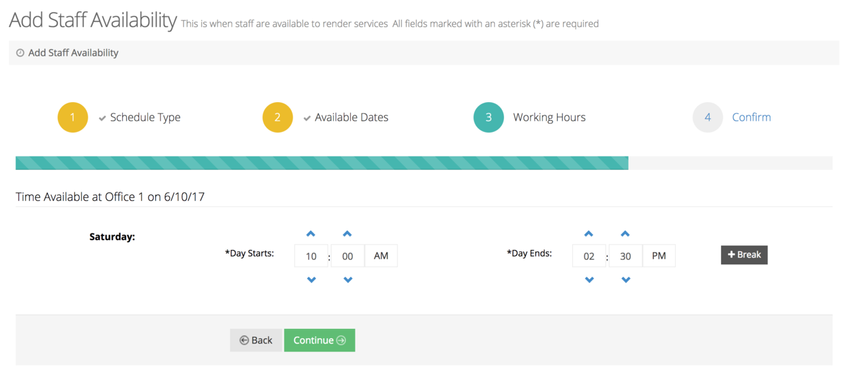
Next, on the Working Hours tab, customize the hours during the day that you're available to take your Service-based appointments. In this scenario, I'm going to be available between 10:00am-2:30pm to take appointments for my services:
That means that if a client is trying to book a service that has a duration of 1 hour, appointments could be made from:
- 10:00am-11:00am
- 11:00am-12:00pm
- 12:00pm-1:00pm
- and 1:00pm-2:00pm
No appointment could be made between 2:00pm-2:30pm because the half hour that is available is not enough time to fit in the hour long service. This is just something to consider as you add in your hours of availability. After you have added them in, click the "Continue" button to move forward to the Confirmation page.
On the Confirmation page, you will see a summary of everything you just added. If it all looks correct, click "Submit":
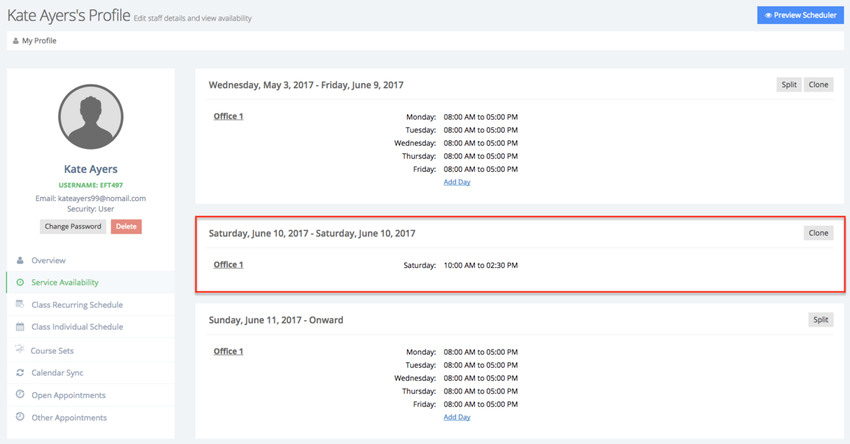
After submitting the new staff availability, you will be directed to the staff's availability page where you can see how that new availability you just added looks against the rest of the staff's schedule:
Adding in availability for a date range is great if you have a varying schedule. For instance, as I'm writing this it is May 3rd, 2017, and I have a schedule of availability between now and the end of this calendar year for accepting appointments. Starting the first of the year, I move on to a different schedule. Adding availability for a date range is great way to accommodate this schedule as it will change after December 31st.
To add availability for a date range, I will select the schedule type "Availability for a date range" from the first page of the "Add Staff Availability" flow and click "Continue":
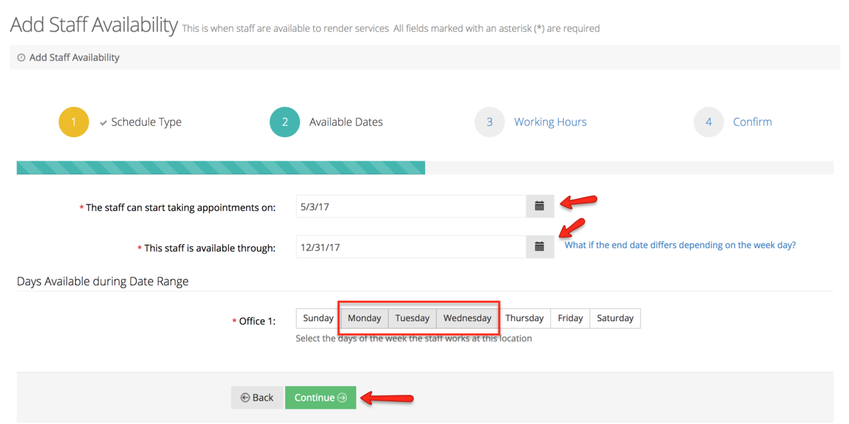
One the next page, you'll first enter in the date range that you're setting up availability for and then you'll select what days of the week during that date range that you'll be available. In this use case it will be starting today and going through the end of December and be available on Monday, Tuesday, & Wednesday. After entering those criteria, I'll press "Continue" at the bottom of the screen:
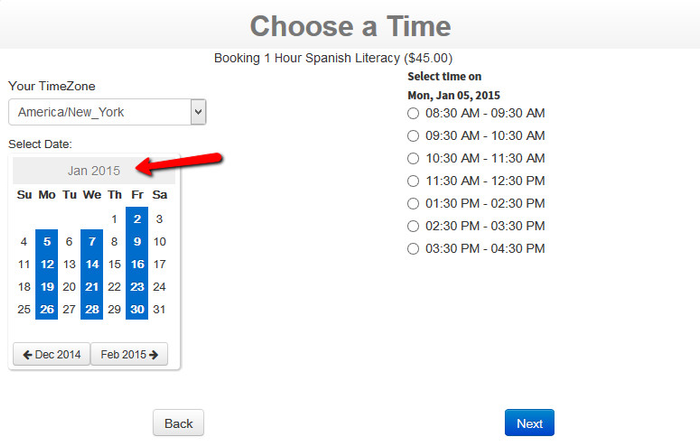
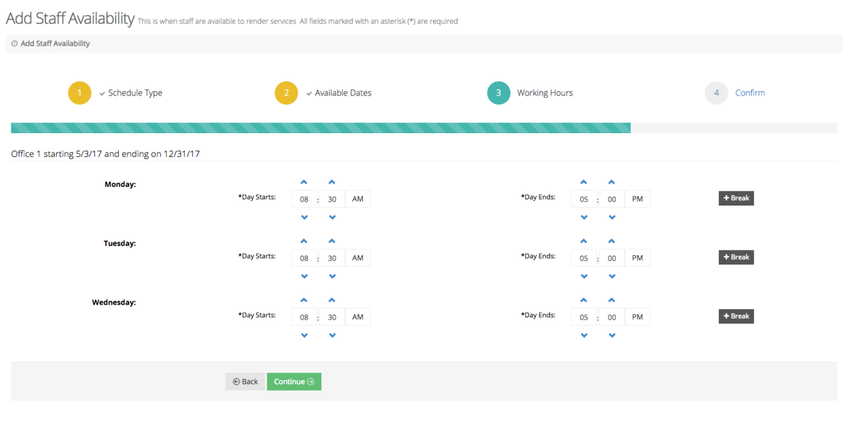
For the Working Hours step, I will add in what hours I'm available to take appointments on each of these days. I can customize this by adding breaks or I can just leave it so that I'm available for a straight period. For this example, I will not add breaks and just say I'm available between 8:30am-5:00pm each of those days:
That means that if a client is trying to book a service that has a duration of 1 hour, appointments could be made from:
- 8:30am-9:30am
- 9:30am-10:30am
- 10:30am-11:30am
- 11:30am-12:30pm
- 12:30pm-1:30pm
- 1:30pm-2:30pm
- 2:30pm-3:30pm
- and 3:30pm-4:30pm
No appointment could be made between 4:30pm-5:00pm because the half hour that is available is not enough time to fit in the hour long service. This is just something to consider as you add in your hours of availability. After you have added them in, click the "Continue" button to move forward to the Confirmation page.
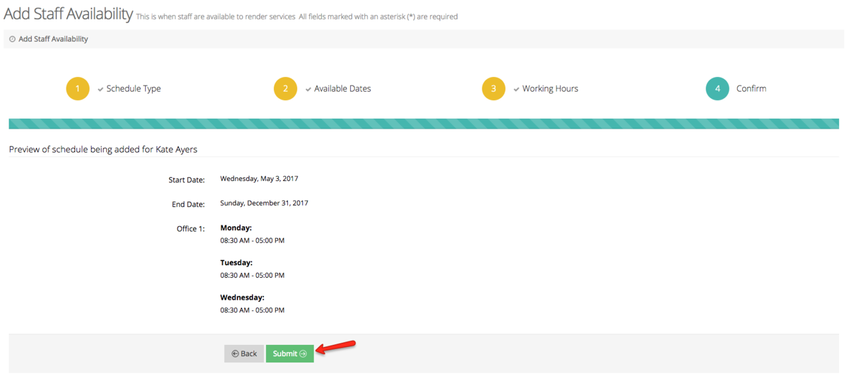
On the confirmation page, you can review all the information to make sure it is correct before clicking "Submit":
After clicking submit, you'll be directed to your staff availability page where you can review the availability you just entered:

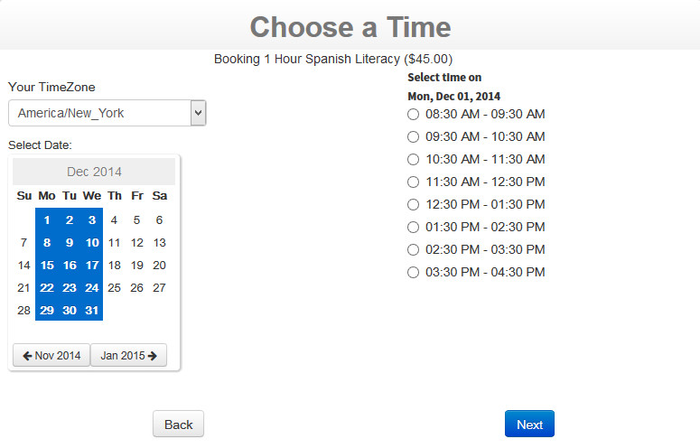
You can also check out what this looks like on your client facing scheduler to see that availability shows Monday-Wednesday from May to December...
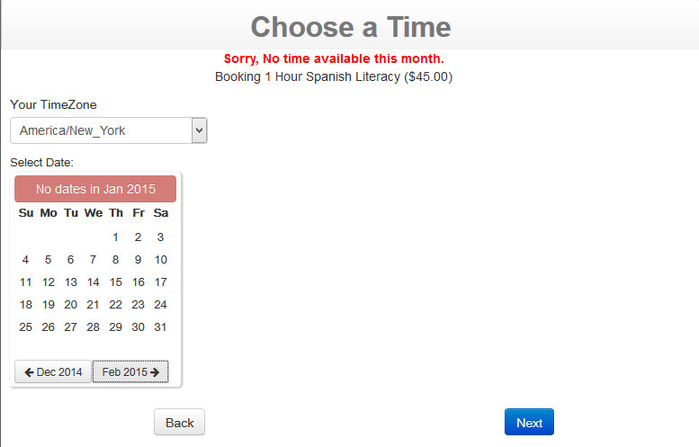
but not in January:
If you read through the example of adding a date range of availability above, you'll be familiar with the following use case.
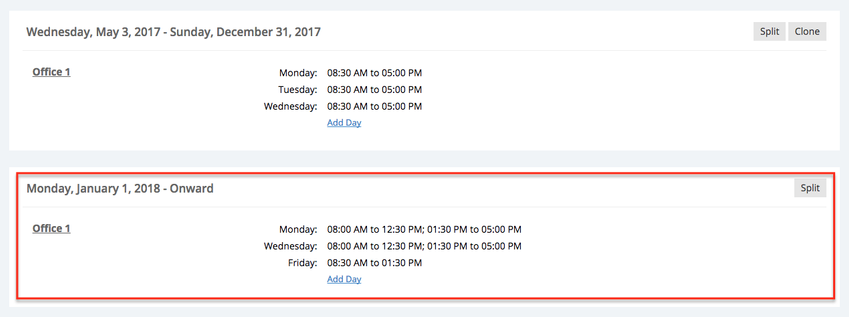
Adding a regularly available schedule is great for when your availability extends indefinitely without an end date. Let's say it's May 2017 and you have availability set up between now and December 31, 2017. Starting the first of the year, however, your schedule changes and you're going to stick with that schedule for at least the foreseeable future.
To add this type of schedule, select the "Schedule that repeats every week" option from the first page of the "Add Staff Availability" flow:
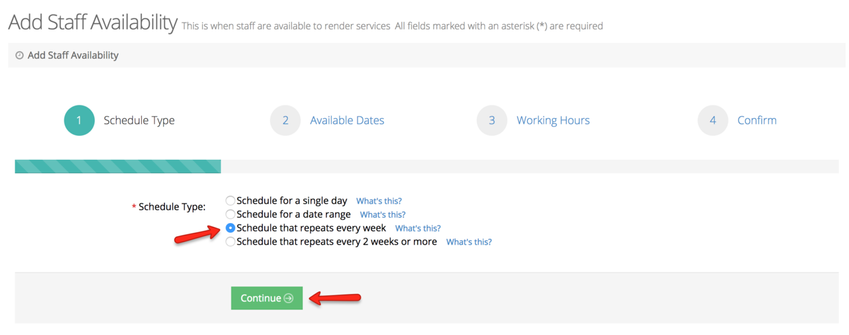
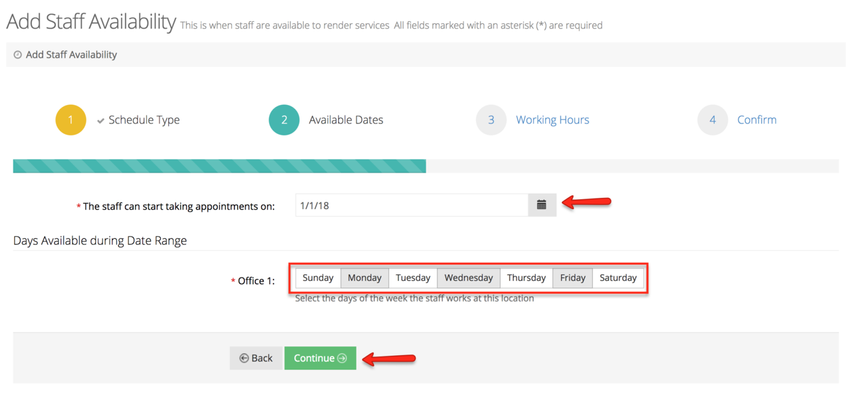
Next you'll select what date this new schedule is set to start on and the days of the week you'll be available. In this case, starting January 1st, 2018, I will be available on Mondays, Wednesdays, & Fridays for appointments:
On the Working Hours page, I will define what hours I'm available to accept service based appointments on Mondays, Wednesdays & Fridays starting January 1st. On Mondays & Wednesdays I'll be available from 8:30am-12:30pm and then from 1:30pm-5:00pm. I will use the "Break" button to add in the "off" period between 12:30pm-1:30pm. On Fridays I will just be available from 8:30am-1:30pm and will not take any breaks:
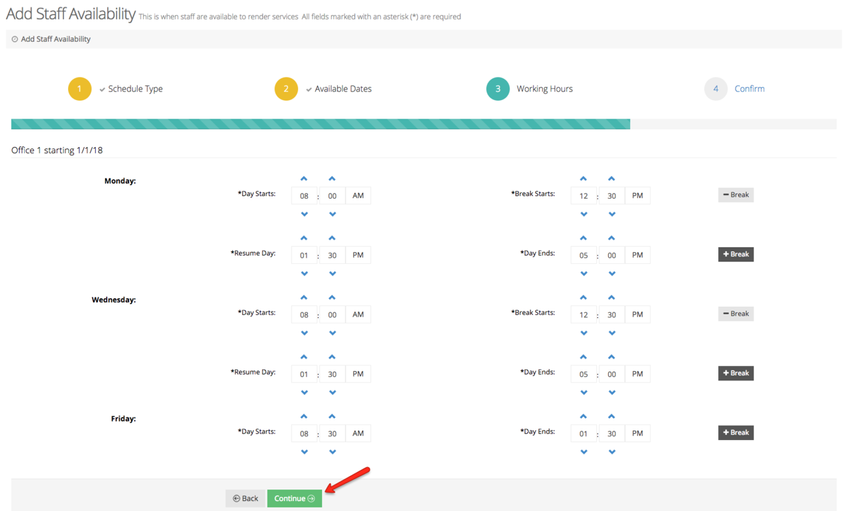
This means that if, for instance, a client is trying to book a service that has a duration of 1 hour on a Monday or a Wednesday, appointments could be made from:
- 8:30am-9:30am
- 9:30am-10:30am
- 10:30am-11:30am
- 11:30am-12:30pm
- 1:30pm-2:30pm
- 2:30pm-3:30pm
- and 3:30pm-4:30pm
No appointment could be made between 4:30pm-5:00pm because the half hour that is available is not enough time to fit in the hour long service. This is just something to consider as you add in your hours of availability. After you have added them in, click the "Continue" button to move forward to the Confirmation page.
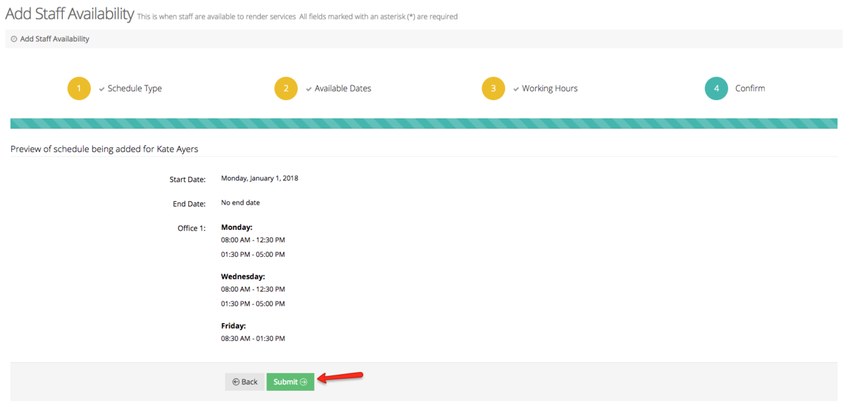
Once on the confirmation page, review everything to make sure it is the availability that you want and press "Submit":
This will take you to your Staff Availability tab where you can see the new availability you just added:
You'll also see this availability on the client facing side starting in January: