Translations
- Lucy Barber (Deactivated)
If you have accounts that recruit candidates who may not all speak the same language, you can take advantage of TimeTap's translation feature to show candidates the messaging in their preferred language.
In this documentation, we'll go through how to add in the allowed languages on your account which should represent the languages that the candidates could potentially speak. We'll then look at adding in translations for common TimeTap elements in this languages and sending out invitations to candidates pulling from these translation types. Next, we'll look at how the translations show up on the scheduling page and how they then translate on the confirmation and reminder emails that send out for phone screenings/interviews. Lastly, we'll look at how you can set up your browser to test all of this to make sure it is reflecting properly for your account.
Let's say you are working on an account that recruits in the United States and several countries in South America, including Brazil. If that's the case, then you would need to make sure your scheduler accommodated for English speakers, Spanish speakers, & Portuguese speakers.
Now, every account has a default language which is the language that you typed all the initial values in. That default language for all of IBM accounts so far has been English and I would expect that to stay that way. So, since the initial values on all properties is set in English, then we just need to add in 2 allowed languages: Spanish and Portuguese.
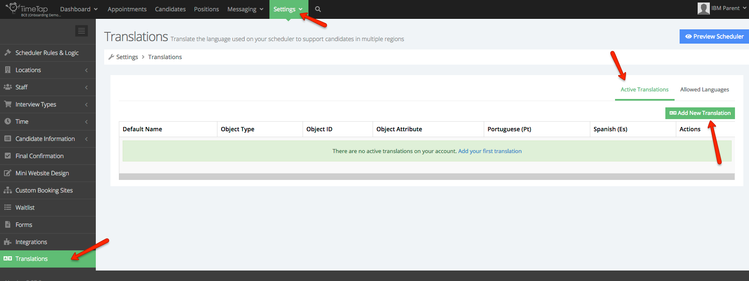
To do this, login to the child account you want to set this up on and go to Settings > Translations > Allowed Languages and click the "Add New Language" button:
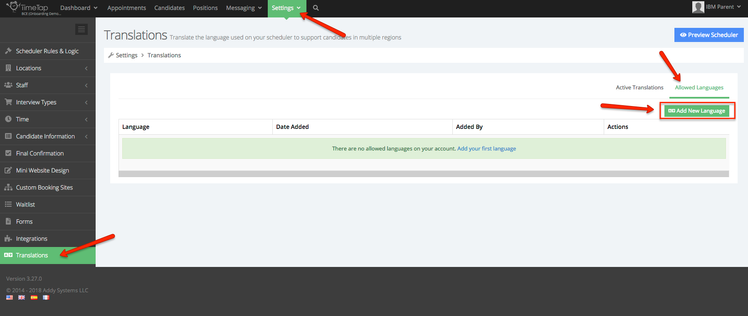
You'll see a line item get added to the table below. Select the language you want to add and click the "Save New Language" button:
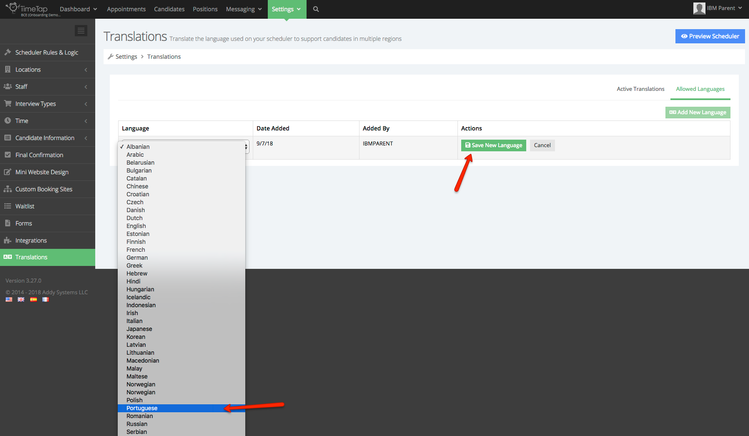
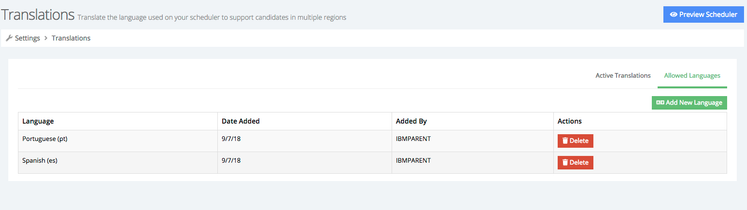
Repeat these steps for the Spanish language as well. Once you are done, you should see the two non-default languages in your Allowed Languages list view:
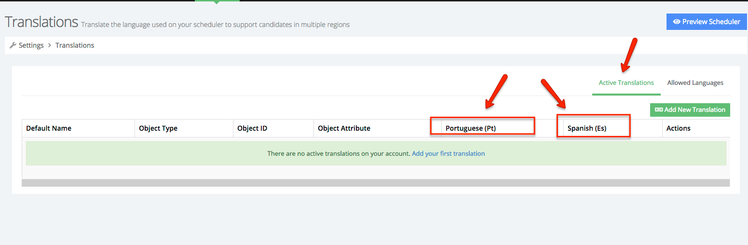
If you toggle over to your "Active Translations" list view, you'll also now see columns for both of those languages in that view, even if no translations have been added yet:
Now that you have your allowed languages configured, you are all set to start setting up translation values.
Once you've configured your account to have the proper allowed languages, you are ready to start translating the values on the account into those languages. These values may be names of interview types or names of locations. They may the button labels that show on the scheduling landing page or the job title that is sent to the candidate.
In this section of the documentation, I'll walk through translating a few of these properties and we'll see how they look on the resulting scheduling page. If there are any properties you want to translate but you're not sure how to set up the translation for the property, please just send our support team an email and we'd be happy to help.
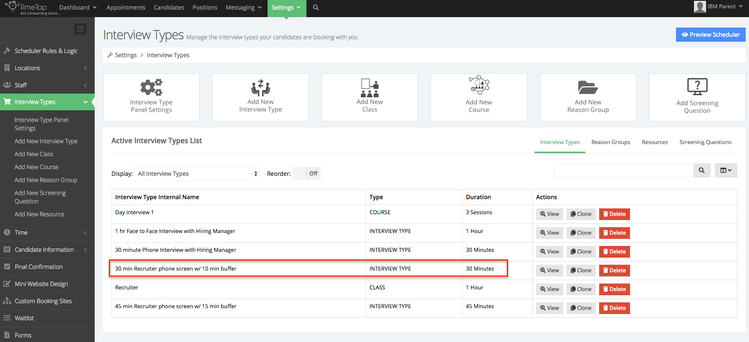
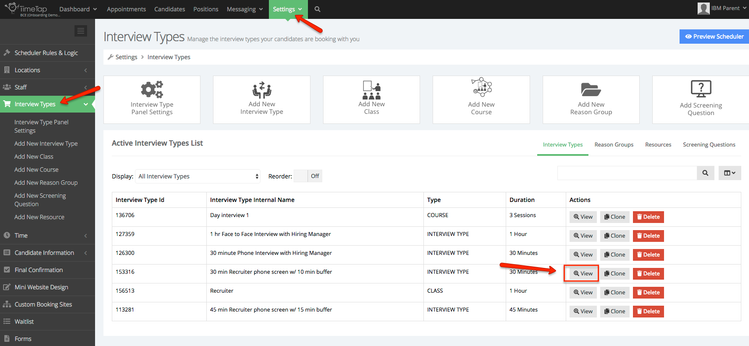
On this demo account, we have 6 different interview types listed under our Settings > Interview Types view. Let's try translating the name for the "30 min Recruiter phone screen w/ 10 min buffer" interview type:
To do this, I can go to Settings > Translations and click on the button to "Add New Translation" under the Active Translations tab:
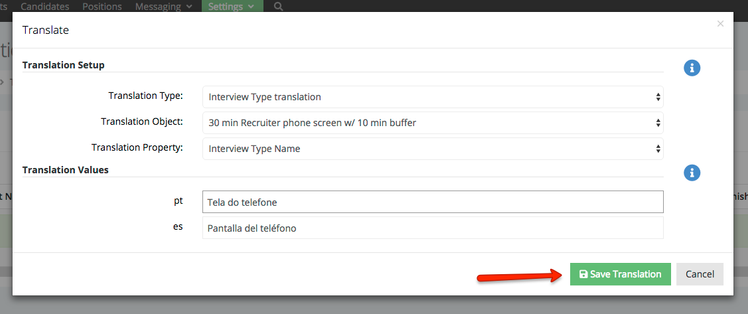
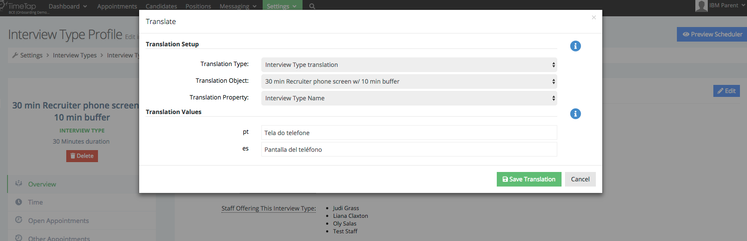
In the pop up window, I'm going to select the following options:
- Translation Type: Interview Type translation (since the property that I want to translate is the name for one of my interview types, it makes sense that I'm wanting to set up an Interview Type translation)
- Translation Object: 30 min Recruiter phone screen w/ 10 min buffer (since the property that I want to translate is the name of this specific interview type, it would follow that I would select this as the type of interview I want to translate a property on)
- Translation Property: Interview Type Name (I want to make it so that if a candidate whose preferred language is either Portuguese or Spanish goes to book this type of interview, they see "Tela do telefone" or "Pantalla del teléfono", respectively, instead of "Phone Screen", which is the default English value)
I'll then put in the translation values for each allowed language at the bottom of the pop up. Before saving, my pop up translation window would appear as follows:
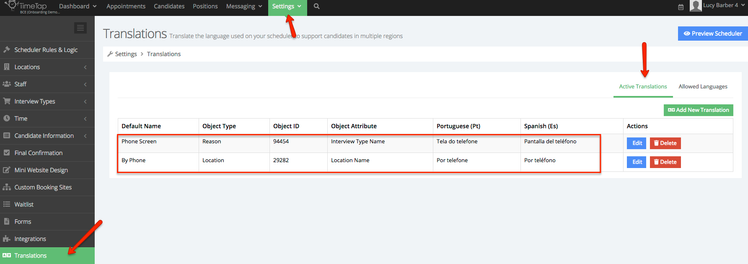
You'll now see this translation among your list of active translations. You can see in the table view what the default value is as well as the two translated values. You can also see what property got translated on what type of object and what that object's id is:

The object ID column value can be mapped back to the interview type itself. If you go back to Settings > Interview Types, you can turn on the "Interview Type Id" column in the display:
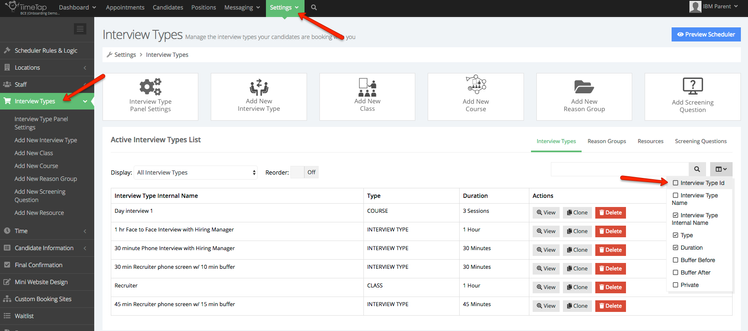
You'll see in the Interview Type Id column that appears, that the unique id for that interview type matches the object id that is stored in the translations table. This will make it so that you have a way to check which interview type that translation was set for.
If you'd like, you can also set the translation value for a property anywhere you see the translations flag icon. For instance, with that same interview type we just translated, we could go to Settings > Interview Types and click the "View" button to the right of the Interview Type to enter that Interview Type Profile:
On the Interview Type Profile, click the "Flag" icon next to the Interview Type's name:
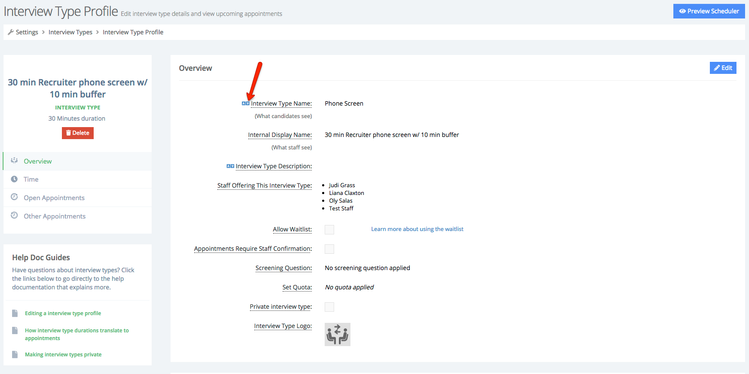
That will bring up the same pop up window where we entered the translation and show you the translation values you have set for it:
This may be an easier method for you to use to add translations for properties if you don't know exactly what type they are stored under. Simply find the value on the account and click the flag icon next to it to put in a translated value. For instance, let's say you also wanted to translate that title that appears on the scheduling landing page for candidates into both Portuguese and Spanish:

But when you go to Settings > Translations > Add New Translation, you're not sure which translation type that property would be stored under. You can always just go to where that property's default value is set on your account and add the translation by clicking the flag icon next to the property:
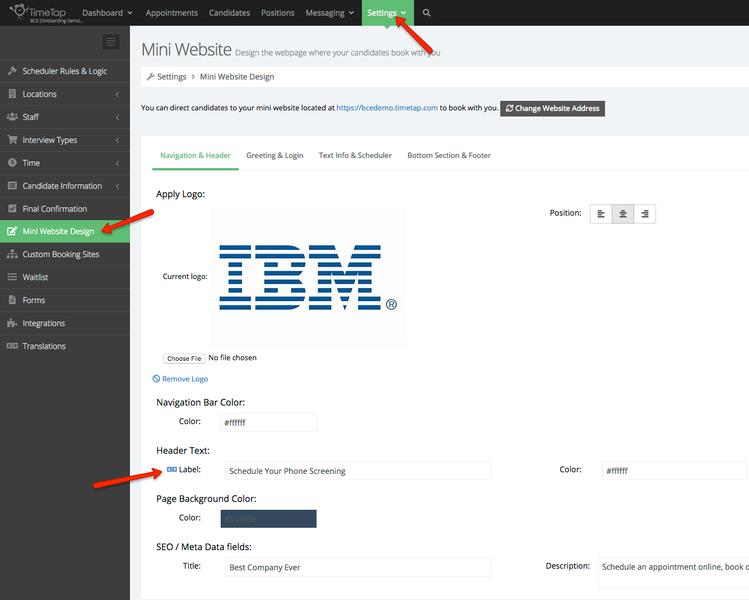
By going this way, the translation type, object, and property will get pre-selected for you. You can then just put in the translation values and click save:
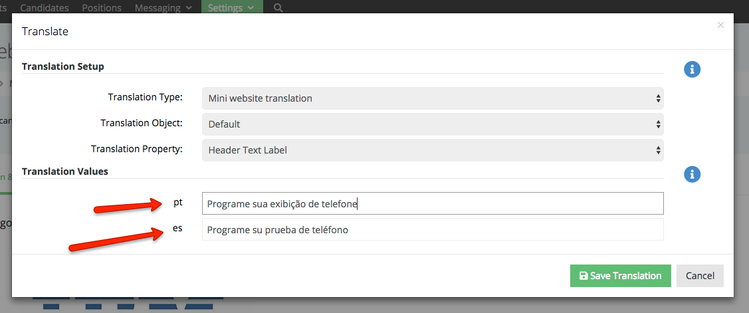
With that translation in place, if a candidate goes to the scheduling landing page and their browser is set to Portuguese, they would see the translation that was stored in the pt value field:
Please let us know if you have any questions on adding in translations, particularly if there is an element you want to translate but you're not sure where to find it. We have been slowly adding in translation properties, so if the property doesn't have a translation flag next to it but you need to translate it, send us a note and we'll get it put in in our next release.
Once you've added in translations for the properties that you use on your invitation templates, you can go ahead and test sending those invitations out to candidates to make sure everything is translating properly.
One important thing to note is that we merge tag values based on any translation set up for them. If there is not a translation set up for that tag value, we fall back to whatever the default is.
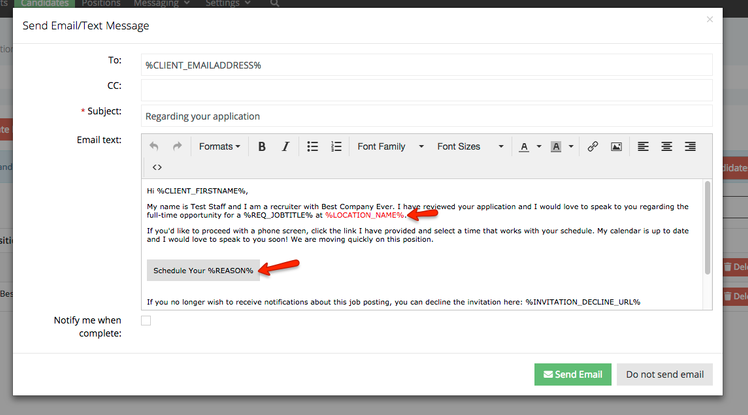
So, let's say you have an invitation template on your account that reads as follows:
Hi %CLIENT_FIRSTNAME%,
My name is %STAFF_FULLNAME% and I am a recruiter with %BUSINESS_NAME%. I have reviewed your application and I would love to speak to you regarding the full-time opportunity for a %REQ_JOBTITLE% at %LOCATION_NAME%.
If you'd like to proceed with a phone screen, click the link I have provided and select a time that works with your schedule. My calendar is up to date and I would love to speak to you soon! We are moving quickly on this position.
Schedule Your %REASON%
If you no longer wish to receive notifications about this job posting, you can decline the invitation here: %INVITATION_DECLINE_URL%
%STAFF_FULLNAME%
Recruitment Specialist
Phone: %STAFF_MOBILE%
Email: %STAFF_EMAIL%
Obviously, the template is written in English. TimeTap does not have a way to translate the body of the email from English to Portuguese or Spanish or any other language automatically. We do have a way, however, to take those tag values (like %REASON% and %LOCATION_NAME% etc.) and translate those based on what you have added in in your Settings > Translations > Active Translations table.
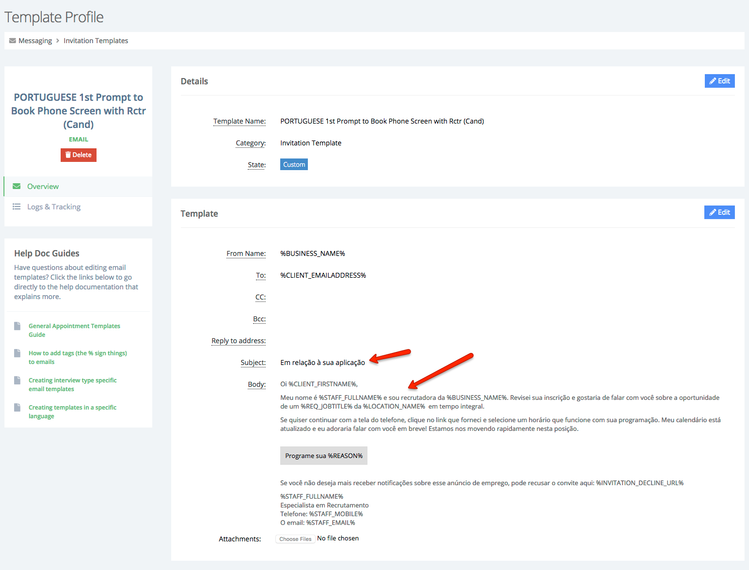
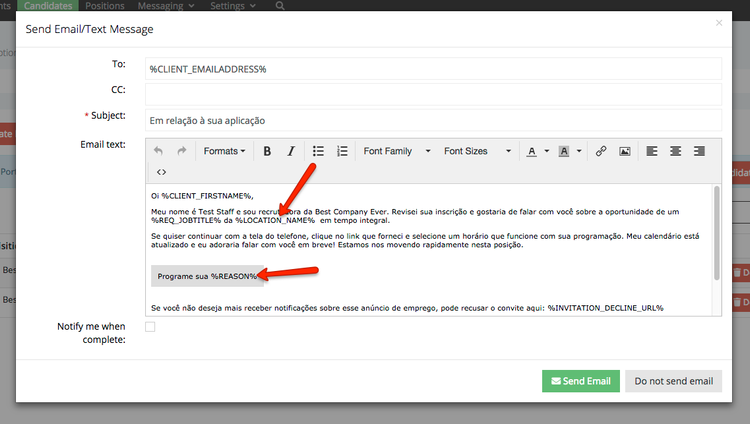
So, with that being said, you'll want to first add in a Portuguese and Spanish (or whatever supplemental languages you are setting up) version of the template where you've translated the non-tag parts of the body into those languages. For Portuguese, the template would read like this:
Oi %CLIENT_FIRSTNAME%,
Meu nome é %STAFF_FULLNAME% e sou recrutadora da %BUSINESS_NAME%. Revisei sua inscrição e gostaria de falar com você sobre a oportunidade de um %REQ_JOBTITLE% da %LOCATION_NAME% em tempo integral.
Se quiser continuar com a tela do telefone, clique no link que forneci e selecione um horário que funcione com sua programação. Meu calendário está atualizado e eu adoraria falar com você em breve! Estamos nos movendo rapidamente nesta posição.
Programe sua %REASON%
Se você não deseja mais receber notificações sobre esse anúncio de emprego, pode recusar o convite aqui: %INVITATION_DECLINE_URL%
%STAFF_FULLNAME%
Especialista em Recrutamento
Telefone: %STAFF_MOBILE%
O email: %STAFF_EMAIL%
Notice the tag values stay the same. It is just the surrounding language in the body that alters. The tags will fill in from the database based on the language that the client you are sending the template to is set to.
If you login to the Best Company Every account and go to Messaging > Invitation Templates, you will see the template "PORTUGUES 1st Prompt to Book Phone Screen with Rctr (Cand)" now listed there:
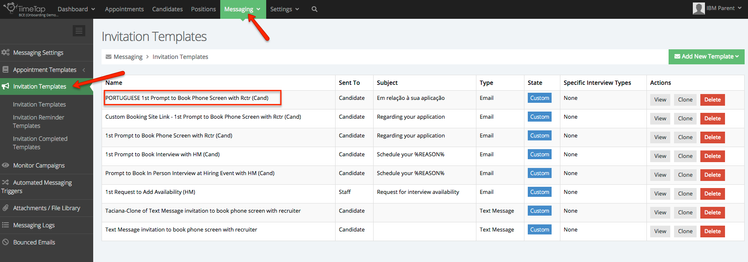
I created this by cloning the "1st Prompt to Book Phone Screen with Rctr (Cand)" template and then changing out the email subject and body to Portuguese instead of English:
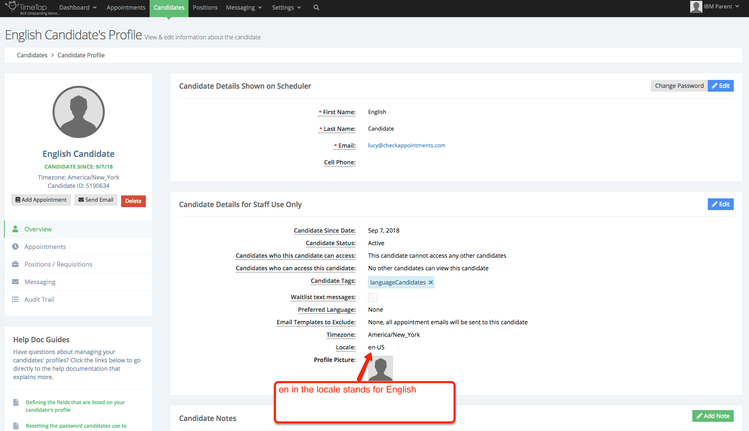
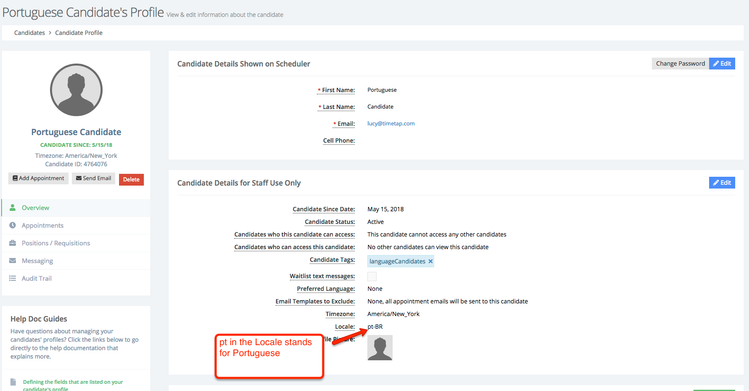
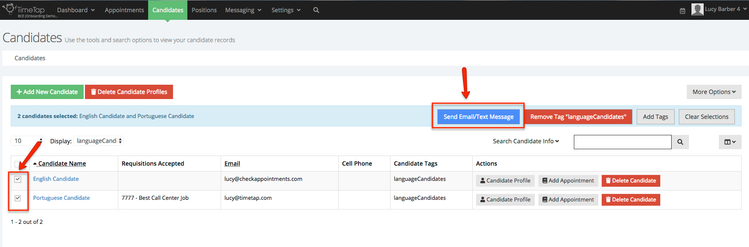
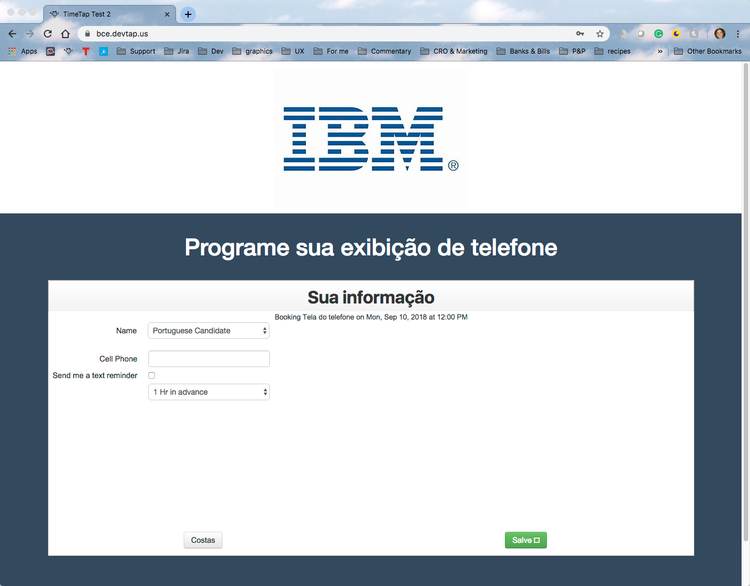
Now, let's say I have a couple of candidates that I want to invite to interview. For the purposes of this demonstration, I have named the candidates "English Candidate" and "Portuguese Candidate", so we can easily tell the difference between the two:
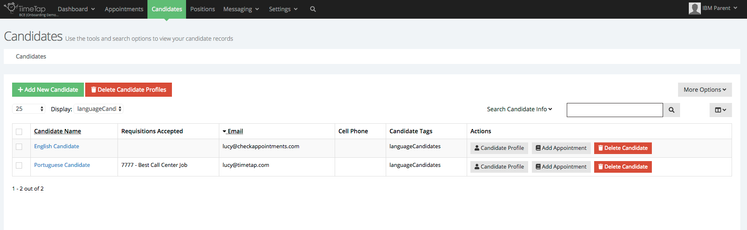
For the English Candidate, I have the locale on their candidate profile set to English:
And for the Portuguese Candidate, I have the locale on their candidate profile set to Portuguese:
On this account, I have already translated the name of the interview type and the name of the location into Portuguese. You can see this under Settings > Translations (look under the "Adding Translations for Common Properties" section of this documentation page for more information on how to do that):
Now, because these candidates speak different languages, I would typically NOT want to select both of them to send an invitation to at the same time because I would need to send a different invitation template to each. BUT for the purposes of this demo, I will send it to both of them so we can see how the resulting templates look.
From my list of candidates, I will select the checkboxes next to both of their names and click the "Send Email/Text Message" button above:
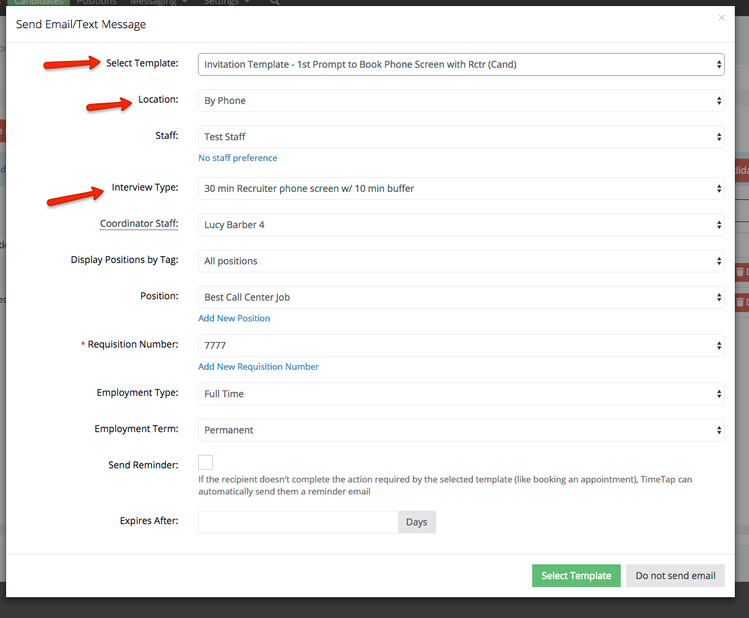
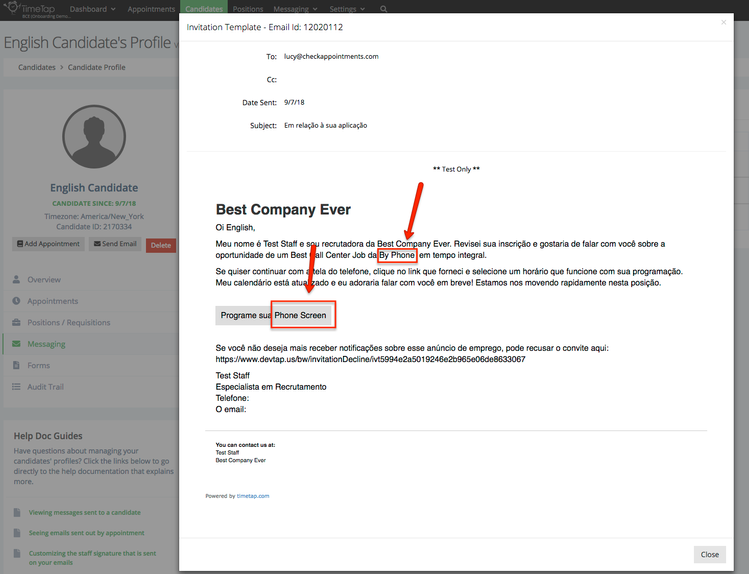
I'm first going to choose my English based template named simply "1st Prompt to Book Phone Screen with Rctr (Cand)", my "By Phone" location (which we know we've set up translations for) and the "30 min Recruiter phone screen w/ 10 min buffer" (which we also know we've set up translations for). I'll leave the rest of the fields as is and click "Select Template":
The email preview before sending won't have anything special on it, but you'll notice that the tags will not have translated yet. They will still just be their representative tag values. This is because (as is the case here) you could be sending a template to people across multiple languages so we don't want to merge the values until we send it so we can merge them on a per candidate language preference basis:
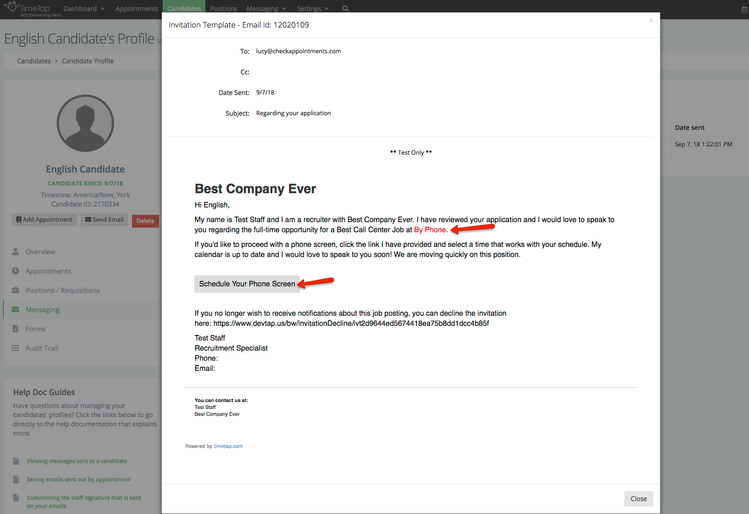
Once we send the email, we can check out how the email looks in each candidate's profile on the "Messaging" view. From the "English Candidates" profile > Messaging section, we can click "View" next to the invitation we just sent out:
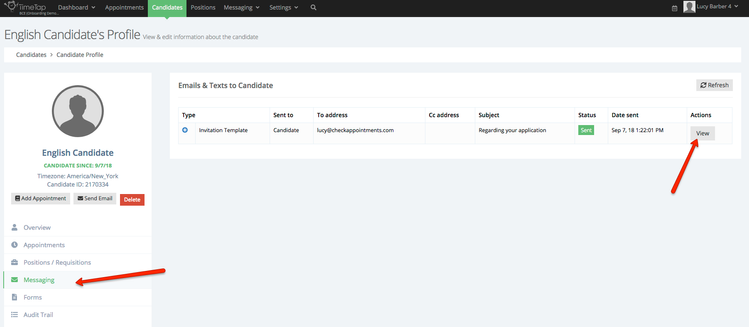
We'll see all values appear merged in the default English value since that is that candidate's locale/language preference:
If we do the same thing from the Portuguese Candidate's profile, we'll see that the tag values merged the Portuguese translation, not the default English:
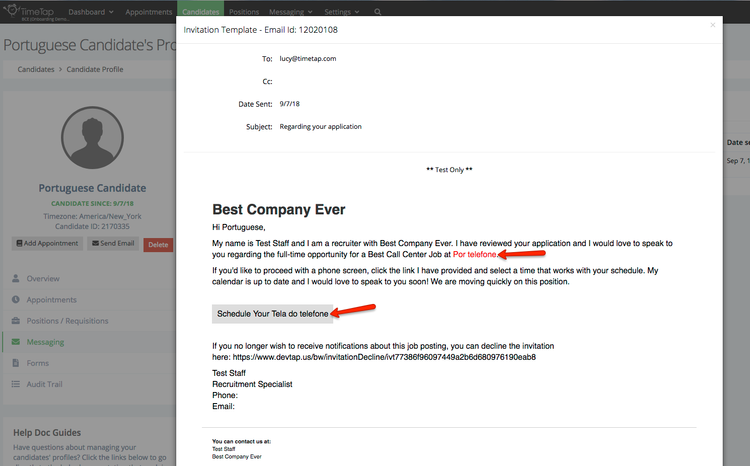
Now, the rest of the surrounding email body is still in English for the Portuguese candidate, but that is because we chose the template "1st Prompt to Book Phone Screen with Rctr (Cand)" in the send email flow.
Now, let's go back through the send email flow, selecting both the English Candidate and the Portuguese Candidate from the Candidate list and instead choose the custom template named "PORTUGUESE 1st Prompt to Book Phone Screen with Rctr (Cand)":

Once again, the tag values will not merge in the email preview but will instead merge after you send it out and the candidate's individual language preferences are read:
Now, if we look at this invitation from the Portuguese Candidate's profile, we'll see that both the tags and the body of the email appear in Portuguese:
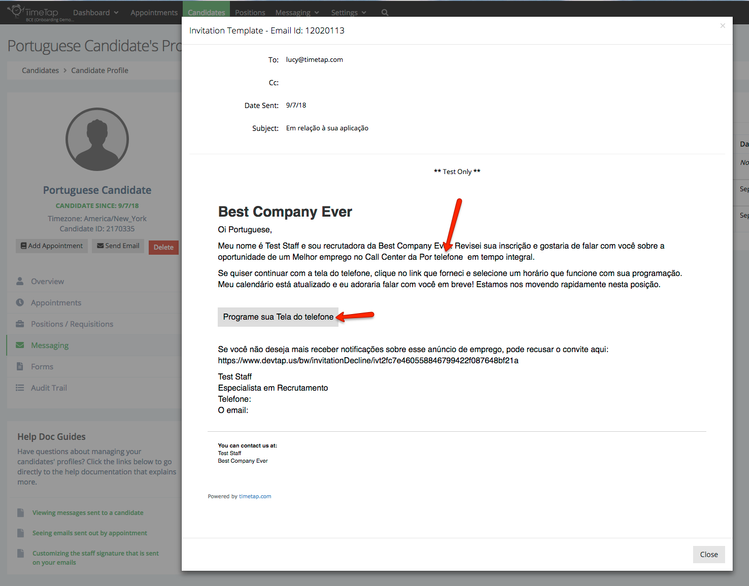
But on the English Candidate's profile, we'll see the tags appear in English while the rest of the body appears in Portuguese:
Again, in real life you would not want to have selected both the Portuguese Candidate and the English Candidate to send the email to at the same time because they would both need different templates. But, my hope is that this illustrates how the tags will merge the values based on the candidates' language preferences as well as how you'll need to select the proper template depending on who you're inviting to make sure the surrounding language in the body of the email appears properly.
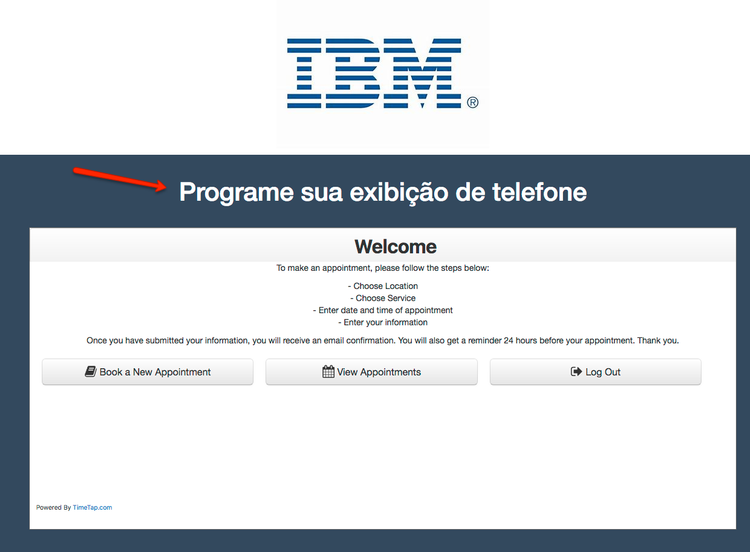
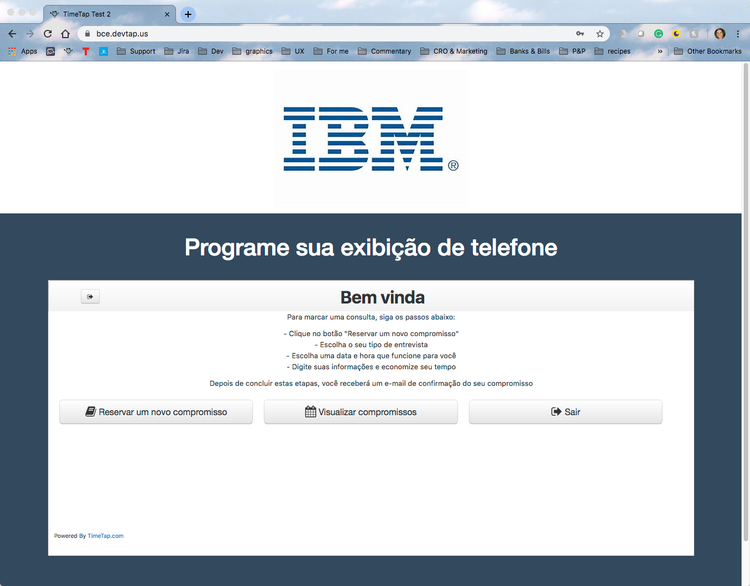
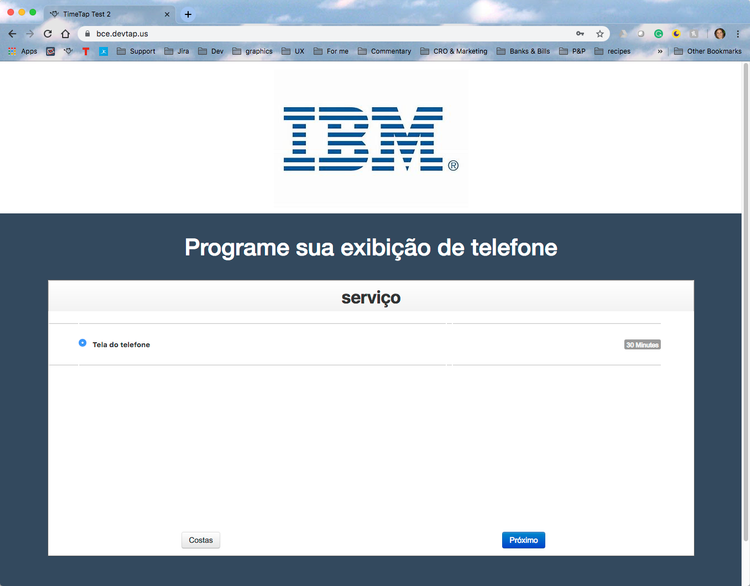
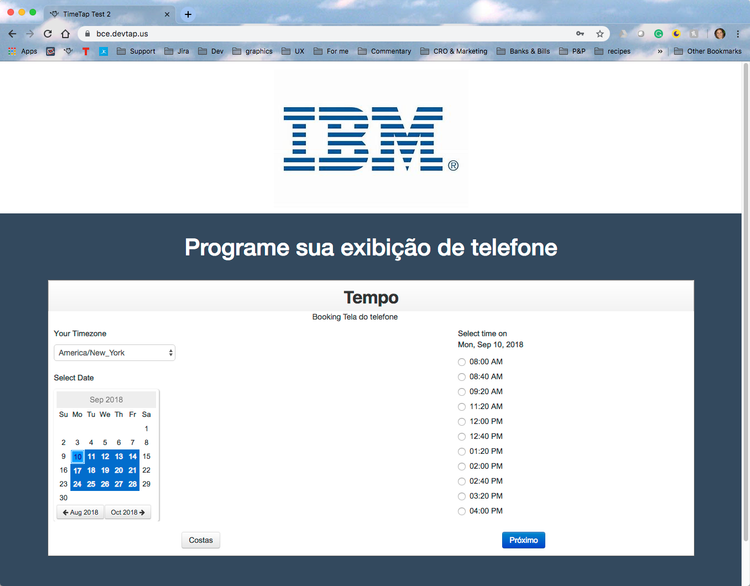
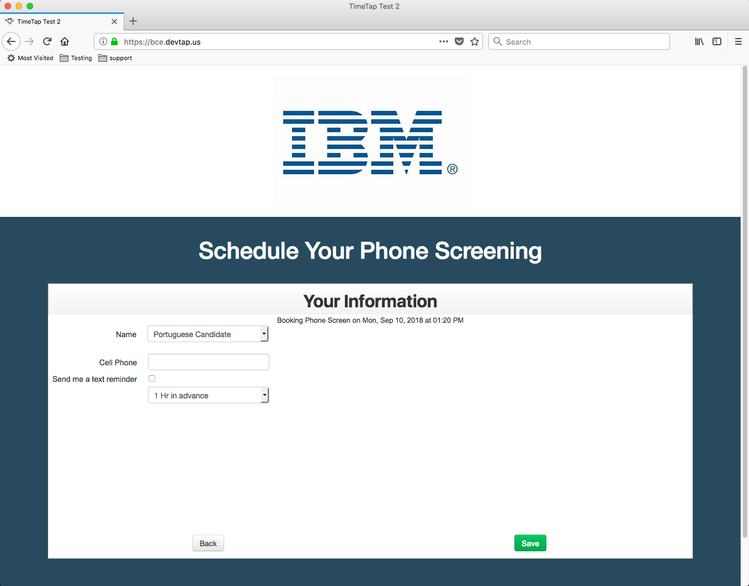
Once a recruiter has invited a candidate to book with them and they click the button to go schedule their phone screening, the landing page will load and render the page in the proper language based on the candidate's browser language setting.
This is an important point of clarification. The scheduler does not render the language based off of the language that the candidate's profile is set to. Instead, it renders it based off of what the candidate's browser is set to. This is nice for when you have a candidate booking with you that you did not pre-load into TimeTap and thus they do not have a locale set for them yet. This way we can make sure the scheduler translated properly for them even if they aren't on the TimeTap account already.
Every browser has a different method of setting the language. Check out the bottom section of this documenation page on "Setting up Test Scenarios" for how to configure your browser to another language to test this functionality out fully.
For the purposes of this demo, I have set up my Chrome browser to be in Portuguese whereas my Firefox browser is still set to English. I will put the images side by side so you can see the difference if I were to click the button to schedule my phone screening from Chrome vs Firefox:
Chrome: Portuguese

Firefox: English
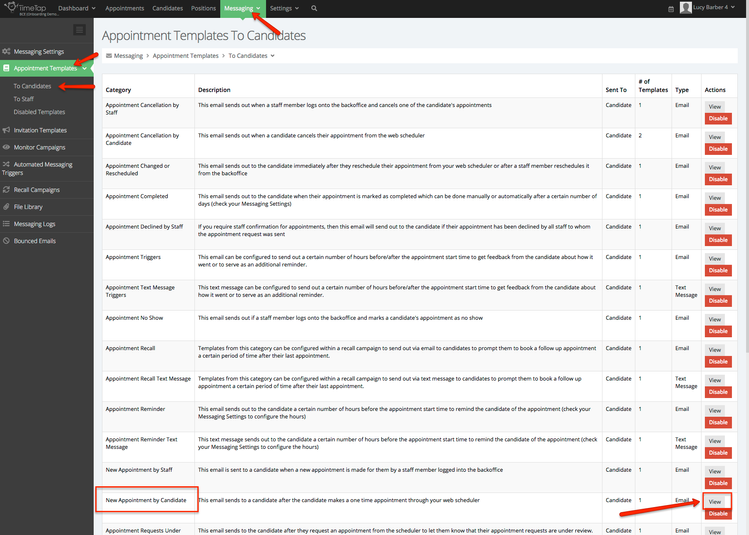
Ok, so on this documentation page, we've already gone over sending your candidates invitations in the proper language and well as making sure when they're going through the scheduler everything is translated properly. Now it's time to think about the emails and texts that send to candidates after they've scheduled. These are the messages you'll find under Messaging > Appointment Templates.
For the purposes of this demo, I will cover how to do this for the New Appointment by Candidate email template that sends out to the candidate immediately after they make an appointment on the scheduler. BUT, please note, that you'll need to follow these steps for any and all of the appointment templates that your candidates may receive and that you want to have the proper language reflected on.
To start, find the email template category that you want to provide a translation for under Messaging > Appointments Templates > To Candidates and click the "View" button next to it:
That will take you to a list of all the templates you have set up in that category (by default it is just 1). Let's say some of the candidates we are recruiting speak Portuguese. We now want to create a custom template for a specific language so that if a candidate goes to book an appointment on the scheduler and their locale property is set to the language pt (or Portuguese) then they should get this new custom template.
To do that, click the "Clone" button next to the default template in the category view:

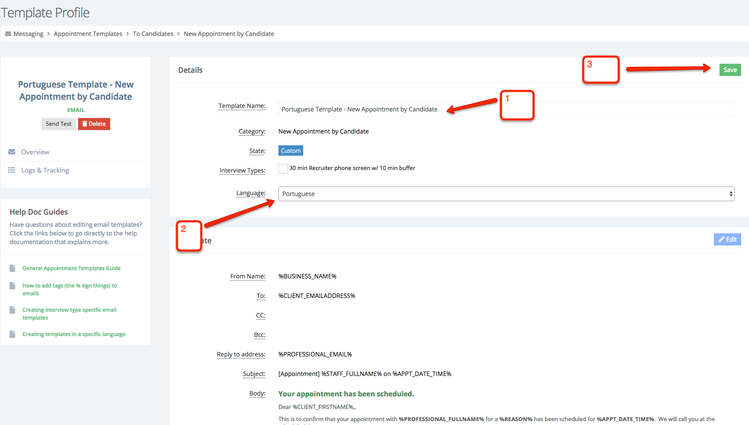
On the Template Profile page, I will:
- Name the template "Portuguese Template - New Appointment by Candidate" (this is only seen by staff so no need to have a friendly name for candidates)
- Then select the language I am translating it for (in this case "Portuguese")
- Click Save
Now, because we cloned this from the default template and because the default template was in English, the subject of the email and the body of the email for this new "Portuguese Template - New Appointment by Candidate" template we just created will also be in English. So then next step will be to take the current subject line and body and translate them over to Portuguese. Right now, the subject line and body reads as:
Subject: [Appointment] %STAFF_FULLNAME% on %APPT_DATE_TIME%
Body:
Your appointment has been scheduled.
Dear %CLIENT_FIRSTNAME%,
This is to confirm that your appointment with %PROFESSIONAL_FULLNAME% for a %REASON% has been scheduled for %APPT_DATE_TIME%. We will call you at the scheduled time.
Our Address:-
%BUSINESS_NAME%
%LOCATION_ADDRESS%
To cancel or reschedule your appointment before the scheduled time, please click %APPT_CANCEL_URL%
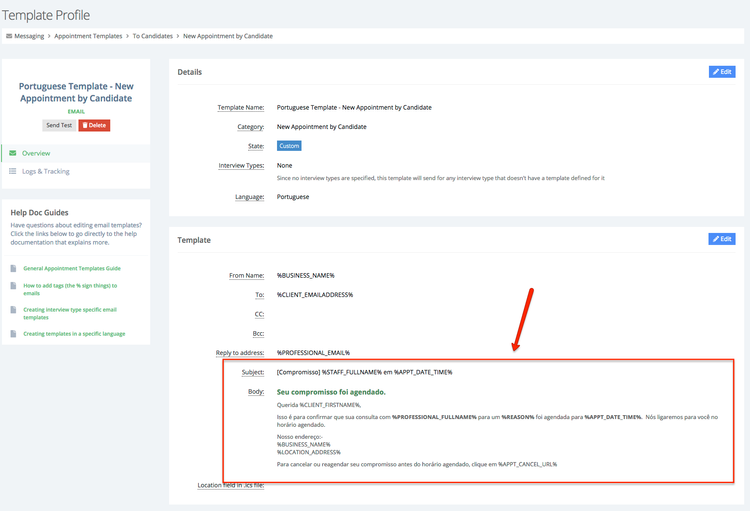
So we'll want to change everything that is NOT a tag (meaning everything that is not surrounded by % sign marks) and swap it out for the language of this template, Portuguese. That will make it so that our template will read as follows:
Subject: [Compromisso] %STAFF_FULLNAME% em %APPT_DATE_TIME%
Body:
Seu compromisso foi agendado.
Querida %CLIENT_FIRSTNAME%,
Isso é para confirmar que sua consulta com %PROFESSIONAL_FULLNAME% para um %REASON% foi agendada para %APPT_DATE_TIME%. Nós ligaremos para você no horário agendado.
Nosso endereço:-
%BUSINESS_NAME%
%LOCATION_ADDRESS%
Para cancelar ou reagendar seu compromisso antes do horário agendado, clique em %APPT_CANCEL_URL%
Notice that I kept my tags the same. Only the surrounding language in the body was changed. Here is how it will look saved on the Template Profile view:
Now, if I invite a candidate that is set to the locale Portuguese to book an appointment with me, I will send them a Portuguese translated invitation template and the scheduling landing page will be translated for them as well (both discussed earlier in this documentation page). This will make it so that the confirmation email they receive will also be in Portuguese.
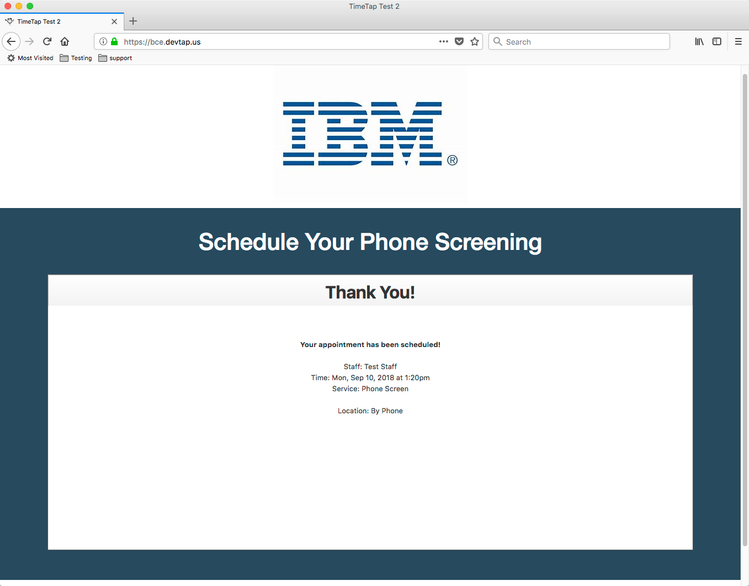
Below you'll see a screenshot of the email that appears in the inbox for the candidate whose locale is set to the language Portuguese immediately after they finish booking an appointment on the scheduler:
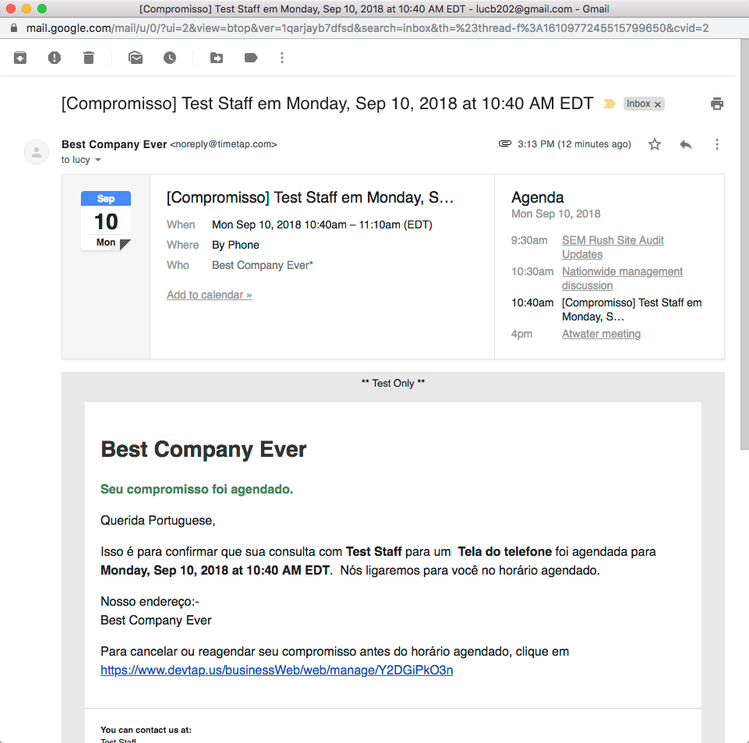
You'll notice that because this is a candidate whose locale is set to a Portuguese language, they received the custom template that we had assigned to the Portuguese language. You'll also see that any of the tags we provided translations for (like %REASON%) filled in with their translation values and not the default values (i.e. reads as "Tela do telefone" instead of "Phone Screen").
Again, you'll need to do this for each of the templates that you want the candidate to receive in their respective language. Please reach out to our support team if you have any questions on any of this.
In order to test how a person who speaks a different language may view the scheduling landing page, you'll need to swap the default language of your preferred browser from English to the language you've translated for. Below are some documentation links on how to do this for popular browsers:
- Instructions for Chrome: https://support.google.com/chrome/answer/173424
- Instructions for Firefox: https://pchelp.ricmedia.com/change-mozilla-firefox-language-settings/
- Instructions for Internet Explorer: https://answers.microsoft.com/en-us/ie/forum/ie9-windows_7/how-to-change-language-internet-explorer-9/45b941b0-4848-e011-86fd-d485645a8348
What I typically do is change the setting on a browser I use less frequently and keep my main browser language as is. I'll then go to the same scheduling link in both browsers and just compare the difference for the languages.