Creating A Substatus For Your Appointments
- Meaghan O'Reilly (Unlicensed)
- Elvis Merino (Unlicensed)
BUSINESS LEVEL FEATUREWithin TimeTap we have created a list of appointment statuses that help organize your calendar and reporting. Based on the status of the appointment you know if the appointment was completed, cancelled, confirmed, etc. Having these statuses gives you a clear picture on who you saw and when. Knowing that not every business works off the same status structure and there may be some exceptions to the rules when it comes to marking an appointment with a certain status, we created the ability for businesses/users to create their own substatuses.
Topics that will be covered on the page:
How to Create a Substatus
The substatuses allow you to label your appointments with your own process jargon. Let's say your business offers appointments at a client's home, as an example this business will be a cleaning service. For whatever reason when your staff member shows up to clean your client's home the appointment does not happen, we can use substatuses to further explain. For instance we can create a substatus of "No Show" as "Not Home" or a substatus of "Cancelled" as "client conflict."
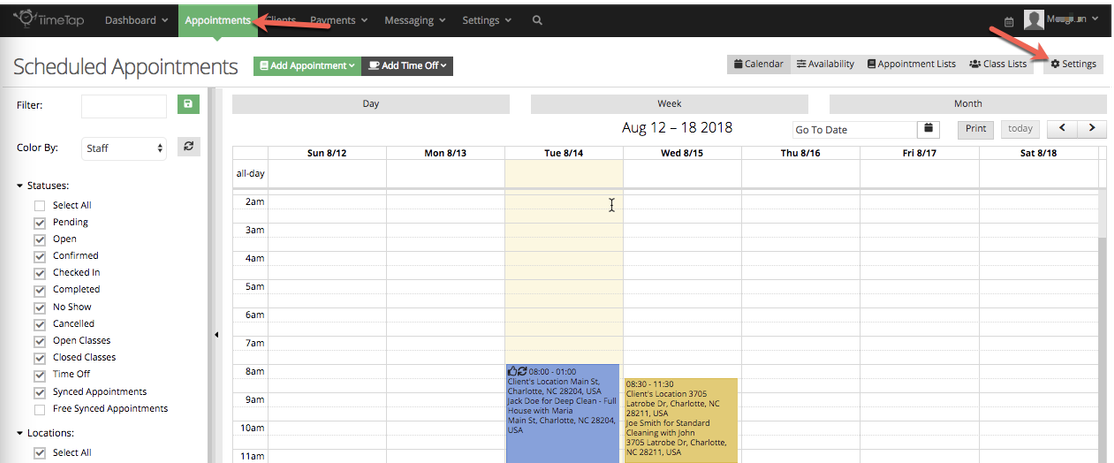
To create these substatus we will go to our Appointments page and click on Settings:
Once you are in the appointment settings you will scroll down to the Account Level Calendar and Appointment View Defaults. This is where you build your substatuses off of the main or "parent" statuses such as Open, Completed, No Show, and Cancelled.

The steps to creating a substatus:
- You first want to click the + sign below the parent status to add a new one. Once you click the + sign a text box will appear and this is where you will input the name to your substatus. In the example below we are going to add a substatus for No Show and labeled it "Not Home" which indicates that when the staff member arrives at the client's home for their appointment the client was not home and therefore they were unable to perform the service.
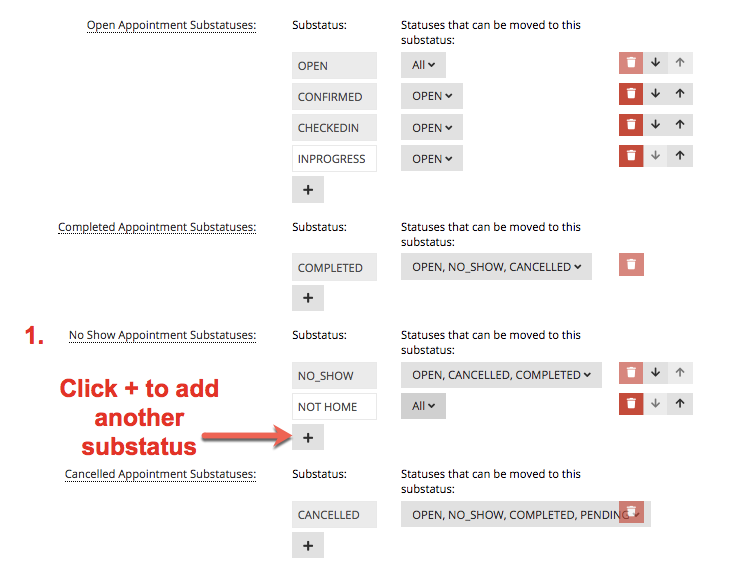
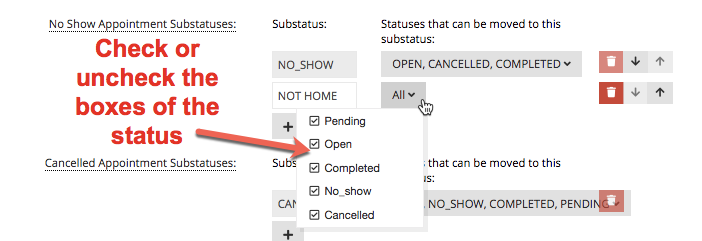
- Once we name our substatus we then want to assign from which statuses we can move our appointments to our new substatus of "Not Home." For example We will allow our open appointments to be marked as our substatus "Not Home" But we may not allow our cancelled appointments to move from Cancelled to "Not Home" as a way to keep our records straight on no shows - Not Home vs cancellations. You will check the boxes next to the status that can be moved to the No Show - Not Home substatus.
- Once you have selected which statuses can be moved to your new substatus you are able to move it up or down to place it in a particular order. This is done by clicking the up or down arrows.

- The other function after creating a substatus is you have the ability to delete the substatus if you no longer want to use/offer it on your account

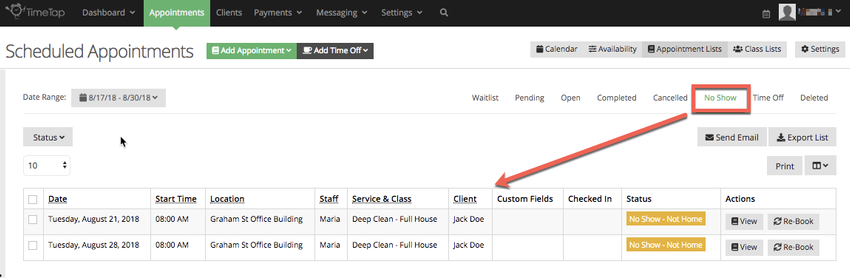
Now that we have created our No Show - Not Home substatus we are able to use it within the backoffice.
Applying Substatuses to Appointments
Now now we have create a new substatus it is time to put it to work. In this section we will go over the steps on how to change our service based appointments from one status to our new substatus "Not Home."
In the back office there are multiple way to change the appointment status of an appointment. You can change an appointment through the quick view on the calendar, through the appointment detail page or through the appointment list. Below are detailed steps in how to use each of these platforms to change your appointment to your custom created substatus:
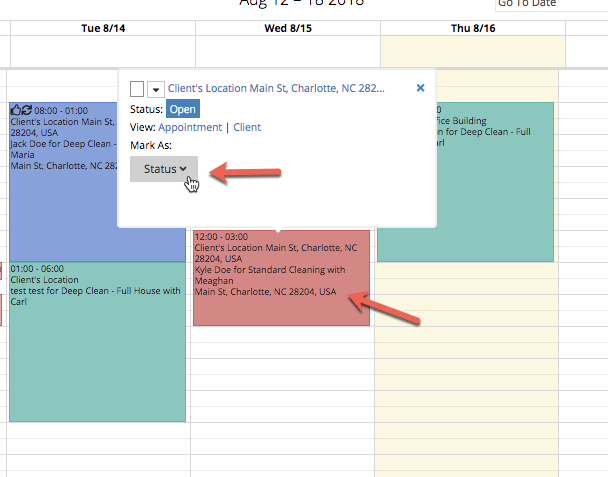
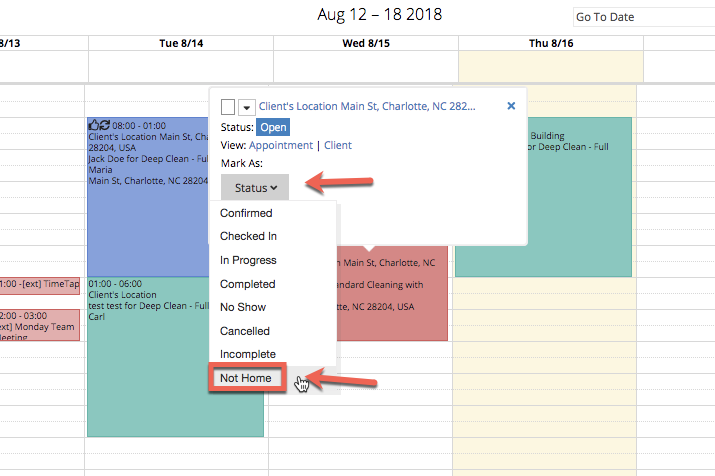
- If you are logged into the back office and are on the Appointments Page in the calendar view you can click once on the appointment on the calendar that you are wanting to change the status of. In the image below we see an appointment on Wednesday August 15th from 12:00pm - 3:00pm with our client Kyle Doe. When we click once that appointment we will see a window pop up (first image) with a section labeled Mark As: If you click the status dropdown box (second image) you will see the different statuses and substatus that we have on our account. In this example we will click on the substatus "Not Home."
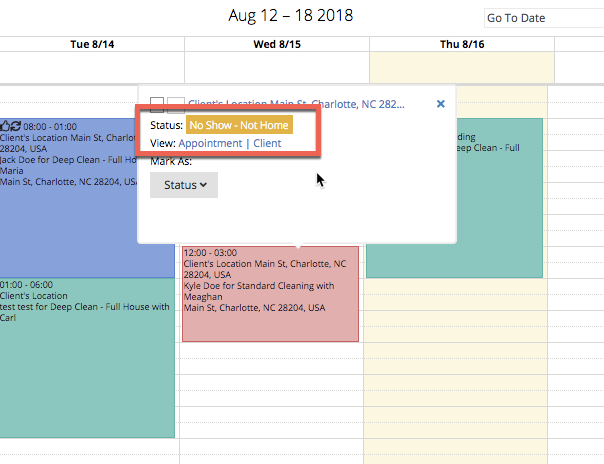
Once you click the Not Home status you will be prompted with a message saying "Please confirm that you want to mark this appointment as Not Home" and you will click Change Status or Cancel. By clicking the Change Status button, Kyle Doe's appointment for Standard Cleaning will change from Open to "No Show - Not Home"
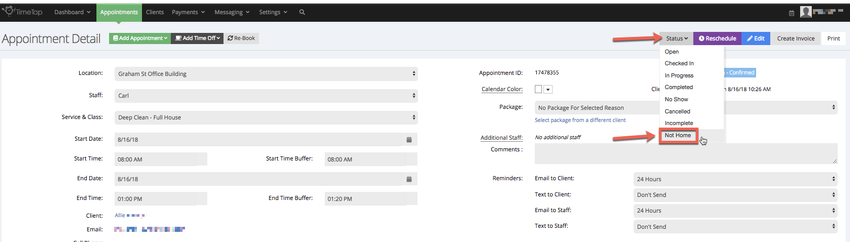
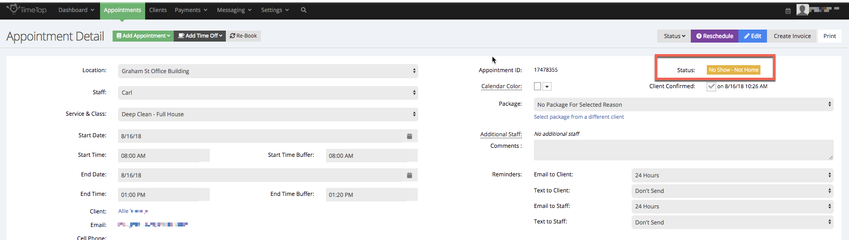
2. Alternatively you can open an appointment up into the appointment detail page and change the status from its current status to the newly created substatus "Not Home." On the appointment detail screen located in the top right corner you will see next to the "Reschedule" button a labeled "Status" This is where we will click on the status dropdown button to select which status/substatus we want to move this appointment to. In the example below we are going to open an appointment that has been confirmed and change it to our substatus of "Not Home." In this scenario the client has opened their reminder email and click confirm appointment thus changing the status from open to confirmed on the staff side. When the staff member arrives at the clients location no one answers the door, thus we will change the status from Confirmed to Not Home.
Once you click the Not Home substatus you will be prompted again to confirm this change and you will click the Change Status button. By clicking that button your appointment will move from Open-Confirmed to No Show - Not Home
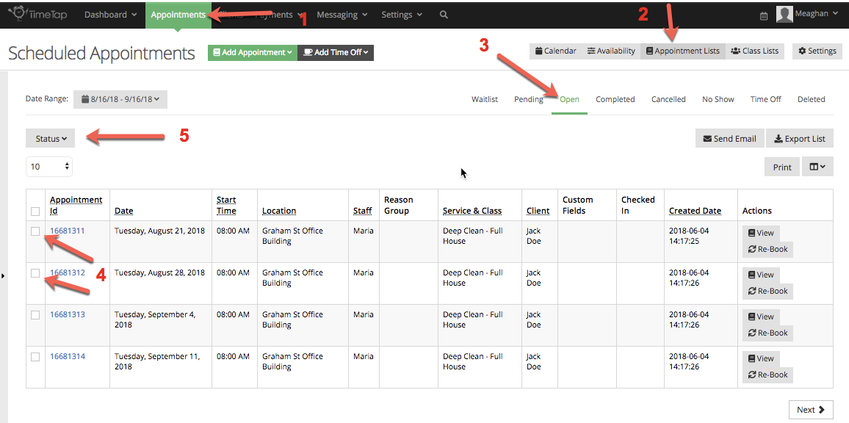
3. The final way to change the status of a service based appointment is through your (1) Appointments > (2) Appointment Lists > select which status folder you want to be in, below we are choosing all (3) Open Appointments within our date range of 8/16/18-9/16/18. Then we will (4)check the boxes next to the appointment(s) that we want to change from open to our substatus of Not Home. Once our appointment(s) is selected we will then click the (5) Status dropdown button and select Not Home as the status we want the appointment to move to.
Once you have change the appointment(s) from Open to Not Home in the appointment list those appointment(s) will be moved to the No Show folder where you will see your it listed as "No Show - Not Home"