How to send interview invitation to candidates

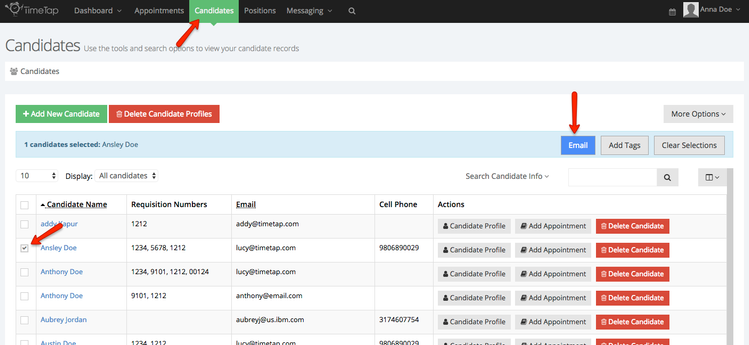
Once you've created your invitation templates, you can start sending them to candidates. To do this, go to the Candidates menu in the top navigation, select the candidate using the checkbox to the left of their name, and click the "Email" button in the top that appears:


This will bring up the send email workflow. This can be customized on a per account basis. Before going live, you'll want to consider how you want your booking flow to be set up as that will determine a lot about how the send email workflow will work.

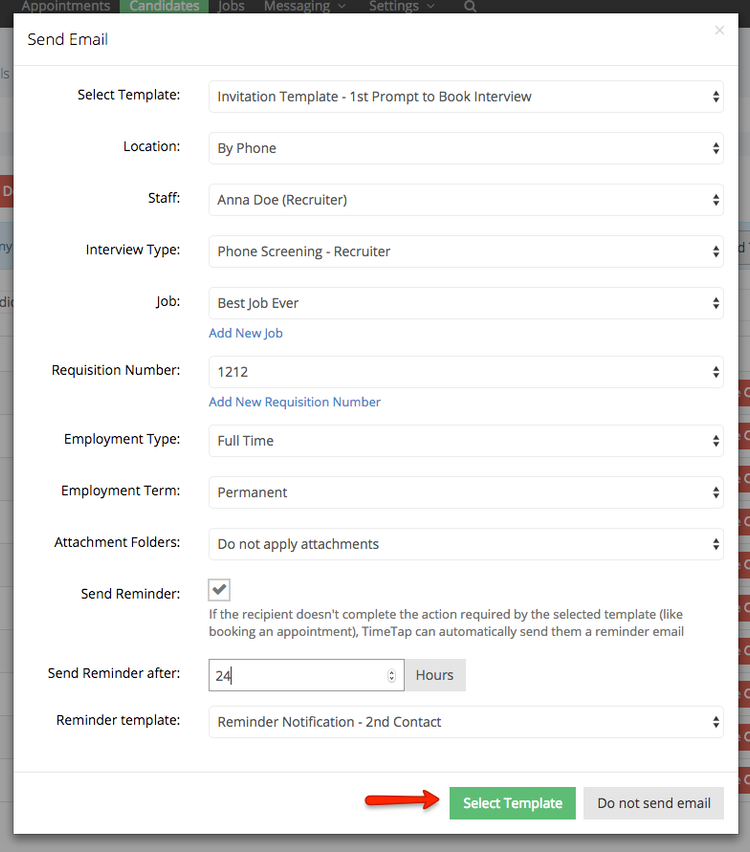
The send email workflow window will be slightly different per account. The below screenshot includes all options that you can pass through to the email by using tags or attachments. Below the screenshot you will see a description of each item:


a. Select Template:

this is the list of Invitation Templates on your account that you can choose from. You can learn more about editing and adding invitation templates here.

b. Location

this is a list of locations on the account (stored under Settings > Locations). You'll also see the option in that dropdown to add a new location in case you need to add a new location on the fly. If you want to include location values on the marketing templates, the following tags can be used:

  • %LOCATION_NAME% - inserts whatever is stored in the name field on the location profile
  • %LOCATION_ADDRESS% - inserts whatever is stored in the address field on the location profile

If any of those elements are empty on the location then they will just fill in as blanks on the template

c. Recruiter

this is a list of the recruiters on the account (stored under Settings > Recruiters). You can pass values stored on the recruiters profile to the template using the following tags:

  • %STAFF_FULLNAME%
  • %STAFF_MOBILE%
  • %STAFF_EMAIL%

d. Reason

this is a list of the reasons on the account (stored under Settings > Reasons) and generally represents the type of appointment a candidate might be wanting to book (i.e. a "Phone Screening"). To use any values stored on the reason profile in the email templates, add any of the following tags to the template:

  • %REASON% - inserts name of the reason
  • %REASON_DESCRIPTION% - inserts the description stored on the reason profile
  • %REASON_INSTRUCTIONS% - inserts the instructions stored on the reason profile under the email settings section

e. Coordinator Staff

this is also a list of staff, but it will not be the staff person that the candidate is meeting with, but rather the staff person that should be listed as the coordinator on the appointment. If you are a service center staff or account coordinator that is sending out this email to coordinate an appointment between the recruiter and the candidate, then you'd want to put yourself (the service center staff or the account coordinator) down as the coordinator staff. If you are a service center staff that is sending out this email to coordinate a meeting between the hiring manager and the candidate, you'll likely want to set the coordinator staff to the name of the recruiter who submitted the request for interview.

f. Position
*only available on accounts that have it turned on

this is the list of positions stored on the account. You can select a position and insert the name of the selected position into the template with the %REQ_JOBTITLE% tag

g. Requisition Number
*only available on accounts that have it turned on

this is the requisition number that you are sending out the email about. This can get tagged to the appointment so you can know which candidates booked in regards to which requisition numbers. Can be inserted into the email with the tag %REQ_NUMBER%

h. Employment Type
*only available on accounts that have it turned on

this is a simple dropdown selection to choose either "Full Time" or "Part Time". You can insert the selection into an email template with the tag %REQ_DURATION_TYPE%


i. Employment Term
*only available on accounts that have it turned on

this is a simple dropdown selection to choose either "Permanent", "Temp" or "Seasonal". You can insert the selection into an email template with the tag %REQ_TERM_TYPE%


j. Attachment Folders
*only available on accounts that have it turned on

this is a list of folders that is stored under Messaging > Attachments / File Library. Select a folder and we will append all files within that folder to the email that is sent out.

k. Send Reminder

If you would like TimeTap to send out an automated email reminder after X number of hours to the candidate if the candidate hasn't booked yet, check off this checkbox

l. Send Reminder after

Fill in the number of hours you would like to wait after sending the initial email before the reminder should go out. Keep in mind that if the candidate books the interview type with you before the hours entered here passes, then the reminder email will not go out.

m. Reminder Template

Select which template you'd want to send out as the automated reminder. For most accounts this has been set to "Reminder Notification - 2nd Contact"


n. Expires After

If you want the invitation that you're sending to expire after a certain number of days, you can enter that number when sending out the invitation and if a candidate tries to click on the link/button to book with the recruiter/hiring manager after that day count has passed, they will receive an error message that the invitation has expired.


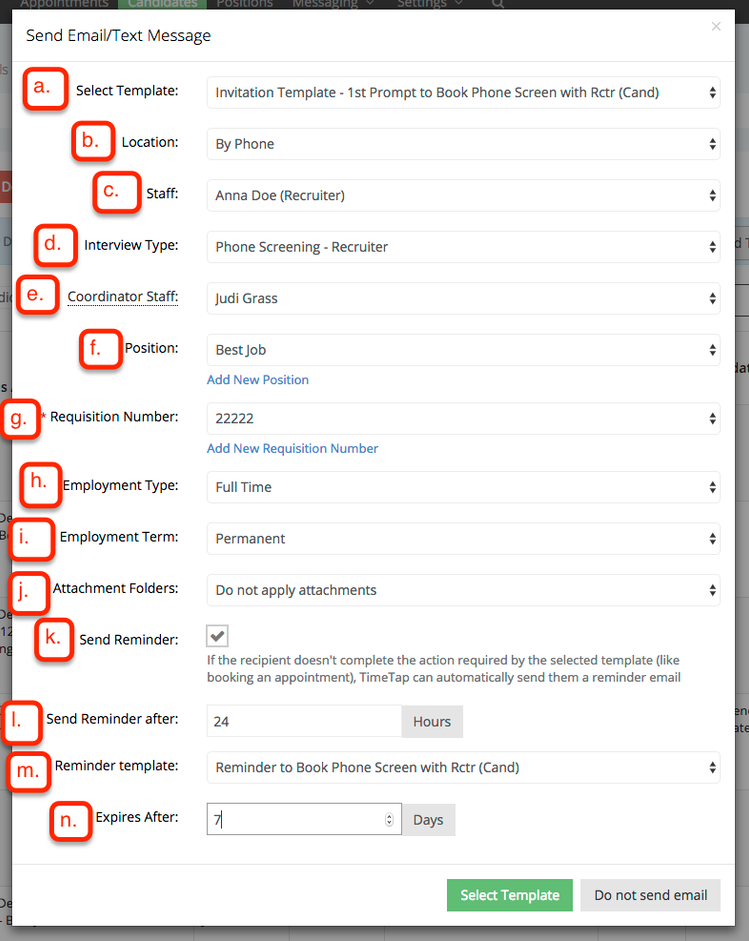
Once you've made the selections you need to on the Select Template portion of the pop up, click the green "Select Template" button at the bottom of the window:

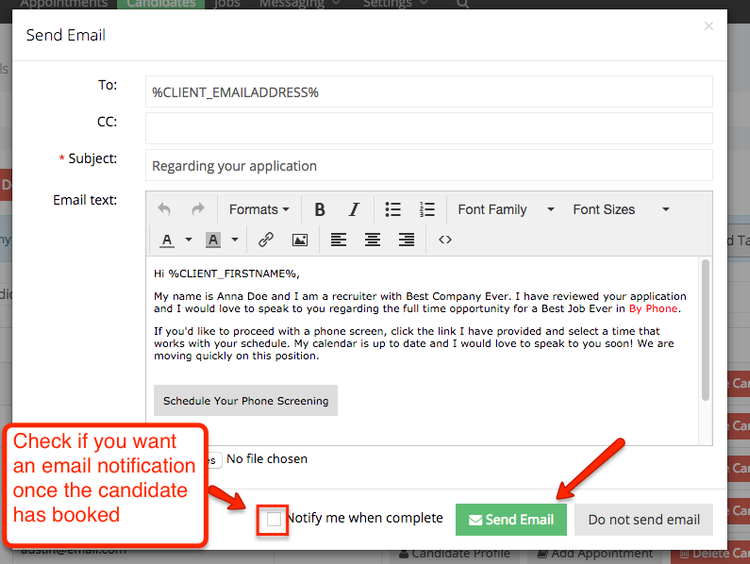
That will give you a quick window to edit the template before sending it out. Make sure that it reads okay for the candidate and will make sense to them when they receive it. If there is any text in Red that means it is placeholder text and you should swap it out with the proper item based on where it is in the template. Once you're done making any customizations, click the "Send Email" button at the bottom of the pop up window: