How to create invitation templates
- Lucy Barber (Deactivated)
- Elvis Merino (Unlicensed)
Every account starts with at least one invitation template (typically called "New Candidate Welcome Message"). This section of our documentation will cover:
I have also included sample templates under this section of the documentation based on the templates that have been set up on different accounts:
Adding a new invitation template will give you the option to send that invitation template out to candidates to prompt them to come book with a recruiter or hiring manager. Invitation templates are stored under Messaging > Invitation Templates, so to start with the process of adding a new invitation template, make sure you are logged into the proper child account and go to that page:
Under the Invitation Templates section, you'll see your list of existing invitation templates. You'll also see in the top right a green button to "Add New Template". If you click on that, you'll see an option to add a template for staff or for candidates:

Depending on what template you are wanting to set up, choose the corresponding recipient from that dropdown. If you are wanting to set up the template that prompts candidates to come book with a recruiter or hiring manager, you'd want to choose the option for "To Candidate". Alternatively, if you want to set up the template that prompts a hiring manager to come add their availability, then you'd want to choose the "To Staff" option.
The only difference in the next few steps dependent on whether you choose "To Candidates" or "To Staff" would be how you'd name the template and what tag you'd put in the "To" field. If you select to send the template to a candidate, then you'd likely want to name it something that corresponds to that step in the process for the candidate, like "Prompt to book phone screening". You'll also want to set the "To" field value to be %CLIENT_EMAILADDRESS% which would correspond to the email address stored on the candidates profile.
If you select to send the template to a staff, you'd want to name it something that corresponds to which staff you'd be emailing it to and what step you want the staff to complete, like "Hiring Managers - Add Availability". You'll also want to set the "To" field value to be %STAFF_EMAIL%.
Once you get to the add new template page, the first thing you'll want to do is fill in the name for the template. This will be how the template displays in the "Select Template" dropdown when you go to email a candidate or staff. This name is not shown to the email recipient at all so you can make it very descriptive of the circumstances you are wanting to cover. Enter the new name and click "Save" in the top right:

Once you've saved the new template, you'll see that you can then edit the template elements (like subject line & body) in the "Template" section below:
With the Template section in edit mode, you can enter in a subject line as well as the email body:
These fields are tag enabled which means you can merge values that the recruiter selects in the send email flow to the body of the template. I recommend looking at some of the example templates we've provided to see more about what tags you can use, but I've listed some common ones below:
- %BUSINESS_NAME% - The name of the business as defined in the "Business Name" column in your list of your child accounts
- %STAFF_FULLNAME% - The full name of the recruiter that was selected in the send email workflow
- %CLIENT_FIRSTNAME% - The first name of the candidate that was selected to send the email to
- %REASON% - The name of the reason that was selected in the send email workflow (like "Phone Screening")
- %REQ_JOBTITLE% - This will print the name of the position that was selected in the send email flow (currently only enabled for Air Canada)
- %BOOK_INVITATION_URL% - this will print a link to the scheduler that will be customized based on the selections made by the recruiter/coordinator when sending the invitation out
- %COORD_STAFF_FULLNAME% - this will print the full name of the staff that has been assigned as the coordinator for the invitation or the appointment
- %COORD_STAFF_EMAIL% - this will print the email address of the staff that has been assigned as the coordinator for the invitation or the appointment
- %COORD_STAFF_MOBILE% - this will print the cell phone number of the staff that has been assigned as the coordinator for the invitation or the appointment
For a full list of tags, please visit our general documentation page here.
Please note: the syntax for tag formatting is critical. There are NO spaces in the tags. The format is %TAGNAME% where the entire tag is wrapper with percentage signs. If you are using the translation tables, then you'll want to add in the #locale-code before the closing % sign.
If you want to make changes to an existing invitation template on your account, login to the child account that has been set up and go to Messaging > Invitation Templates:

Find the template you want to edit in the list and click the "View" button next to it:

Scroll down to the "Template" section of the template profile and click "Edit":

Make the changes that you want to make int he template body/subject line and click "Save" in the top right:

These templates are html enabled so you want customizations in terms of adding buttons or links of some kind and are not sure how to insert those, please email lucy@timetap.com and she'll be glad to assist
As of version 4.3.1, we have added the ability to associate invitation templates with interview types. If you do not associate invitations with interview types, then an invitation may be sent out to candidates for any interview type. If you do associate invitations with interview types, then when you go to send an invitation to a candidate if you select the invitation that is associated with interview types, only the interview types associated with that invitation will show up in the send email window dropdown to select.
First, let's go through how to associate an invitation template with an interview type. Go to Message > Invitation Templates and click the "View" button next to the template that you want to associate interview types with:

This will take you to that template's profile. On the template profile, click the "Edit" button next to the "Details" section:

Once the Details section is in edit mode, select which interview types you want to assign to the template and click "Save":

Now that you've assigned the interview types to the template profile, when you go to your Candidates list screen, select some candidates, and click the send an email, you'll see that if you select the template you just edited that only the interview types you've selected when editing the template will show as options in the interview type dropdown:
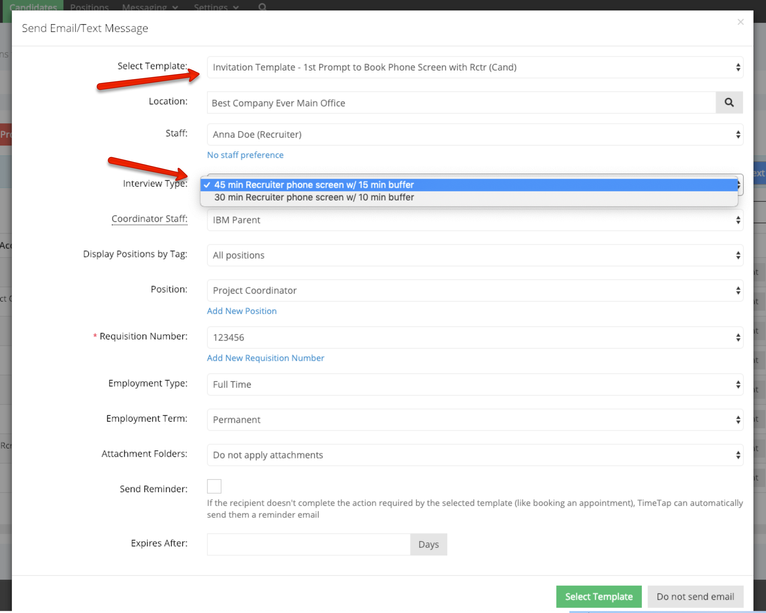
One thing that is important to note is that interview types are first sorted by the selected staff. If the staff selected (in the screenshot above "Anna Doe") does NOT offer one of the interview types that was assigned to the template then it will not show in the interview type dropdown as you wouldn't want to send a candidate an email to book an appointment for an interview type the selected staff doesn't offer. To see which interview types any given staff offers, go to Settings > Staff and click "View" next to their name in the staff list. On the staff profile's overview page, you'll see the list of interview types that staff offers.
As of version release 3.9.0, we have added the tag %INVITATION_DECLINE_URL% which you can add to any invitation templates or invitation reminder templates. This will convert into a hyperlink once the email is sent out that the candidate can click on in the email they receive to decline the invitation and move the requisition number to the requisition numbers declined table in their account.
Below, you'll see where the %INVITATION_DECLINE_URL% tag has been added to the Invitation Template:

Once the email is sent out to the candidate, this tag will convert into a hyperlink:

If the candidate clicks on this link in the email, they will be directed to a small landing page where they can click a "Decline" button:

Please note: you can control the text that is shown on this page from the account's Messaging > Messaging Settings page:

Once the candidate clicks the Decline button on the landing page, if you expand the monitor campaigns view for that candidate's invitation, you'll see that he/she has declined that invitation:
