Automated Messaging Triggers
BUSINESS LEVEL FEATURE
**Please note that this feature is enabled by request only as it can significantly increase the volume of emails and texts that are sent from an account.**
The Automated Messaging Triggers is a feature that allows you to send custom messages to clients or staff notifying them if there have been any changes, updates or important information regarding the appointments or classes they are booked for. In an effort to avoid spam coming from our servers, we activate this feature only for Business and Enterprise account holders (not bots 😊 ) who ask for it.
Within the Automated Messaging Triggers users will have the option to define a reason, staff, or location before sending a specific appointment template to clients/staff either individually or in bulk. As an example, this email can be configured to be sent out a certain number of hours before/after the appointment start time to get feedback from the client about how it went or to serve as an additional reminder.
The Automated Messaging Triggers come in handy when you have a message you want sent to your clients based on an action taken or a timeframe. For example if you wanted to send an email to your clients based on the status of the appointment changing from Open to Open-Confirmed, you can set a specific trigger message to be sent.
On this page we will go over:
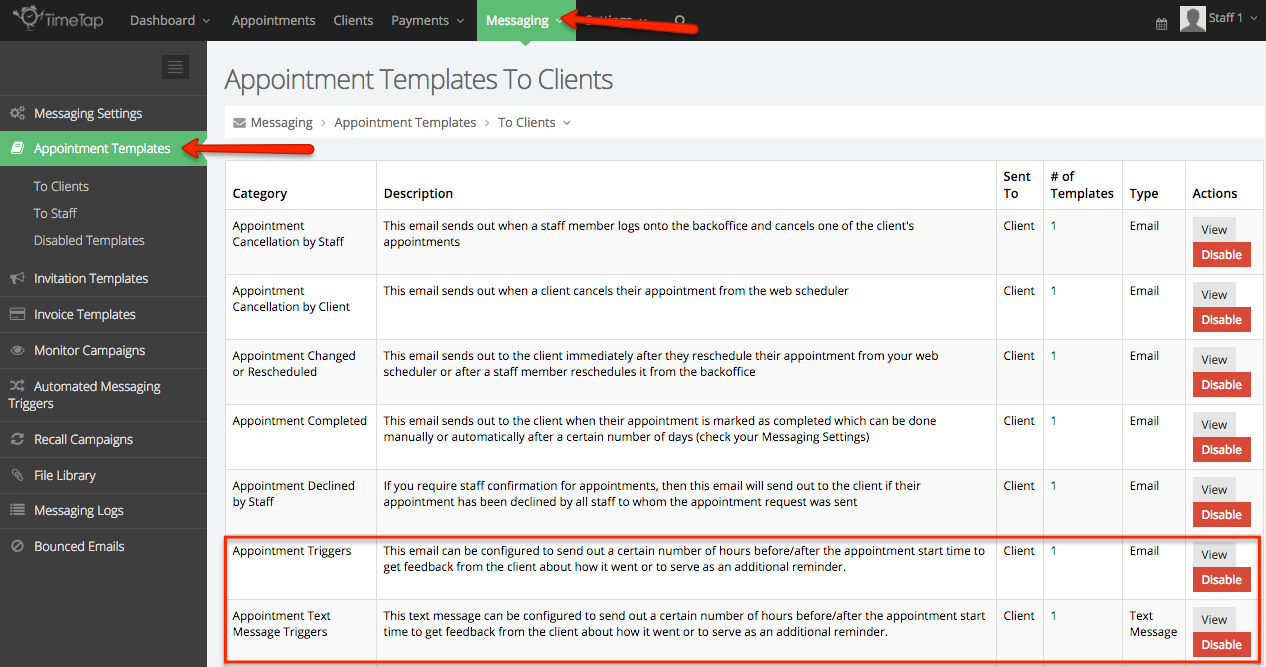
Before setting up your triggers you want to make sure your appointment templates are first set up. The Appointment Triggers Templates are located in Messaging > Appointment Templates > Appointment Triggers (choose your type: Email or Text Message).
For a refresher course on how to edit or clone appointment templates click here.
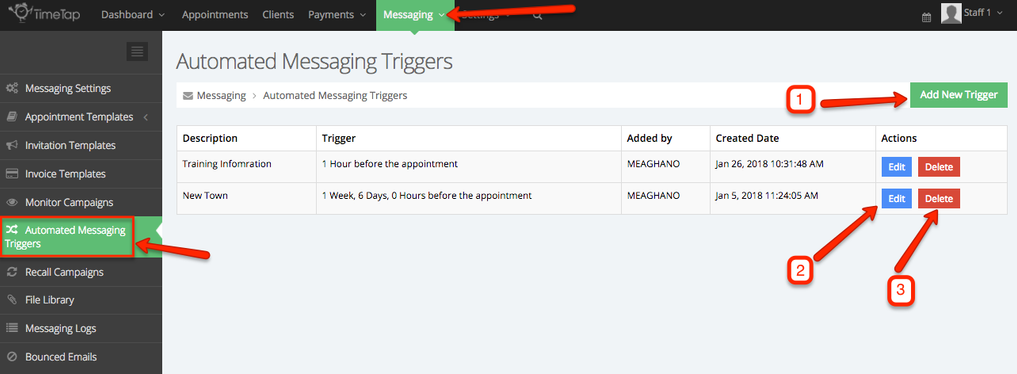
To access your current Automated Triggers or to create a New Trigger you will go to Messaging > Automated Messaging Triggers. On this page you will have the option to Create a New Trigger or edit and delete previously created Triggers.
On this page you will find the following call to action buttons:
- Add New Trigger: Click add new trigger to define a reason, staff, location, and what the trigger activation is before sending an Appointment Trigger template to clients and/or staff
- Edit: Click edit to make changes to a previously created trigger. (ex. If you want to add an additional message or change the time frame at which the trigger message is sent)
- Delete: Click delete to completely remove the trigger from your account
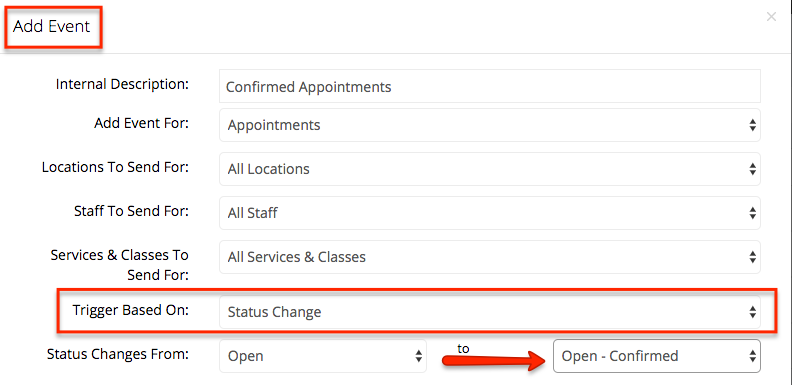
Once you have clicked the button "Add New Trigger" you will be taken to the Update Event Screen where you will define the properties of your trigger(s). To keep with our example above we will label this trigger "Confirmed Appointments" and we will assigned it to all locations, staff and services. We will then set the trigger to send based on status change, specifically the status change from open to open-confirmed
Under the Update Event section you will choose the properties your trigger is assigned to.
- Internal Descriptions: This will be the name of your trigger will be (internal use only)
- Add Event For: assign the type of event this trigger will be tagged to - an appointment (one on one service) or class session
- Locations To Send For: Identify which location(s), if not all, will be assigned to this trigger message
- Staff To Send For: Identify which staff(s), if not all, will be assigned to this trigger message
- Services and Classes to Sent For: Identify which services and classes, if not all, will be assigned to this trigger
- Trigger Based On: this field is the action that will initial the trigger message to send. In this section you can choose:
- Time (months, weeks, days, hours before/after appiontment),
- Status Change - From Open to Completed, Open to Canceled, Pending Payment to Open, ETC..
- On Creation - when a service or class is created your trigger message will be automatically sent out to the clients assigned to that Reason
Now that you have selected the properties that define your automated trigger message it is now time to decide who gets the message, what type of message it is and which appointment triggers template you want to send to this audience.
In this section we are choosing to send the message to the client via email and the template we choose for our confirmed appointment trigger which is called "Appointment Triggers - Confirmed Appointments." As a reminder this Appointment Trigger template was created under Messaging Settings > Appointment Templates > Click view next to Appointment Trigger > Cloned the default template.
Once you have set the below fields we will click save event.
Under Messages you have the following to select:
- TO: This is who the trigger message will be sent to. In this field you will choose either Client or Staff
- Type: You have the choice to send an email or a text message to your clients or staff
- Template: Here you will choose from the templates you created in the appointment templates. As you can see we have listed out some examples to show the selection process
- Add Another Message: Click this button to add another message where you will have the same fields to choose from. If your first message is sent to the client via email and now you want to sent another message to client via text OR if you want to send a message to staff as well you can set up multiple messages within the Trigger
- Save Event: Once you have finished setting the properties of the Trigger you will then press Save Event to put it into motion
- Cancel: If you decide you no longer want to set up this trigger click cancel to exit the process
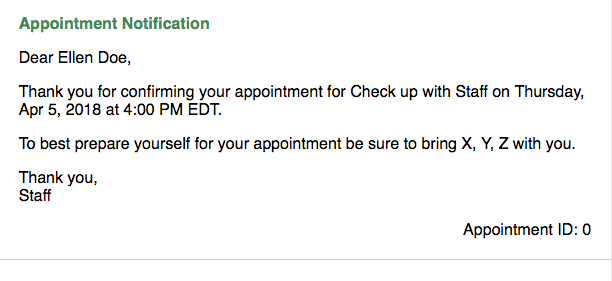
Trigger Message Received
Now that we have set our Automated Messaging trigger into action from here on out when a client confirms their upcoming appointment(s) they will automatically receive the Appointment Template labeled "Appointment Trigger - Confirmed Appointment" email notification.


