Messaging Settings
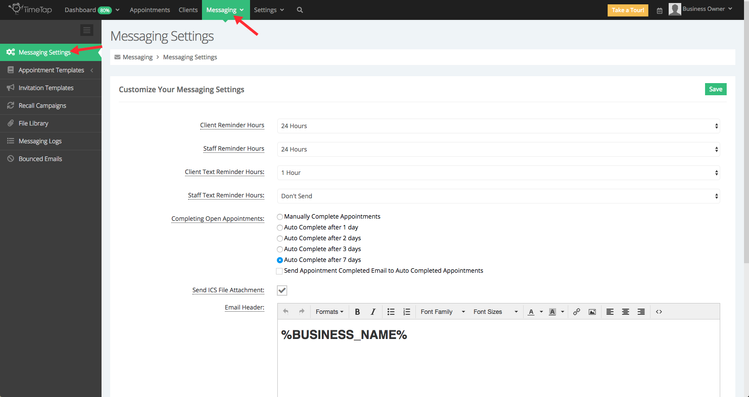
Your Messaging Settings page is where the general settings for the emails send out from your account are hosted. You'll find this page by clicking the "Messaging" menu in the top of your navigation bar and choosing the "Messaging Settings" option underneath it:
Important: Remember to press the "Save" button after making any changes to any of the settings found here.
What follows is a description of each of the settings on this page and how each of them impact your account. If you have questions on any of them, please feel free to contact our support team to ask.
- Reminder notification hours: There are four different settings for the four different reminders that can go out before the appointment start time (2 to clients, 2 to staff). In the messaging settings view you can set the default value for each of them which will be applied to each appointment when it's created. You can change this on a per appointment basis, but these values will be applied on the onset
- Client Email Reminder Hours: This setting determines the default number of hours before the appointment that a client will receive the appointment reminder email
- Staff Email Reminder Hours: This setting determines the default number of hours before the appointment that the staff assigned to the appointment will receive the appointment reminder email
- Client Text Reminder Hours: This setting determines the default number of hours before the appointment that a client will receive a text message notification as a reminder for their appointment email. Text messaging is only available on our Professional and Business level plans, not for Free accounts.
- Staff Text Reminder Hours: This setting determines the default number of hours before the appointment that the staff assigned to the appointment will receive a text message notification as a reminder. This is assuming that the staff has "send text alerts" checked off on their staff profile. Text messaging is only available on our Professional and Business level plans, not for Free accounts.
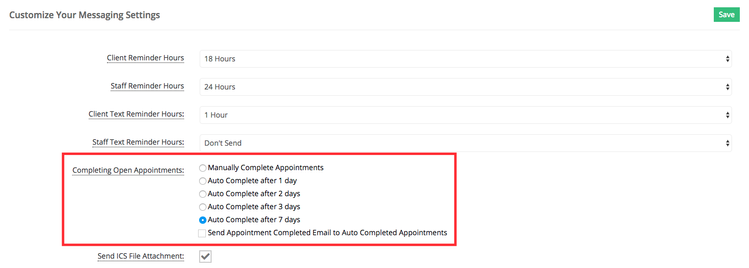
- Completing Open Appointments: If you have read our documentation on managing the statuses of your appointments, then you'll be familiar with the different status names. To quickly summarize, all appointments start out in "Open" status. Once the appointment time comes to pass, the appointment can either be marked "Completed" or "No Show" to reflect whether or not the appointment was actually rendered. Assuming that most of your appointments will be successfully completed, you can set this setting to automate this process so you don't have to login and do it every day. By default, all appointments will be marked as complete after 7 days, but if that's too long for you, you can change this so that they are auto completed after 1 day, 2 days, or 3 days. You can also not turn on auto complete by selecting the option to "Manually Complete Appointments". This means that you'll be logging in to change the status of open appointments to completed.
You'll also notice a checkbox at the bottom of this setting to "Send Appointment Completed Email to Auto Completed Appointments". If you have auto complete turned on, then when the number of days passes that you have set to automatically mark the appointment as completed and the appointment's status is changed from "Open" to "Completed", TimeTap will deliver the Appointment Completed email from your account at the same time. This is a great way to automate sending out links to have clients fill out surveys about their experience or something to that effect.
- Send ICS File Attachment: On both the appointment confirmation as well as the appointment changed/rescheduled email that sends to the client and staff, you have the option to include a calendar attachment (known as an .ics file). This can be used to quickly add the appointment to your native calendar (like Google Calendar, Outlook, iCal, etc.) depending on which email client you use. By default this is checked, but if you deselect it, the attachment will no longer be sent out.
- Invitation Campaign Declined Message: This is what shows if a client clicks on the link to decline the invitation to book an appointment
- Invitation Campaign Expired Error Message: This is what shows if a client clicks on the link to book an appointment after the expiration date set on the invitation campaign
- Invitation Campaign Description: This is what shows in the description column under Messaging > Monitor Campaigns
- Email Header: Each of your email templates send out with the same header applied to them. By default, this just includes your business name, but if you are savvy in html you can customize this to your heart's desire by toggling the source switch and adding in table elements, color coding, etc.
- Email Footer: Each of your email templates sends out with the same footer applied to them. By default this just includes the email signature of the staff who will be assisting the client during the appointment, this information can be found in every staff's profile under the Email Settings section.
When you first create your TimeTap account, your Reminder Email Hours will be set to 24 hours and your reminder Text Message will be set to 1 hour. This means that when a client creates an appointment, the reminder email is, by default, set to go out to the client and the staff 24 hours before the appointment start time. You can adjust this setting in your Messaging Settings under the Main Messaging menu
First, open up your Messaging Settings by going to Messaging > Messaging Settings:
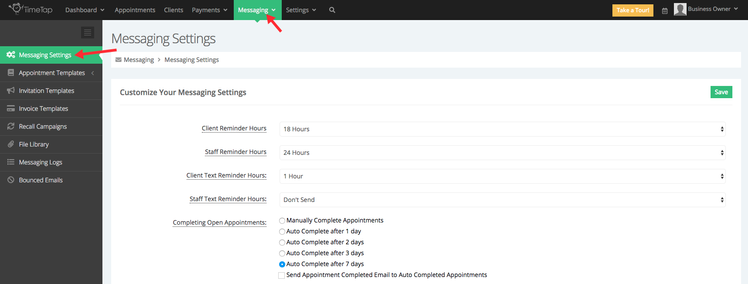
You'll see the reminder hours settings at the top of the Messaging Settings view:
You can change it (for client or staff) so that the reminder email is sent to send out:
- 1 hour before the start time of the appointment
- 2 hours before the start time of the appointment
- 3 hours before the start time of the appointment
- 4 hours before the start time of the appointment
- 6 hours before the start time of the appointment
- 12 hours before the start time of the appointment
- 18 hours before the start time of the appointment
- 24 hours before the start time of the appointment
- 30 hours before the start time of the appointment
- 48 hours before the start time of the appointment
- 1 week before the start time of the appointment
- 4 weeks before the start time of the appointment
- Or select "Don't send" and by default the email reminder will be sent to not send out
You'll see these options on the screenshot below:
Once you've updated the reminder hours to what you want them to be set to, press the green "Save" button in the top right of the Messaging Settings view:
Now, the next time an appointment is made with you or the next time you add an appointment using the back office, the default reminder hours will be as you have them set in your appointment actions menu:
You can also update these on an appointment by appointment basis if you'd like to. Details on that available here.
You always have the option of manually completing open appointments at the end of each day. We highly recommend keeping up with appointment statuses by properly categorizing them, but we understand this can get tedious especially if you have a lot of appointments.
That's why we have the auto complete feature which is turned on when you create your TimeTap account. By default, this is set so that after 7 days, so that if you haven't marked your appointment as completed manually, then after a week it will be automatically moved to completed status. We do not, by default, send out the appointment completed email to your client.
First, open up your "Messaging Settings" view by going to Messaging > Messaging Settings:
Next, look for the "Completing Open Appointments" selection:
You can change the default "Auto Complete after 7 days" option so that appointments:
- Auto Complete after 1 day
- Auto Complete after 2 days
- Auto Complete after 3 days
- Auto Complete after 7 days
- Or you have to manually mark them as completed
You'll also see at the bottom that you have the option to check the checkbox to send out the Appointment Completed Email to your clients when the appointment is auto marked as completed.
Once you have made the changes you've wanted to make, click the "Save" button in the top right of this section and your appointment completed flow will update based on your new preferences.


