Customizing your Greeting Message & Client Login Settings
As the adage goes, a first impression can make or break a relationship. While the greeting message on your TimeTap scheduler may not be the first interaction your clients have with you or your business, it will be the first interaction they have with your online scheduling system. For some clients, it will be their first time making an appointment online at all. Your welcome message is a good place to set expectations and convince clients that this is going to be a quick & easy process.
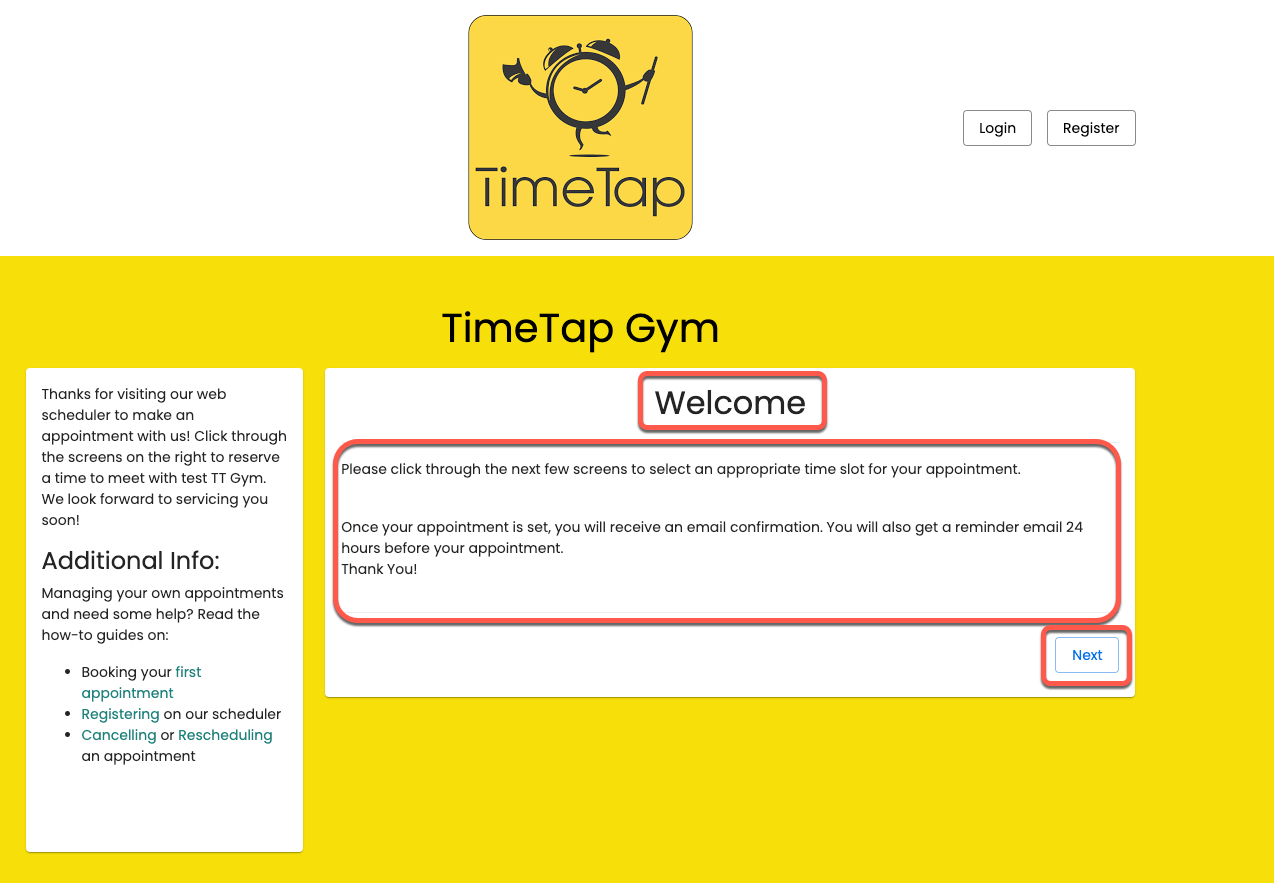
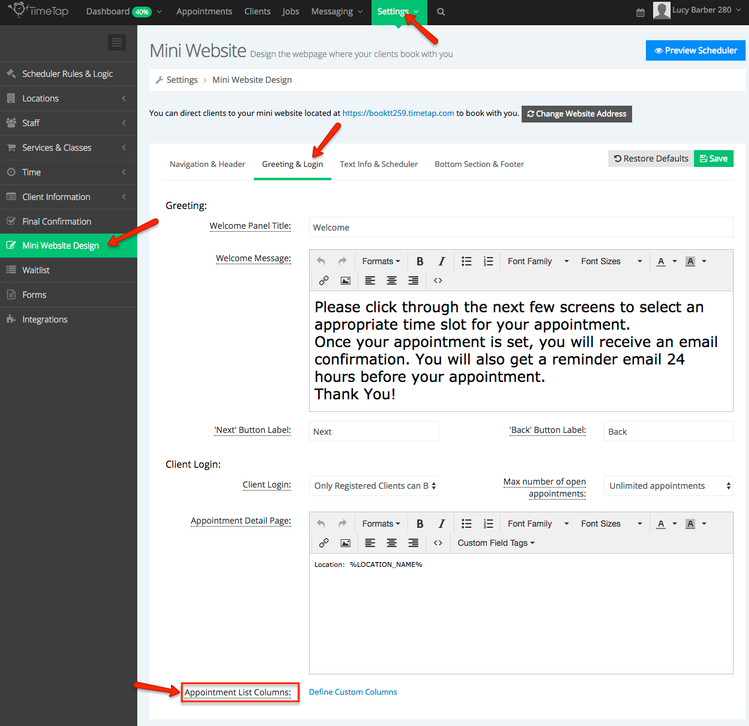
To give you a sense of where the greeting message is, if you visit your Mini Website, the greeting is the first thing that loads in the scheduler.
The portions of the image to the right that are highlighted by the red boxes will show you what text you can customize from the Greeting section under Scheduler Rules & Logic.
In this documentation, we'll go through how to:
- Customize the different elements highlighted in red from the mini website on the right
- Best practices in writing a Greeting & Configuration message
- Customizing the Client Login process
Once you have finished reading this documentation page, you should feel comfortable making changes to the front page of your scheduler through the Greeting section.
As always, if you have any questions that aren't answered here, please contact our support team and we'd be happy to assist.
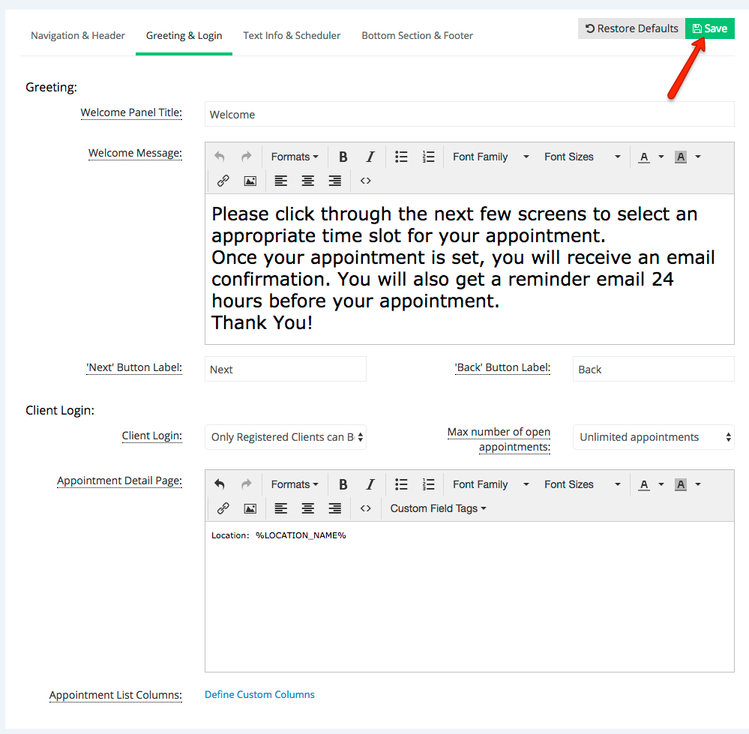
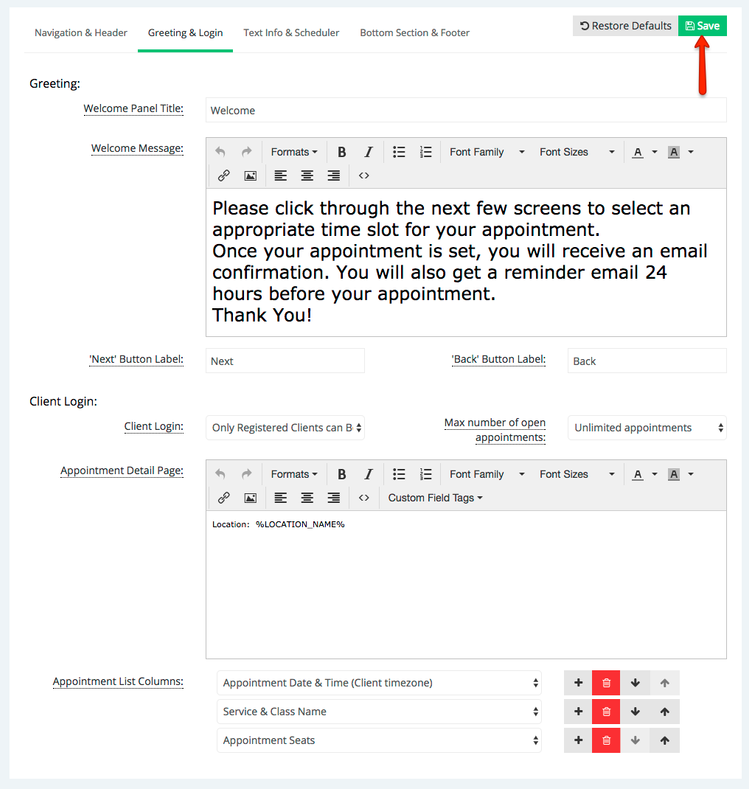
The "Greeting" section is found under the "Greeting & Login" portion of your Mini Website Design page under the Settings menu: 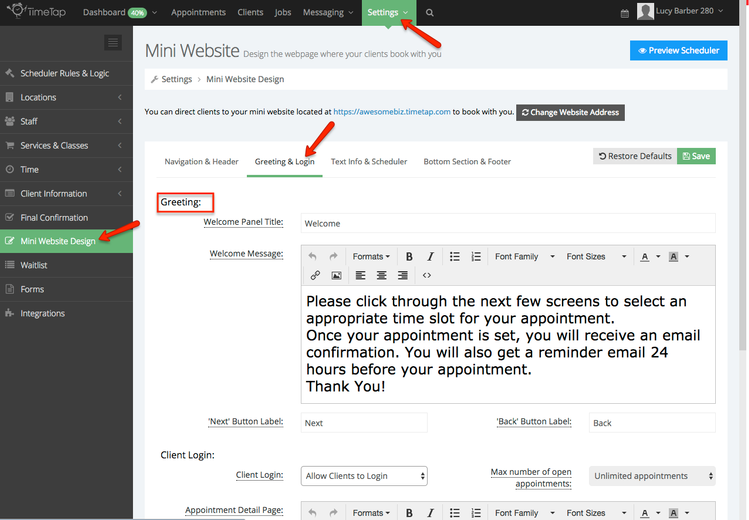
Under this section, you'll see options to edit four components of the greeting:
- The Welcome Panel Title
- The Welcome Message
- The Next button label
- The Back button label
Each of these components are explained in detail below.
Welcome Panel Title:
Out of the box your Welcome Panel Title will be labeled "Welcome". Some people prefer to change this to something more descriptive which you can do from the Edit Greeting window. You can have it say "Welcome to our Scheduler" or "Book an Appointment with Us" or "Our Scheduling Portal". Whatever you think will most familiarize your clients with the idea that this is the scheduler they can use to book with you, enter that as the header as it will likely be the first things clients see when they look at your scheduler.
Welcome Message:
By default, the welcome message will read "Please click through the next few screens to select an appropriate time slot for your appointment. Once your appointment is set, you will receive an email confirmation. You will also get a reminder email 24 hours before your appointment.
Thank You!"
This gives clients a good idea of what is coming as they click through the next few screens to secure an appointment, but it feels very canned and may not "sound" like the language your business or your brand uses. We have a few best practices that you should consider when writing your Welcome Message, and you can edit it at any time from this Edit Greeting window.
Next & Back Button labels
The client scheduling process is kept very simple so that clients only ever have one focus on any page that they are on while they're securing their appointment. The Next & Back buttons guide the client through the scheduling process. The labels "Next" and "Back" work for most folks, but if you would rather them read as something else (maybe you prefer Pirate's lingo or something: "Next Matey" & "Back, Aaargh!") you can type over the default labels and replace them with your own style.
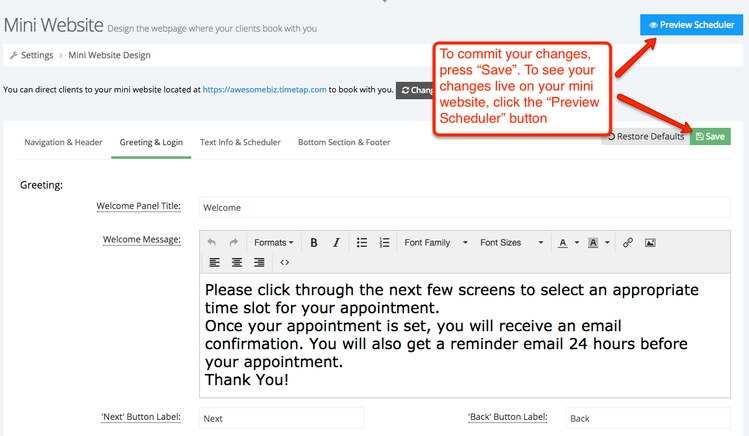
Once you finish making the changes you want to make to the greeting, you can click the green "Save" button in the top right to commit your changes. If you click the blue Preview Scheduler button, you can see the changes you made to your Greeting take place immediately.
As mentioned above, your welcome message will be many of your clients' first interaction with your online scheduling system. You can use the message to reduce anxiety and set expectations. Here are a few quick tips for your welcome message:
- Keep it short: It's good advice for any writing, I know, but especially if you are promoting online scheduling as something that's quick and easy for your clients to do, don't weigh them down with a long intro that they have to read
- Don't be redundant: If you are using the Mini Website, you have probably already customized the left hand side of the scheduler with some text and messaging that represents your business. That's awesome, but you want to make sure that you're not just simply re-iterating what's already been said on your Welcome message.
- Give them a sense of what's to come: If you have your reminder emails set to deliver 24 hours in advance of the appointment, tell them that. If they can cancel or reschedule up to 12 hours before the appointment, tell them that. If they are required to login or register in order to book with you, tell them that. If you are not currently accepting new clients, tell them that. It's better to let clients know ahead of time what might surprise them as they get into the booking process. This way they have no excuse for not knowing.
- Use the formatting tools: Underlining, bolding, font size, lists, alignment. All of these tools are at your disposal when customizing your welcome message. Use them to help emphasize important parts of your message, but don't abuse them!
- Consider providing your contact info: Some of your clients might be terrible at organizing or finding past emails and will have thus misfiled the original appointment confirmation email you sent to them. They may, however, remember the web page they used to book their appointment and so including your email address or phone number on your welcome message may help clients who will have lost your email with your contact info.
Under Settings > Mini Website Design > Greeting & Login are the options for customizing your client login:
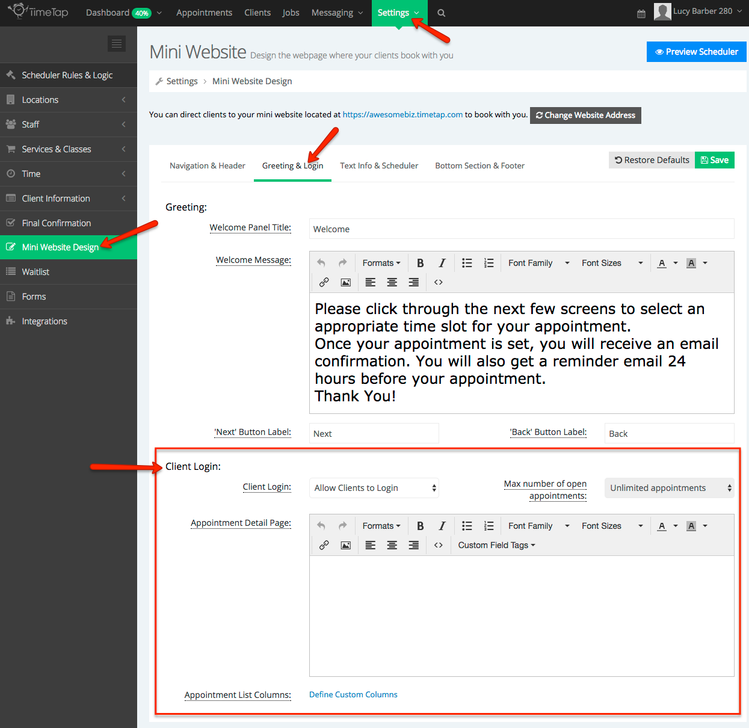
In that section of the "Greeting & Login" portion of the Mini Website Design page, you'll see there are 4 field options to edit:
- Client Login Field - this turns on or off whether to allow your clients to login to the scheduler
- Max Number of Open Appointments - this determines how many "Open" appointments a client can have at any time. This is only configurable if you force clients to login.
- Appointment Detail Page - this determines what fields show on the appointment detail page that clients click through to from any confirmation email or when they login and click on one of their appointments from the list view
- Appointment List Columns - this determines which columns show in the appointment list view of the scheduler
We have described each of these fields in more depth. Please click on the links next to the field names above to jump to the section of the documentation where we discuss those items in depth.
Setting your client login option is something that is determined on a business by business basis. Some businesses really want to let clients login to view their appointment history and book new appointments without having to enter in their information every time. Other businesses couldn't care less if their clients logged in to book with them or not and choose to remove the client login to reduce clutter and confusion.
The choice is yours to make, but I highly recommend reading through our documentation on how to configure client login when deciding what to go with on this setting. On that page we go through everything you could need to know about allowing (or not allowing) clients to login on your scheduler including:
- The 4 Options you can choose when setting Client Login
- How Clients will Register and Login
- What the Login screens look like for Clients
- How Clients can be linked to one another through the login
Since there is another whole page dedicated to discussing Client Login, I will not go too in depth with it here. Just note that the default setting is "Allow Clients to Login" and read through the client login documentation to understand your other options with it.
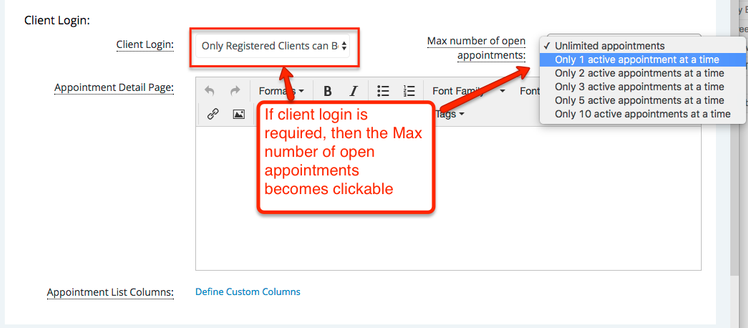
By default, your clients can book an unlimited number of appointments through the web scheduler. In some cases, you may want to restrict the number of appointments a client can book and have open at one time. To enable this feature, the client should only be allowed to book if he or she is logged in, meaning that the Client Login option should be set either to “Clients Must Login to Book an Appointment” or “Only Registered Clients can Book an Appointment.”
Once the Client Login has been set to mandatory, then you will see the dropdown entitled “Max number of active appointments” become active. Here, you can set the number to 1, 2, 3, 5, or 10 active appointments at a time. That way, if you set the max active appointments to 1 and a client has already booked 1 appointment, he won’t be able to complete the booking process for a second appointment until the first appointment has been "Cancelled", "Completed", or marked as "No Show".
Once you have selected the maximum number of appointments you want clients to be able to make, press “Save” in the top right and the updated settings will be applied to the scheduler.
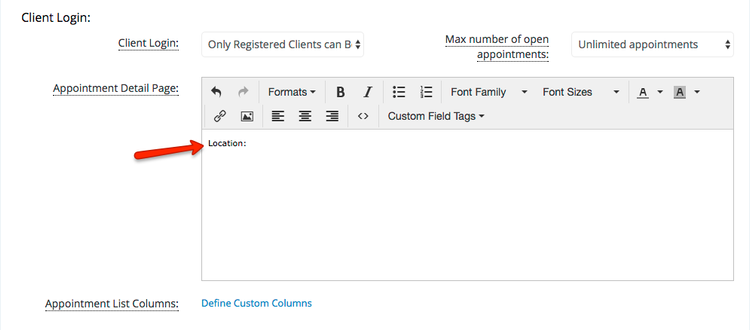
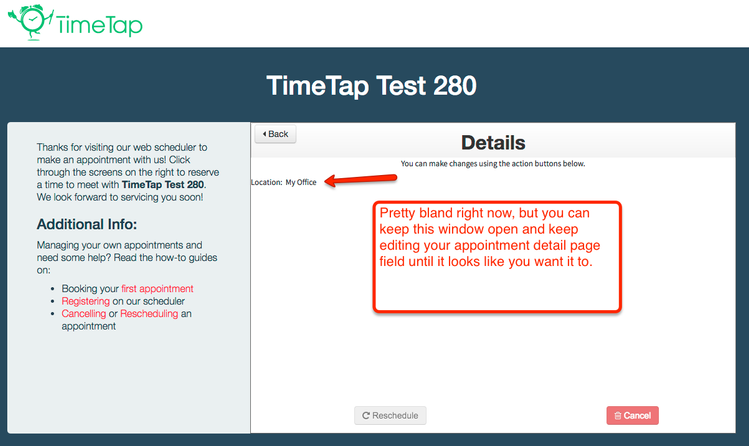
The appointment detail page is the page that clients click to from the manage appointment url that is sent out in their email or by logging into the scheduler and click the magnifying glass icon next to one of their appointments in their appointment lists.
By default, the appointment detail page shows the appointment id, date & time, location, staff, and reason. If you'd like to change what is displayed there, you can customize the editor with the text and tags you'd like to show.
First, type a label for what you want to show:
Next, locate the "Custom Fields Tags" dropdown in the text editor. You'll use this to find the tag you want to place next to the label:
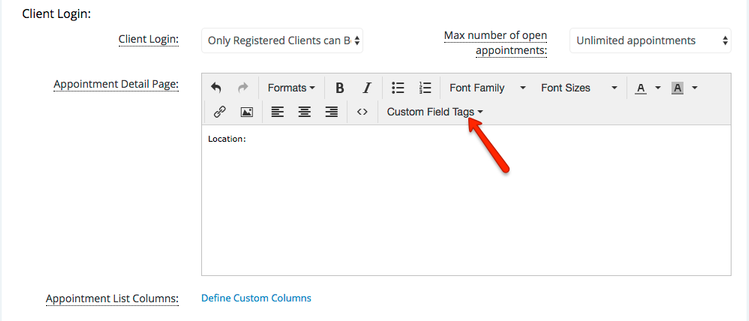
Click the dropdown and find the value for what you want to insert. Click that value:
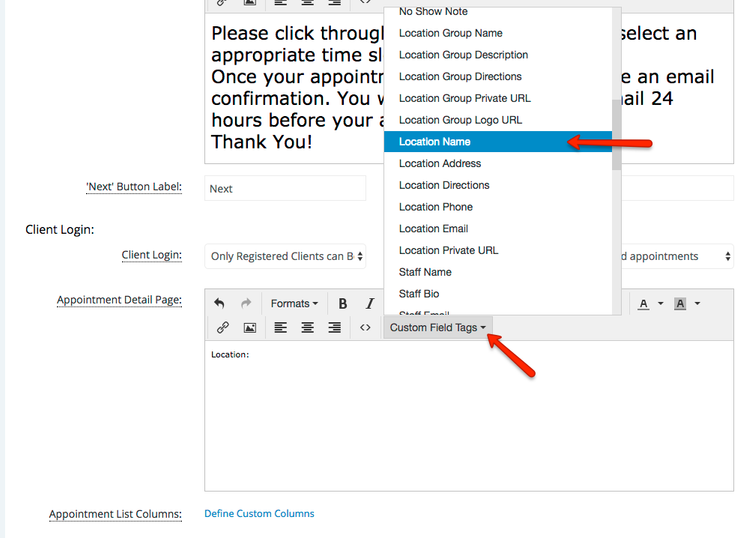
Once you click the value from the Custom Field Tags dropdown, you'll see that the tag for that value will insert in the Appointment Detail Page text editor wherever your cursor was before you clicked it:

Once you've customized the fields that you want to show, click the "Save" button in the top right:
To test it out, I recommend logging into the scheduler as a test or dummy client that you've set up or making a test appointment and clicking the link from the confirmation email you receive. You'll see the changes that you've made and then can keep editing that field and refreshing that page on a separate tab to complete the editing process:
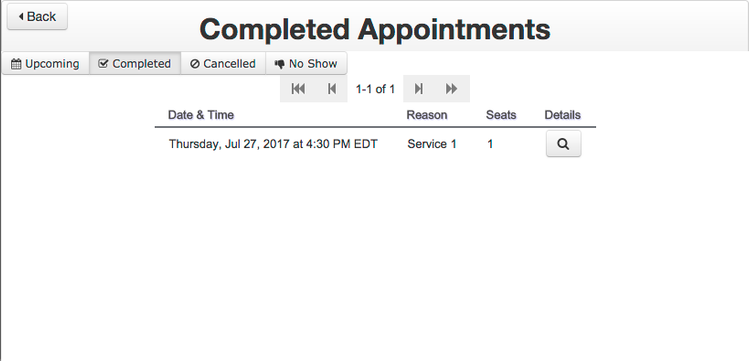
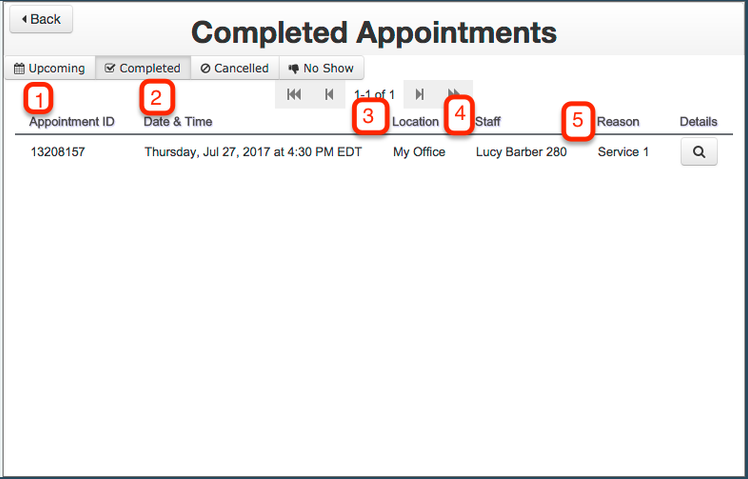
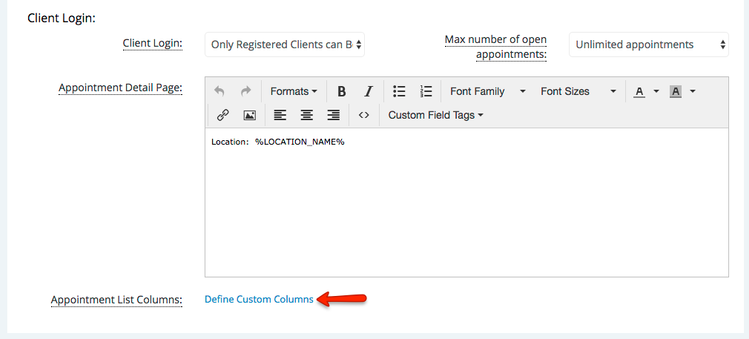
If your client logs into your scheduler and clicks the button to view their existing appointments, they'll get a table view of their Open, Completed, Cancelled, & No Show appointments. You can customize which columns show up in this table view under your Settings > Mini Website Design > Greeting & Login section in the field titled "Appointment List Columns".
By default, the table view shows the following columns:
- Appointment ID
- Date & Time
- Location
- Staff
- Reason
These are shown in the screenshot below:
You can change each of these columns by customizing the "Appointment List Columns" section of the Greeting & Login portion of your Mini Website Design page:
If you haven't made any edits to the columns yet (meaning all the defaults are in place), you'll see a link in that section to "Define Custom Columns". Click that to get started:
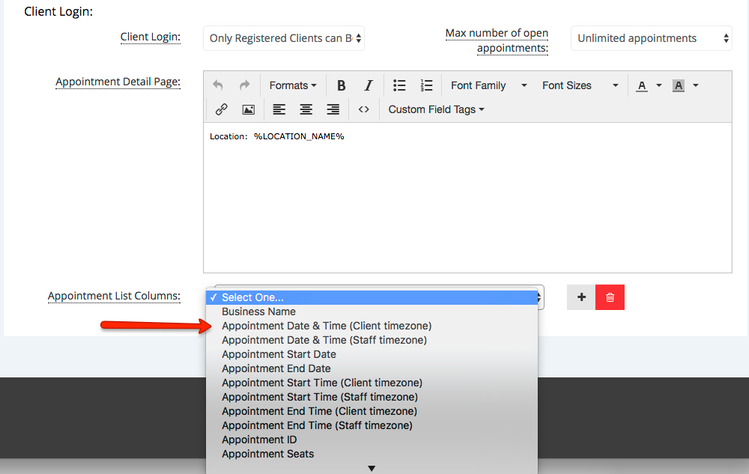
Once that appears, you will see a dropdown where you can select which columns you want to show. Select a column from the dropdown:
You can then use the "+" button on the right hand side to add other columns as well:
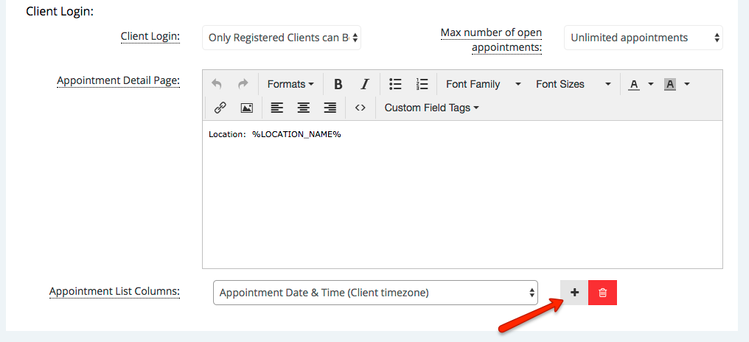
Do that as many times as you want depending on how many columns you want to show. Once you've added in all the columns you want, you can use the up and down arrows to reorder them (the top most option will appear on the far left in the table, the last option will appear on the far right):
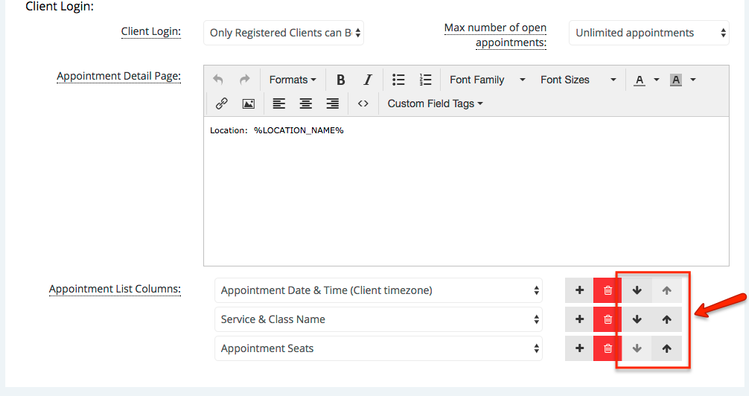
Once you've got the columns that you want showing in the order you want them, click the "Save" button in the top right:
If you go back to the client scheduler login view after that and take a look at the list view for appointments, you'll see the new columns you defined showing up instead of the default columns: