Time
- Lucy Barber (Deactivated)
- Elvis Merino (Unlicensed)
Through the Time screen on our Settings menu, you can customize how appointment timeslots display to clients, add new staff availability, and view a table of exsiting staff availability.
In the subsections of this area of our documentation site, we will go through how to:
On this documentation page specifically, we're going to cover the different aspects of your Time screen.
You should know that you can also add in available time for Service-based appointments by adding to or modifying your staff availability and/or location availability. The Time screen, however, is the only place where you can customize how your appointment start times display.
If you navigate to Settings → Time, you will see that you have a number of things available to you including the Time Panel Settings, Add Staff Availability, Service Time Display, Class Time Display, and the current Staff Availability Table:
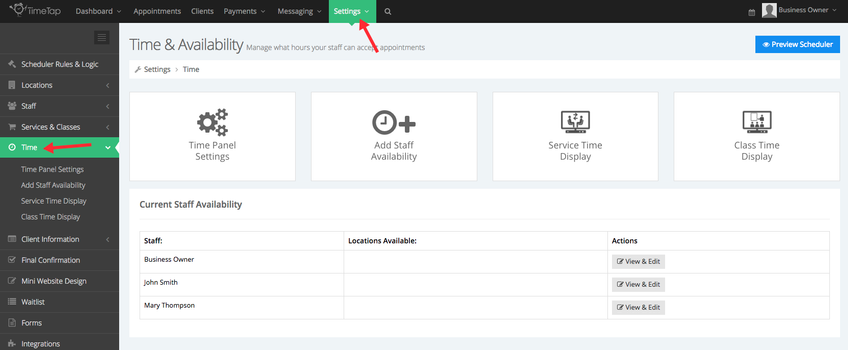
Here's a brief description of what each of them do as well as some helpful links to learn more:
- Time Panel Settings: this window has a number of settings to determine how your appointment availability displays to client on the Time panel of the scheduling flow. Learn more
- Add Staff Availability: this will take you step by step through adding availability to your staffs' profiles. It's very similar to the initial set up process you went through on your account and can be used in substitution for adding a date range of availability on your staff profile. Learn more
- Service Time Display: This window holds the configuration settings for how appointment times display on the Time panel of the scheduler when clients are booking a service-based appointment with you.
- Class Time Display: This window allows you to adjust some of the configuration settings that affect how class sessions display on the "Time" panel of your scheduler.
- Current Staff Availability table: This shows you what date ranges you currently have set up on your staff profile and what days of the week are included in those date ranges. Click the blue "View & Edit" button next to it to look at the specific hours your available on those days within the staff profile or click the red "Remove Availability" to complete remove that date range of availability from your schedule.
- Preview Scheduler button: as with almost all of the pages in the Settings menu, you can quickly access you mini website and check out changes you made by clicking the "Preview Scheduler" button in the top right