Adding and editing line items on an invoice
- Lucy Barber (Deactivated)
When looking at a client's open invoice, you can either add charges, appointments, or credits to it which will affect the invoice's total.
This section of our documentation will go over how you can add each of those elements as well as how you can edit them once they are on the invoice. Click the links below to jump to the section of this documentation where we discuss those specific elements:
- Adding uninvoiced appointments to an invoice
- Adding charges to an invoice
- Adding credits to an invoice
- Editing line items on an invoice
If you still have questions on how to add or edit line items on an invoice after reading through this documentation, please contact our support team.
When establishing an invoice for your client, you can always check to see whether or not the client has any appointments on their client record that have been included on an invoice.
While TimeTap automatically creates invoices for clients when they book an appointment for any service or class that has a price or deposit amount listed, you may have edited these invoices and removed those appointments from them or you may have created an appointment from TimeTap's back office for the client and not created an invoice for it yet.
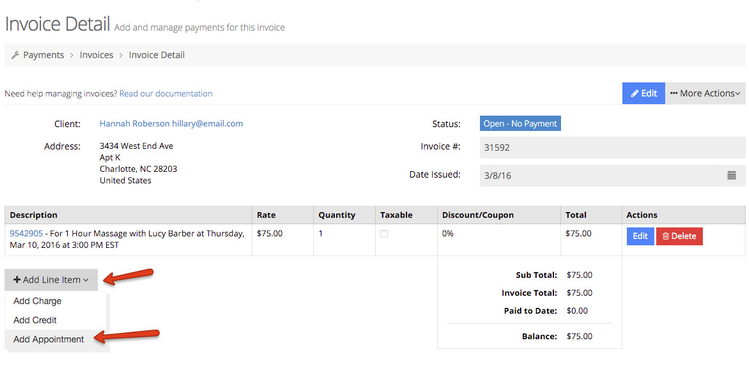
To do this, go to the "Add Line Item" dropdown beneath your invoice's line items and choose the option to "Add Appointment":
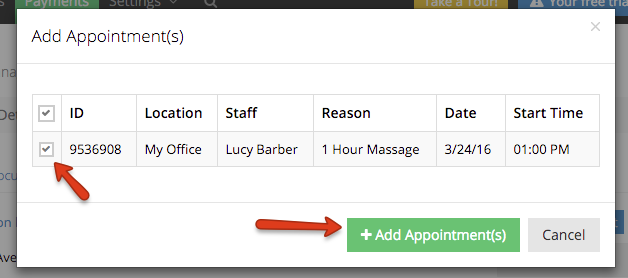
On the window that appears, you'll see all appointments that have not been included on any invoices yet. Check off any appointments you want to include and click the "Add Appointments" button:
The appointment will then appear on your invoice with whatever price that was set for the service or class as the "Rate" for the line item and a quantity of 1:
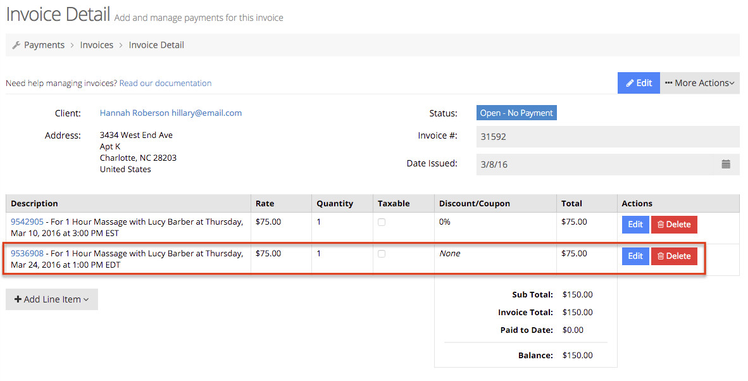
If you indicated on the profile for the service or class that any appointments made for that appointment type were taxable, you would see the taxable box checked as well. In this example, the 1 Hour massage service is not taxable and thus there is no tax amount reflected.
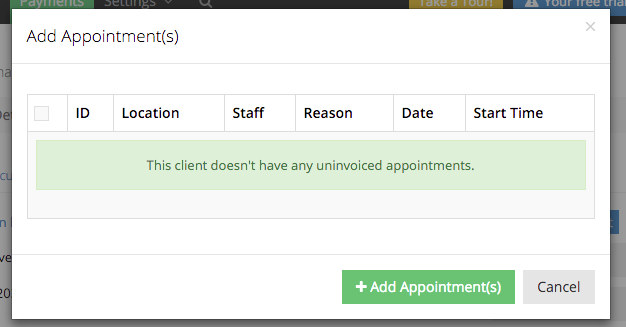
Now if I try to add appointments using the Add Line Item dropdown, I will not be able to as all the appointments for that client have been included on an invoice:
A few things you'll notice about appointment line items on invoices:
- They have the appointment Id next to them: This differentiates them from just line item charges or credits that may be on the invoice
- The description gets set automatically: The description gets generated based on what you have setup in your Payment Settings
- They have a "Delete" button next to them: Charges and Credits have a "Remove" button next to them on invoices. This is because if you remove a line item charge from an invoice it will get put back on the Client's uninvoiced charges table. If you have an appointment on an invoice, you would want to delete it from the invoice so that it can later be found under the uninvoiced appointments window. This does not delete the appointment, it just deletes the line item from the invoice and does not add it back to the client's uninvoiced charges since it isn't a charge, it is an appointment.
- Note: if you are looking to actually delete an appointment so it doesn't show up on your account anymore, we have documentation on that here.
You can also include charges from purchases the client may have made in office or fees they acquired from doing business with you.
If you click on the "Add Line Item" dropdown beneath your list of line items on an invoice, you'll see the option to "Add Charge":
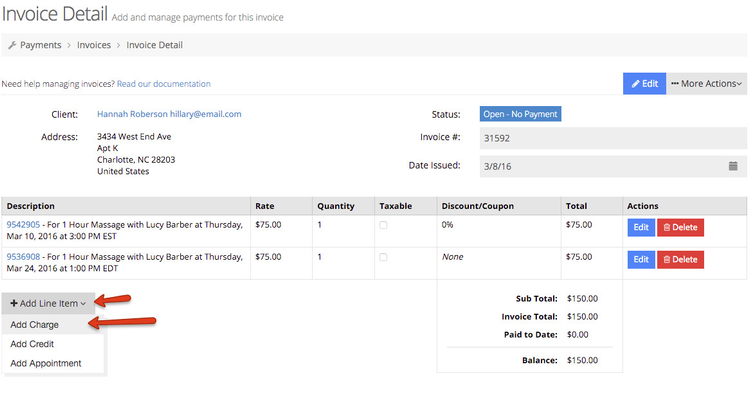
Clicking on this option will bring up a small window where you can elect to either add uninvoiced charges form the client's profile or add a new charge:
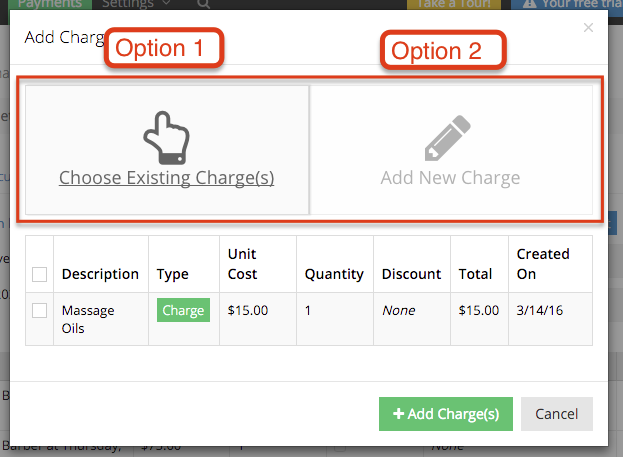
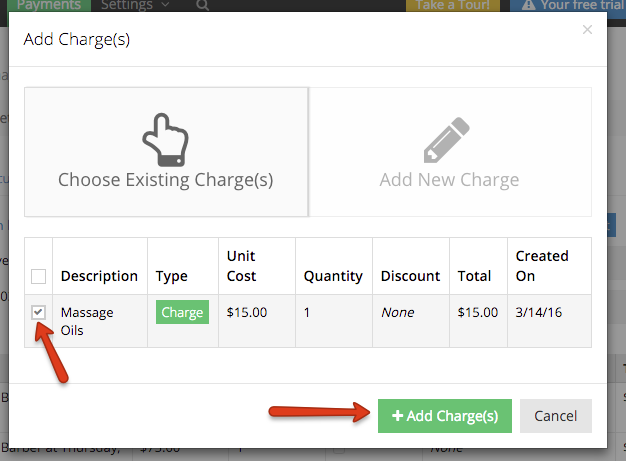
Option 1: Looking at the Existing Charges option, you'll see any charges that are on the client's profile currently and have not been included on an invoice. You can select these charges using the checkbox on the left hand side and click the "Add Charges" button to include that charge on your invoice:
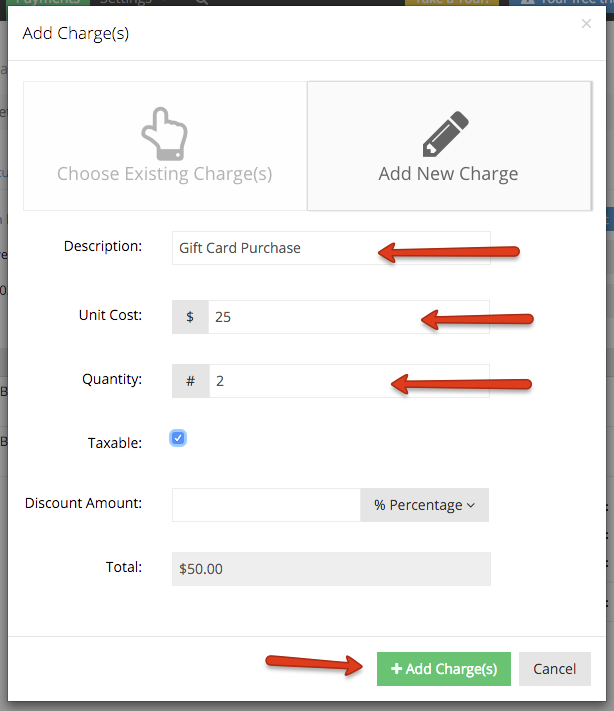
Option 2: You can also toggle to the "Add New Charge" side of the window and type in a new charge to include on this invoice. This requires that you fill in a description, cost, and a quantity. Optionally, you can select whether this charge is taxable and if there is any discount amount that should be applied to it. Once you have at least the required fields filled in, you can click the "Add Charges" button at the bottom:
Once the new charges are added to your invoice, you'll see your invoice line items list grow as well as the invoice total amount:
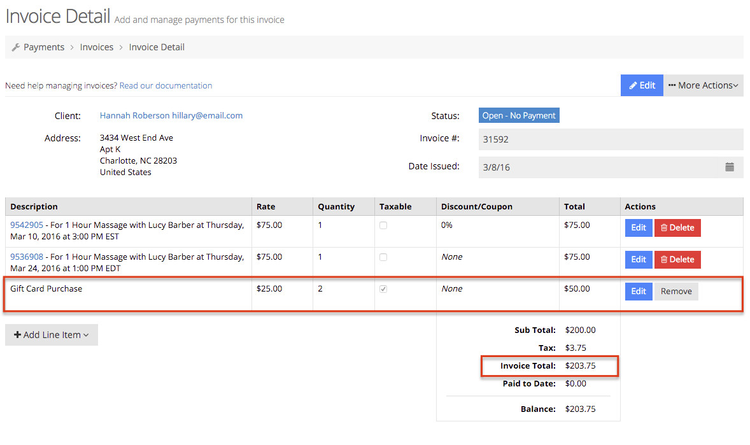
Now that at least one of the items on the invoice is taxable, you will see a tax amount show up at the bottom of the invoice. This is based on the tax rate I have set for my business under my Payment Settings. For this business shown on these screenshots, the tax rate is set to 7.5%. 7.5% of $50.00 (which represents the one taxable item on the invoice the gift cards) is $3.75.
You'll notice that Charges look a little different than credits and appointments:
- Charges can be removed from an invoice but must be deleted from a client's profile. The client's profile is where any uninvoiced charges are stored. Thus the process of getting line items off an invoice is different if you are dealing with a charge or a credit than if you're dealing with an appointment. Charges and Credits should still be accessible if they are taken off the invoice thus we just remove them and return them to the client's uninvoiced charges table. Appointments are not stored the same way, thus you delete them from the invoice and you can either create an invoice from the appointment's detail page or find it under your uninvoiced appointments table.
- Charges are a positive value for your business so they show up in black. Negative values for you business (which include credits or flat rate discounts) display in red.
- There is no linked appointment id next to the description: Since charges and credits are not appointments, they do not have an appointment id. Thus no id is shown next to them when they are added to an invoice.
Credits represent a negative amount for your business and thus display in red. You may add a credit once a client has 10 appointments, they get $25 off their next visit. Or maybe you give clients $10 for referring a friend. Whatever the reason, when you want to apply negative amount to an invoice based on something the client has earned, you'll use the credit feature.
If you click on the "Add Line Item" dropdown beneath your list of line items on an invoice, you'll see the option to "Add Credit":
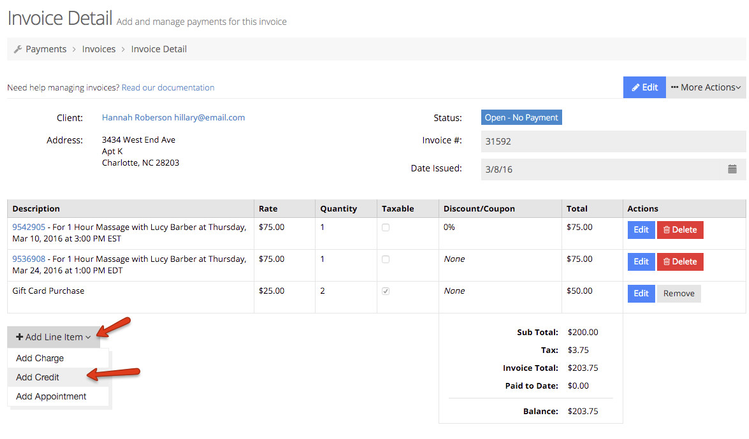
Clicking on this option will bring up a small window where you can elect to either add uninvoiced credits form the client's profile or add a new credit:
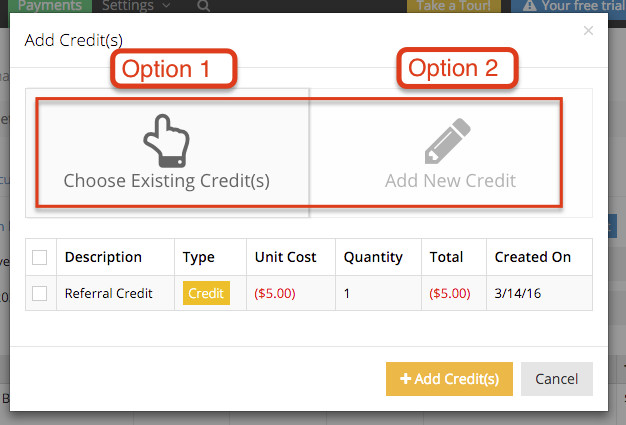
Option 1: Looking at the Existing Credits option, you'll see any credits that are on the client's profile currently and have not been included on an invoice. You can select these credits using the checkbox on the left hand side and click the "Add Credits" button to include that credit on your invoice:
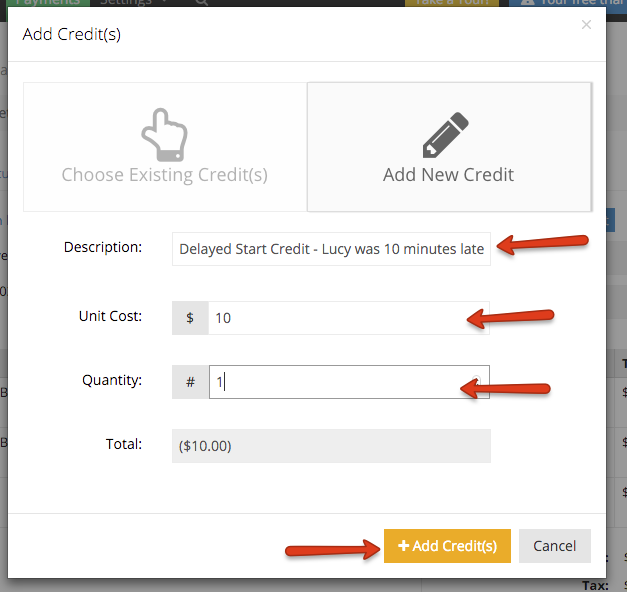
Option 2: You can also toggle to the "Add New Credit" side of the window and type in a new credit to include on this invoice. This requires that you fill in a description, cost, and a quantity. Contrary to what you would see adding a new charge, adding new credits does not give you the option to indicate whether it is taxable or whether a discount should be applied since a credit essentially acts like an invoice discount already.
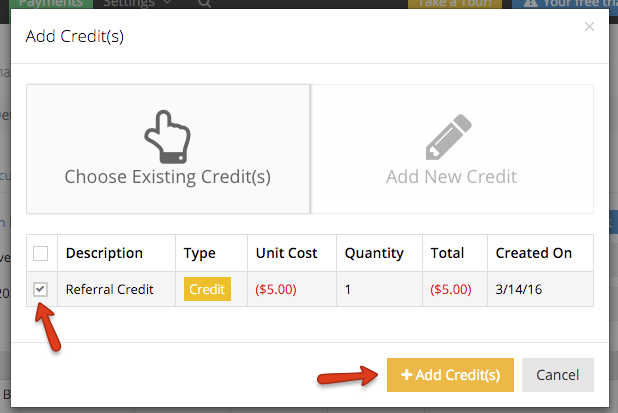
Once you have the required fields filled in, you can click the "Add Credits" button at the bottom:
Once the new credits are added to your invoice, you'll see your invoice line items list grow and the invoice total amount decrease by whatever the credit total amount was:
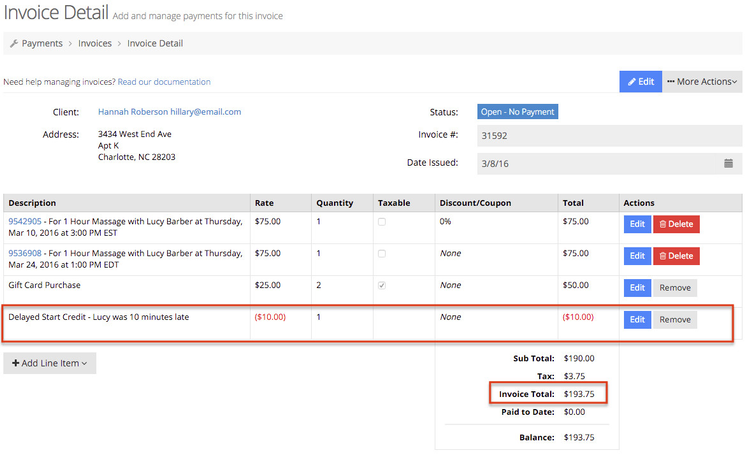
You'll notice that Credits look a little different than charges and appointments:
- Credits can be removed from an invoice and then can be deleted from a client's profile. The client's profile is where any uninvoiced credits and charges are stored. Thus the process of getting line items off an invoice is different if you are dealing with a charge or a credit than if you're dealing with an appointment. Charges and Credits should still be accessible if they are taken off the invoice thus we just remove them and return them to the client's uninvoiced charges table. Appointments are not stored the same way, thus you delete them from the invoice and you can either create an invoice from the appointment's detail page or find it under your uninvoiced appointments table.
- Credits are a negative value for your business (it is an amount you are giving to a client) so they show up in red. Positive values for you business (which include charges and appointment fees) display in black.
- There is no linked appointment id next to the description: Since charges and credits are not appointments, they do not have an appointment id. Thus no id is shown next to them when they are added to an invoice.
- There is no way to check off whether it is taxable and if you try to edit it you cannot apply a line item discount to a credit.
Once a line item is on your invoice, you can do a number of things to change that line item, depending on whether it is an appointment, a charge, or a credit.
Appointment line items will have two distinguishing features from Charges and Credits:
- They have a Delete button instead of a Remove button: This is because when you are working with charges or credits, you would remove the charges and credits from the invoice and they will fall back on the client's uninvoiced charges and credits table in the client's profile. With appointments, those do not go back into the uninvoiced charges and credits table because they are not a charge or a credit. Instead they would go back into the uninvoiced appointments list. So by deleting them from the invoice, you are not including them on the uninvoiced charges
- They have their appointment id hyperlinked before them: With appointment line items, you can easily click on the appointment id to the left of the invoice description to go to that appointment's detail page. Charges and credits do not have any appointment id to the left of them because they are not associated with appointments, specifically.
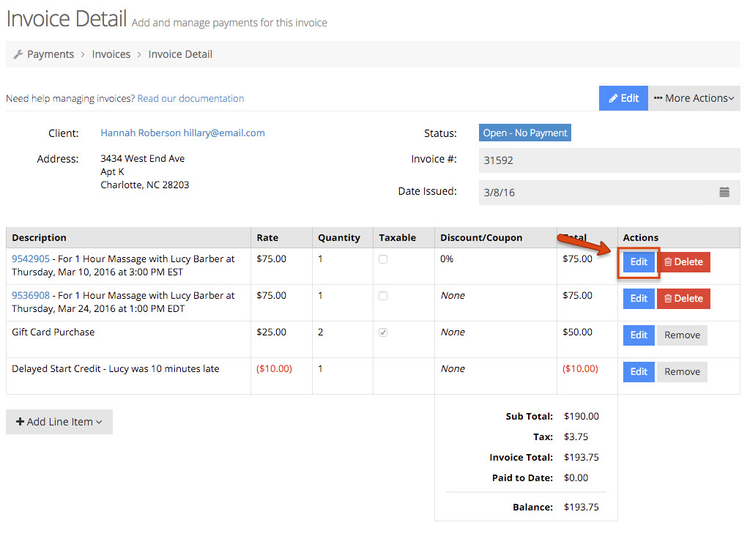
For ease of use, editing line items works pretty much the same regardless of whether you are editing an appointment line item, a charge, or a credit. When you are in the invoice detail screen, simply click the "Edit" button to the right of the line item you want to change:
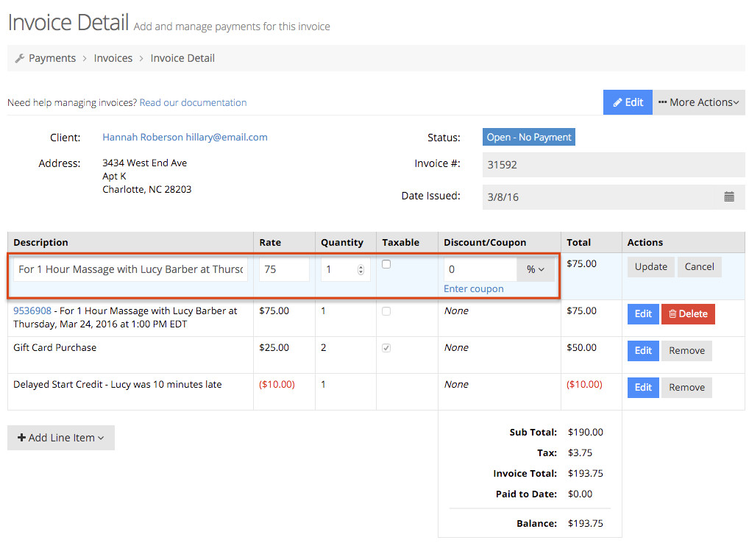
This will make the individual cells on the invoice editable (except for the "Total" cell column). You can change the description, rate, quantity, check whether or not it's taxable, and include any discount or a coupon:
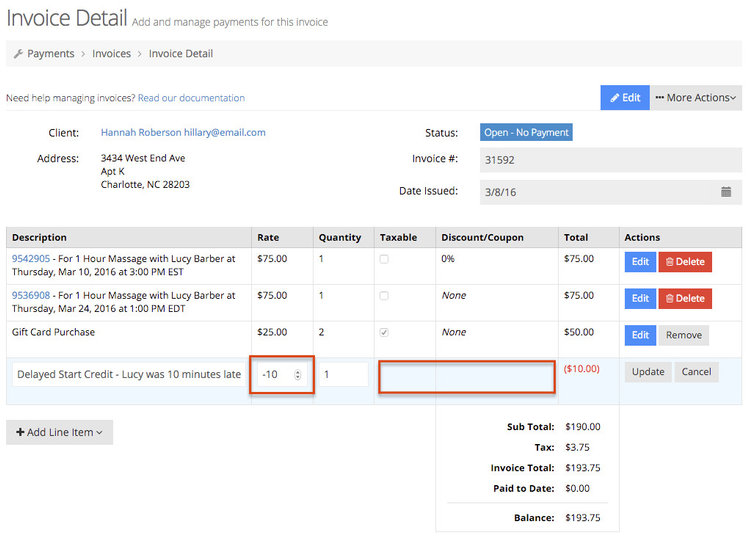
You'll notice if you edit a line item that has a negative rate amount (most commonly this will be a credit, although you can set a negative rate on an appointment line item if you'd like) that the taxable and discount fields do not have options to edit:
As you make changes, the "Total" column will update to reflect those changes. So if I edited the Gift Card Purchase line item on this invoice and changed the Quantity to 3 and added a discount of 10%, the total would change from it's initial display of $50 to $75 after I changed the quantity to $67.50 once I entered the 10% discount:
Once you click the "Update" button to the right of the the line item that you are editing, TimeTap will calculate up how your changes have affected the invoice total:
Clicking the "Cancel" button will discard any changes you made to the line item while in edit mode and return the invoice to exactly what it was before you edited it.
If you have any questions about editing line items, please reach out to our support team and we'd be happy to answer them for you.