How to add and edit a service
All the services you crated in checkAppointments will appear in TimeTap, in this documentation we will cover how to add a new service and edit existing and new services.
Make sure to check out our documentation on how to use the Service & Class panel settings, how to adjust a service profile, reordering how to your services & classes display, and deleting services.
In this page we'll cover:
If you wanted to add a new service in checkAppointments, first you would have to go to the Setup tab > Service and choose to add a new service. After adding a service, if you wanted to make changes to it you will then have to go back to the Setup tab and select a service make your changes and click Save.
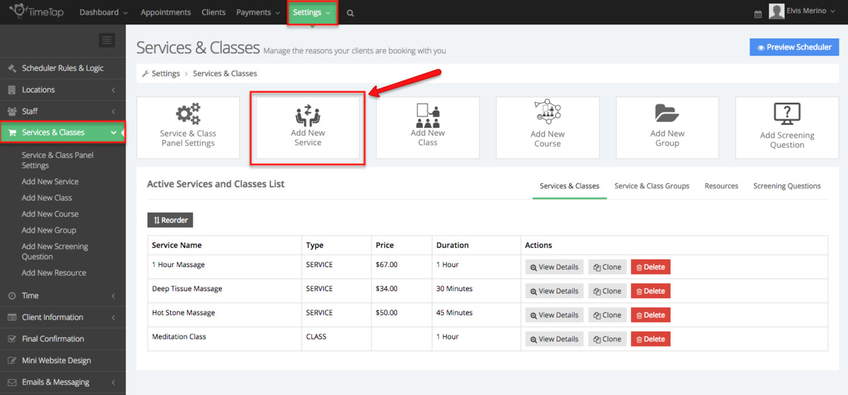
To add a service, navigate to your Services screen by going to Settings → Services and Classes and click the button to "Add New Service":
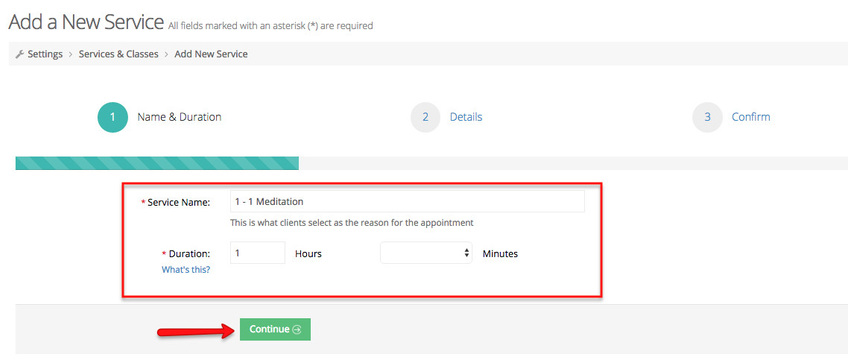
This will take you into the Add New Service flow. On the first page, enter in the name and the duration for the service. Once you've entered in those basic details, click "Continue" at the bottom:
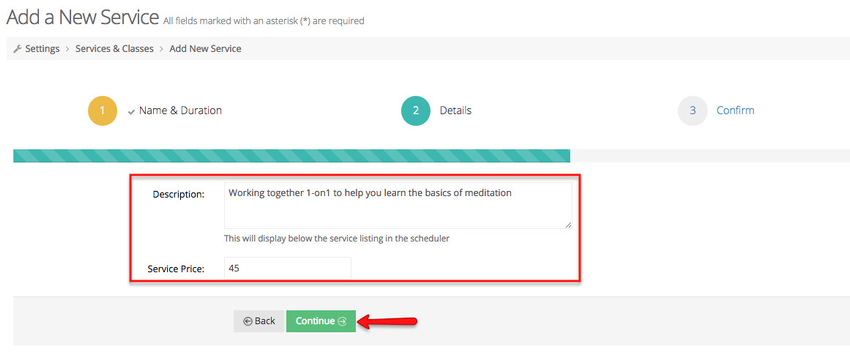
On step 2, you can enter in a description for the service which will display underneath the service name in the scheduler flow as well as a price for the service if you charge or invoice your clients for making an appointment. After you enter in those details you can hit the "Continue" button to move on to the confirmation page or the "Back" button if you need to make a change to the name or duration:
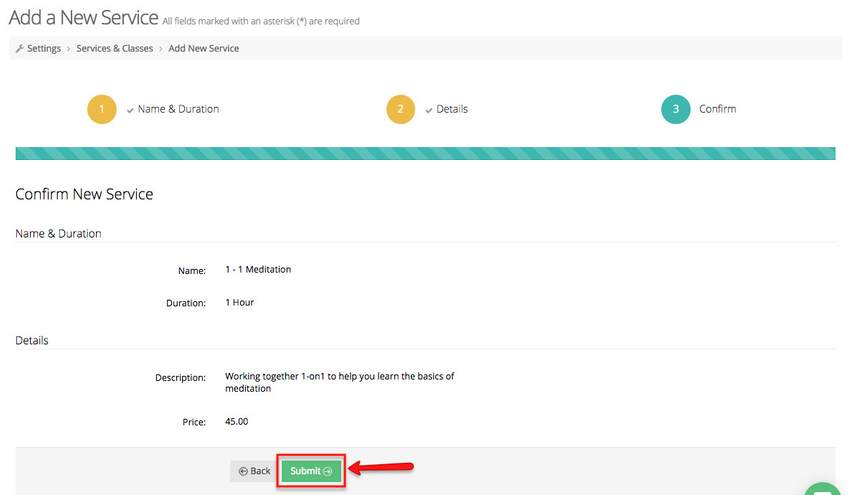
The last page of the Add New Service flow is the confirmation page where you can review all of the information you have entered so far to make sure it is all correct. If you are fine with all the information displayed, click the "Submit" button to be directed into the Service's Profile:
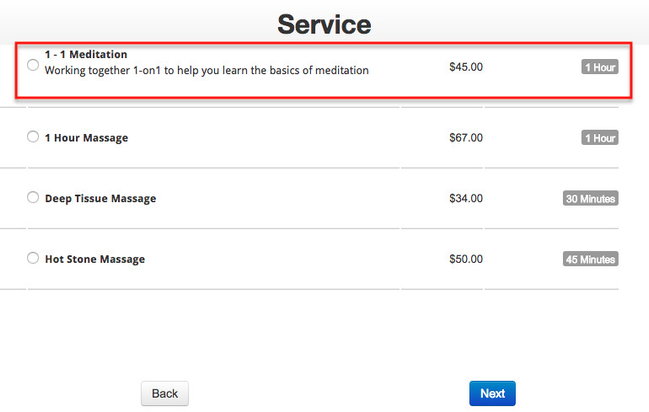
Now when your clients click through your scheduler, they will see this new service as another appointment offering:
Now that you know how to add a new service, we'll cover how to edit the service profile.
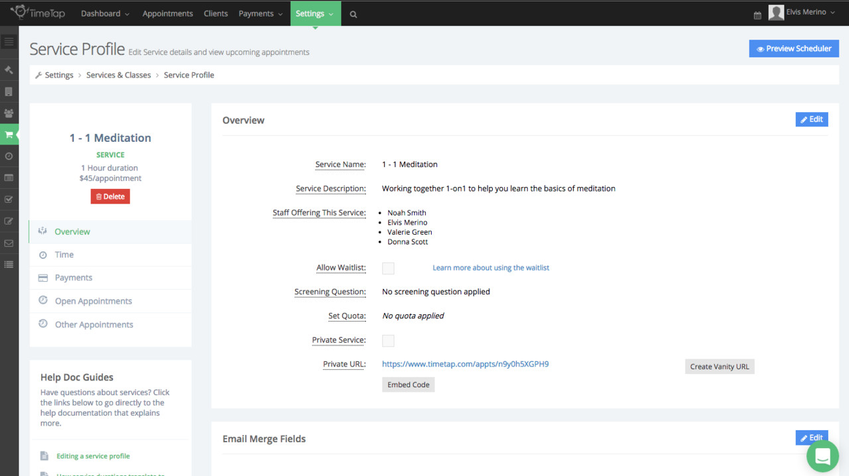
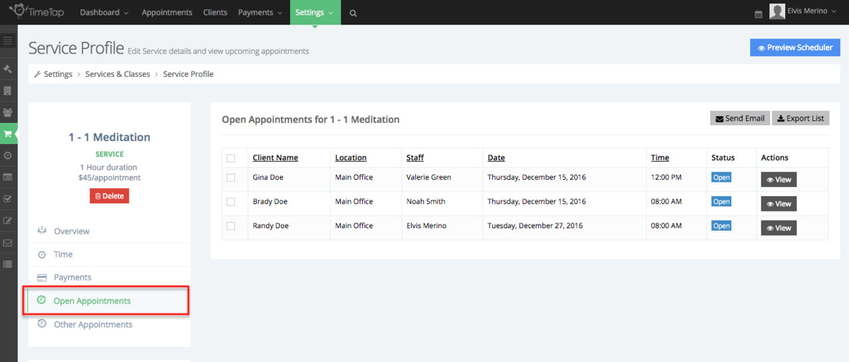
After you click Submit after adding a new service, you'll immediately be take to the service's profile. You can also go to any service's profile by going to Settings > Services & Classes > click View Details next to the service you would like to edit. The service profile consist of five tabs:
First we'll cover the Overview tab, after you've selected to go to a service profile by default you'll be taken here first:
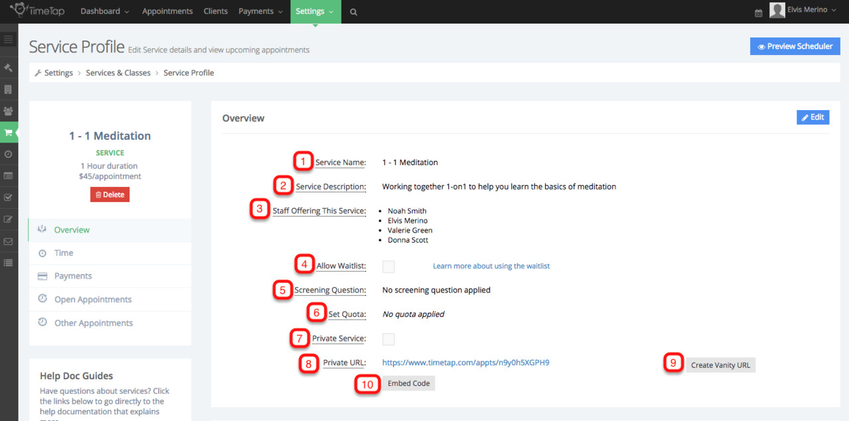
This screen is divided in two sections, Overview and Email Merge Fields. First, we'll cover the Overview section:
- Service Name: The name is what your clients will see as they are booking in the scheduling flow
- Service Description: This appears under your service's name in the scheduling flow and can be used to provide more details around what your clients are booking
- Staff Offering This Service: This is which staff can offer this service. If a staff is selected her but you don't se them on the schedule flow, be sure they have hours available at the locations listed for this service on the service's 'Time' tab
- Allow Waitlist BUSINESS ACCOUNT FEATURE : This will make it so that if a client is trying to book this service on a date where you are completely booked, it will prompt your clients to join a waitlist in case any times become available. Read more about how to use the waitlist feature here
- Screening Question BUSINESS ACCOUNT FEATURE: Screening questions allow you to make sure that clients meet certain criteria before they are allowed to see the times that you're available for appointments. Read more about how to use screening questions here
- Set Quota BUSINESS ACCOUNT FEATURE: This is where you can put a cap o the number of appointments that can be booked for this service in a given time frame
- Private Service: Checking this box will enable this service to only by shown at the service's private URL and in the back office when staff are setting up appointments for clients
- Create Vanity URL BUSINESS ACCOUNT FEATURE: Change how your Private URL displays for this Service by entering a new webhandle and choosing which domain you want to link it to with the dropdown that appears in the new window once you click this button
- Embed Code: This is the iframe code that you can enter in your website where clients will only be able to book appointments for this service only
To make changes to any of the section mentioned above click the Edit button on the right side of the screen.
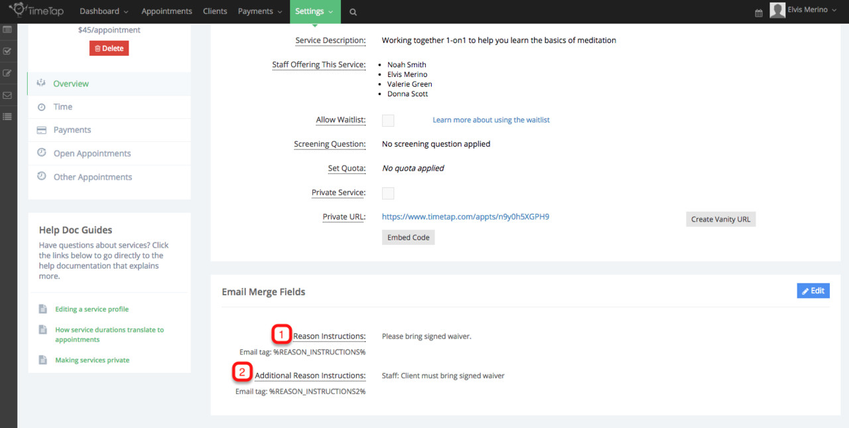
Now we'll cover the Email Merge Fields section:
- Reason Instructions: This is an optional merge field that you can use to push special instructions about this service to the appointment email that sends out to your client/staff, all you have to do is include the tag %REASON_INSTRUCTIONS% in the email templates you want it to appear in
- Additional Reason Instructions: This is an optional merge field that you can use to push special instructions about this service to the appointment email that sends out to your client/staff. This could be used on a separate email template from your first Reason Instructions, all you have to do is include the tag %REASON_INSTRUCTIONS2% in the email templates you want it to appear in
To make changes to any of the section mentioned above click the Edit button on the right side of the screen. The two reason instructions mentioned above are the equivalent of the Email Instructions in checkAppointments.
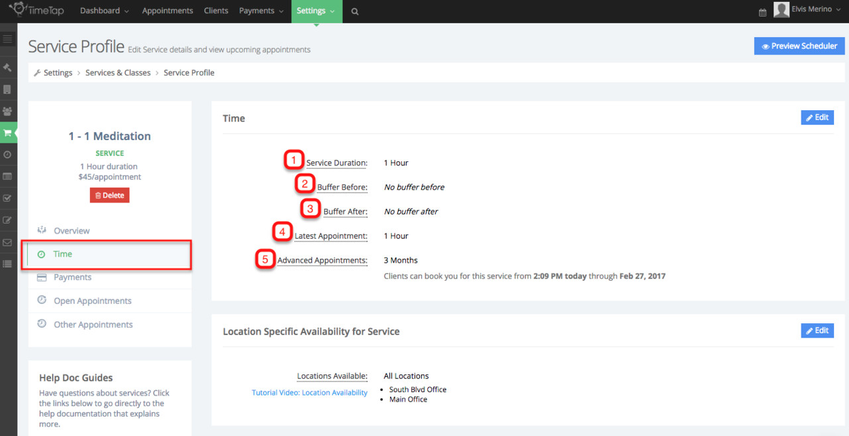
Now, we'll cover the Time tab, this screen is also divided in two section, Time and Location Specific Availability for Service. Let's take a look at the Time section first:
- Service Duration: This is how long the appointment's for this service will last
- Buffer Before: Applying a buffer before your service will add some padding before the start time. For instance, if your service duration is one hour and you have a 15 minute buffer before the appointment, then a client who schedules at 9:00 am would have you reserved starting at 8:45 am
- Buffer After: Applying a buffer after your service will add some padding after the end time. For instance, if your service's duration is 1 hour and you have a 15 minute buffer after the appointment, then a client who schedules at 9:00 am would have you reserved until from 9:00 am until 10:15 am
- Latest Appointment: This is how close to the service appointment's start time a client can book
- Advanced Appointments: This is how far out in the calendar a client can click to see your availability for an appointment
To make changes to any of the section mentioned above click the Edit button on the right side of the screen.
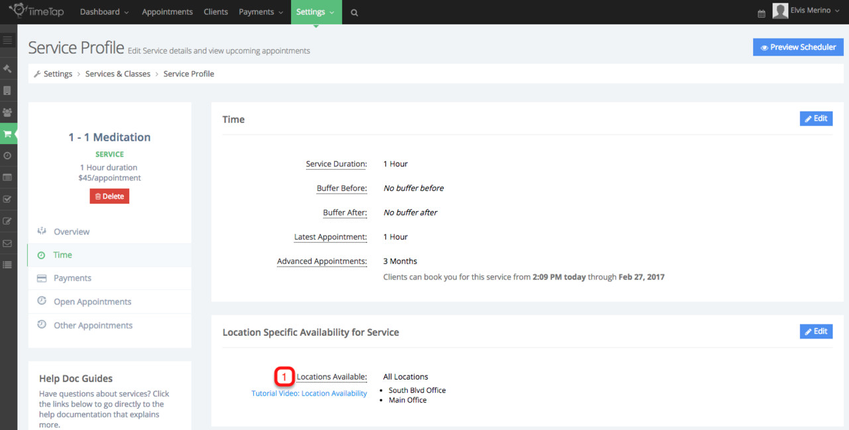
Now, we'll focus on the Location Specific Availability for Service section:
- Locations Available: By default, your services will be available at all locations. You can refine this, though, so that they are only available in some locations, on certain days, and even at specific times. Before setting this up, we recommend watching the video tutorial.
To make changes to any of the section mentioned above click the Edit button on the right side of the screen.
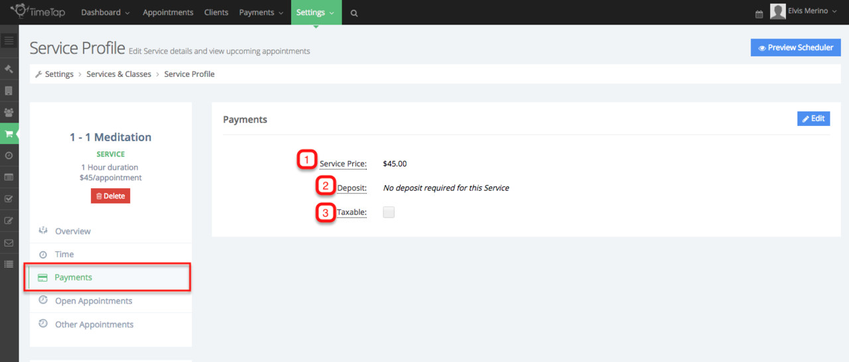
We'll now cover the Payments tab:
- Service Price: This is how much an appointment for this service will cost in total. If you have a payment portal set up and require payment, then the client will be asked
- Deposit: If you don't require the full price of the service upon booking, but only want to collect a deposit amount, enter that amount here. You must have a price entered in ordered to put a deposit
- Taxable: If you collect tax when someone books this appointment, check this box. You can enter your business' tax rate under Payment > Payment Settings
To make changes to any of the section mentioned above click the Edit button on the right side of the screen.
