How to sync an additional Google account
- Elvis Merino (Unlicensed)
- Eddie Harris (Unlicensed)
Now that you know how to sync your Google Calendar, we will discuss how to customize it and allow others to add appointments to a shared calendar.
In this page we will discuss:
- How to sync an additional Google Account
- How to stop downloading appointments from one of your Google calendars
- How to stop uploading appointments to one of your Google calendars
Syncing multiple calendars is very helpful if you have more than one Google accounts where you would like to see your appointments booked in TimeTap or would like to separate calendars for work and personal appointments.
Remember, if you have any questions about any of the features Google sync has to offer, you can reach out to our Support Team.
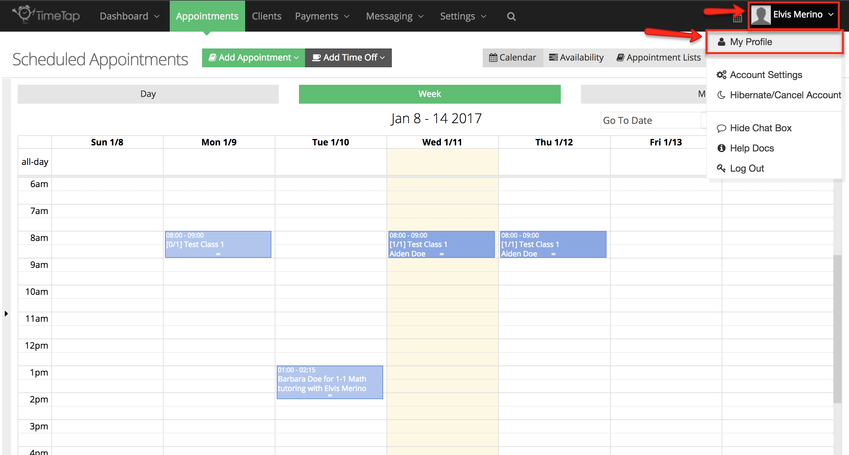
You can sync your TimeTap account with multiple Google accounts. This will help you keep track of upcoming appointments in your work calendar and personal account. In order to sync an additional Google account, Begin by clicking on your name on the top right corner of the screen and select My Profile:
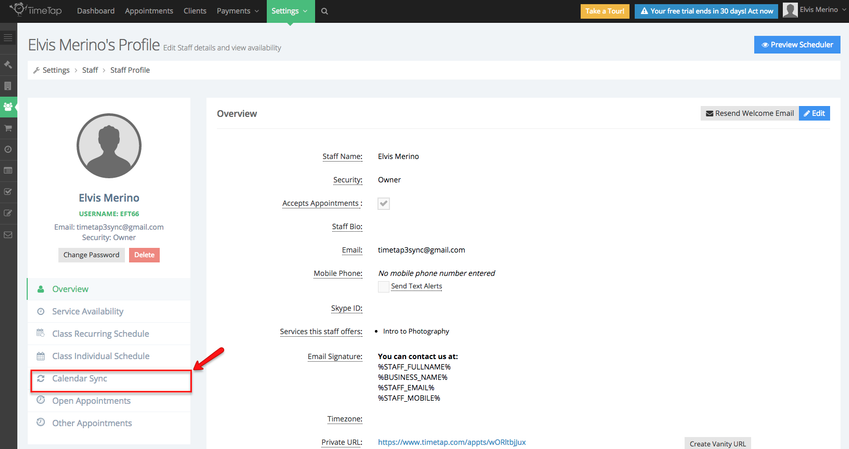
From the staff profile view, click on the "Calendar Sync" tab:
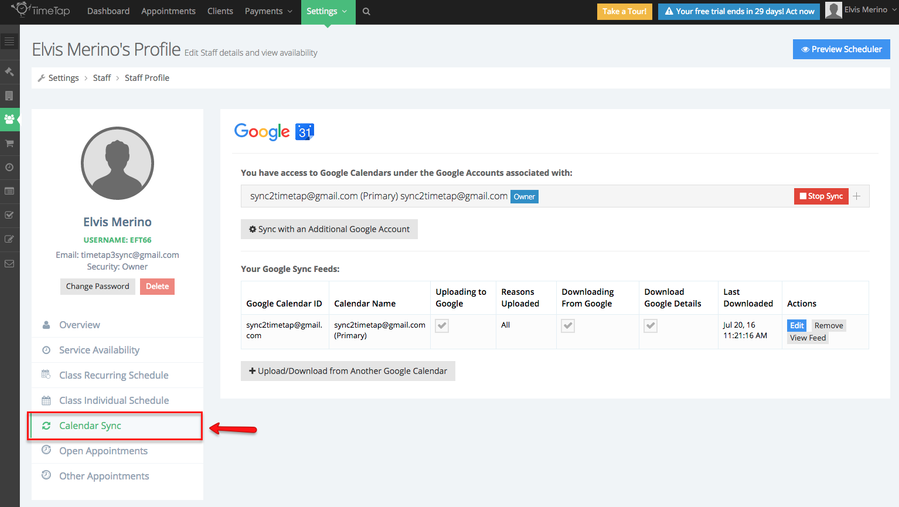
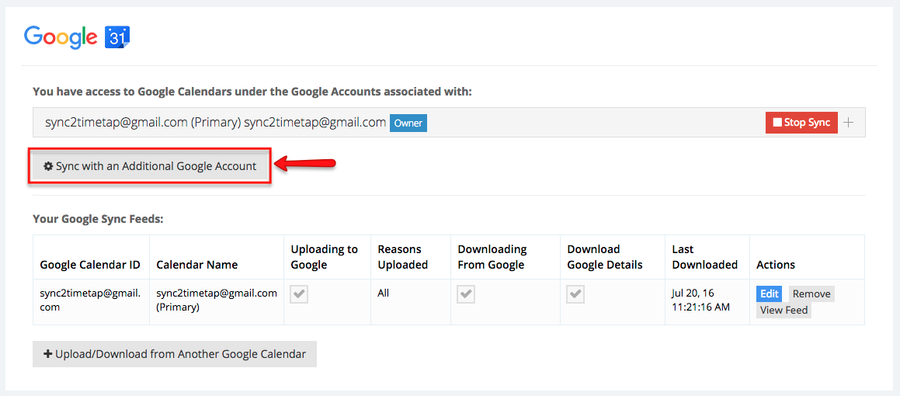
Inside the calendar sync tab, you will see the account you are already syncing to. If you need a refresher on how to sync to a Google calendar, click here. To sync with a new account, click the "Sync with an Additional Google Account" button:
Please note: If you are already logged into Google on your current browser session, TimeTap will auto detect the Google Account you are logged in as. If you need to sync TimeTap with a different Google account, you should log out of Google before initiating the sync.
This will take you to Google to authorize TimeTap to have access to your Google Calendar account:
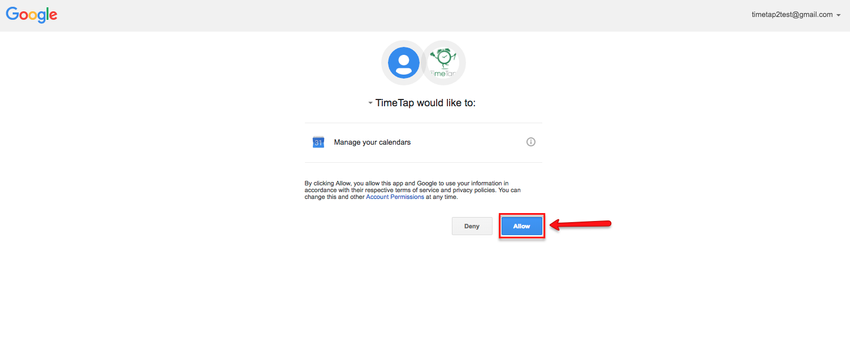
Once you press "Allow", you'll be taken back to TimeTap. Your sync will start to run. The first sync typically takes about 30 minutes to complete. Afterwards, the calendars update automatically about every 15-20 minutes.
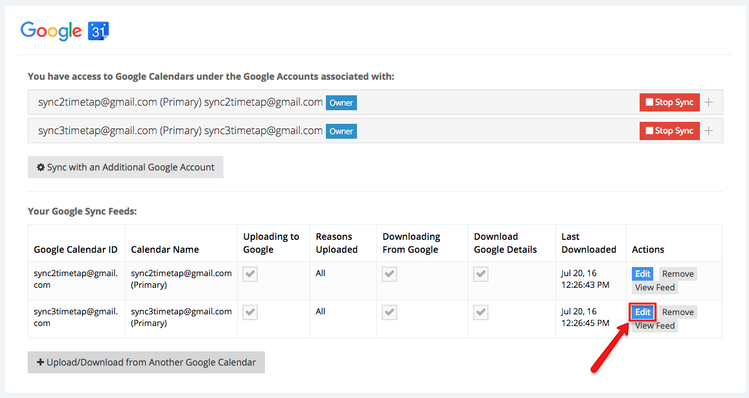
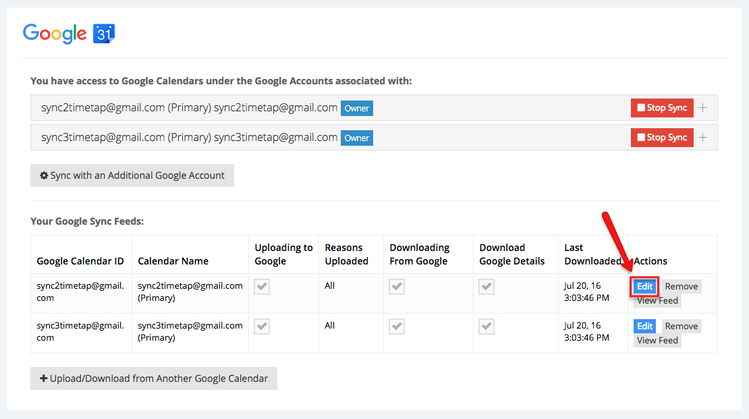
In the Calendar Sync tab you will now see the two Google calendars you are syncing to:

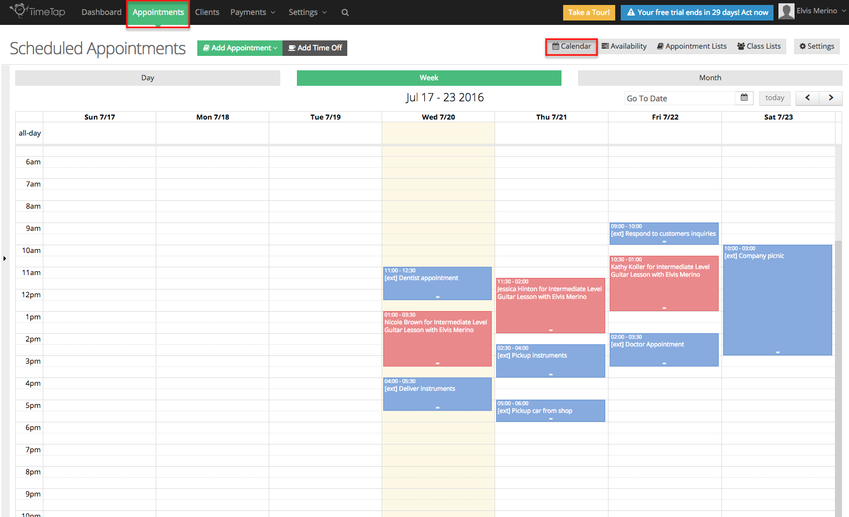
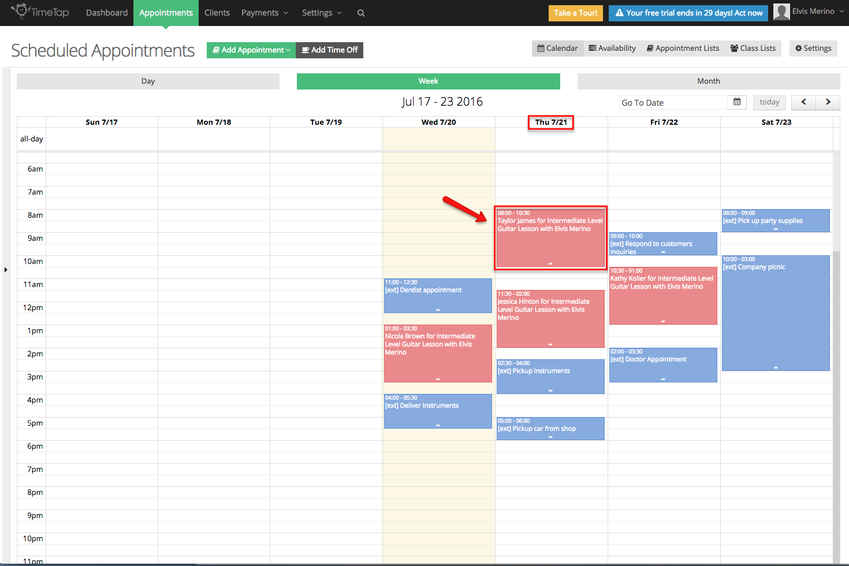
You can verify that all your appointment are syncing by going to you calendar under the Appointments tab, in this case all the blue boxes are appointment created in the Google account I synced:
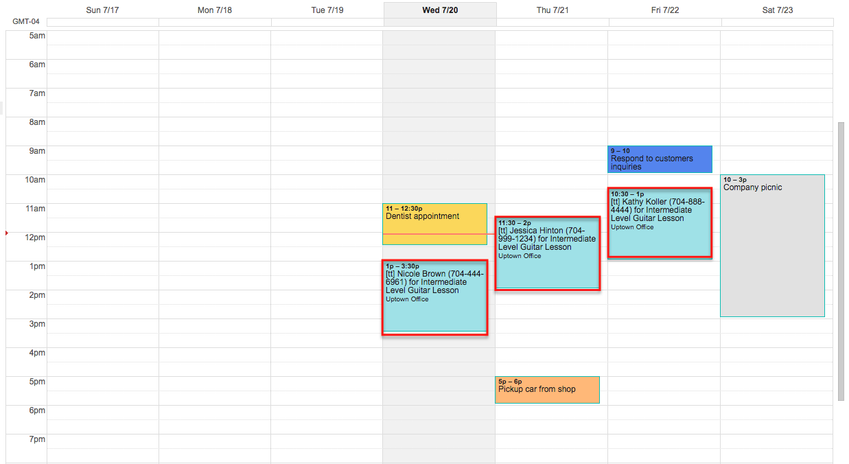
And if I you go to each one of the Google calendars you synced you will see your TimeTap appointments added. Below is the view of the first calendar I synced:
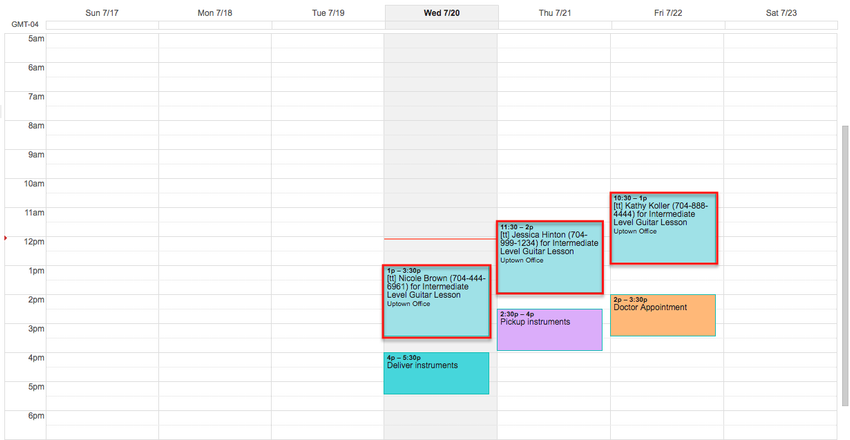
Below is the view of the second calendar I synced:
Now every time an appointment is added to TimeTap it will appear in your Google calendar, and when an appointment is added to one of your Google calendars it will appear in your TimeTap calendar.
If you need to stop downloading appointments from one of the Google calendars but would like to continue uploading appointments from TimeTap, simply go back to the staff profile for the account you wish to stop syncing and click on the "Calendar Sync" tab:
Under the Calendar Sync tab, you will see the Google calendars you are syncing to. From here determine from which calendar you want to stop downloading appointment from, but would like to continue uploading TimeTap appointments to, then click the Edit button next to it:
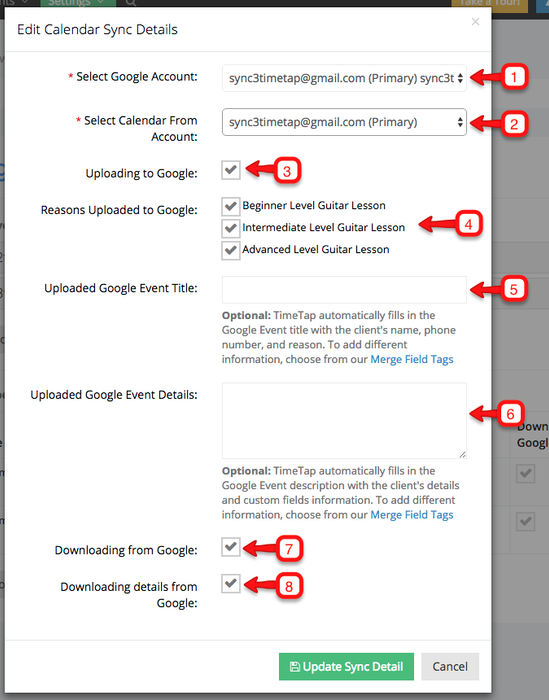
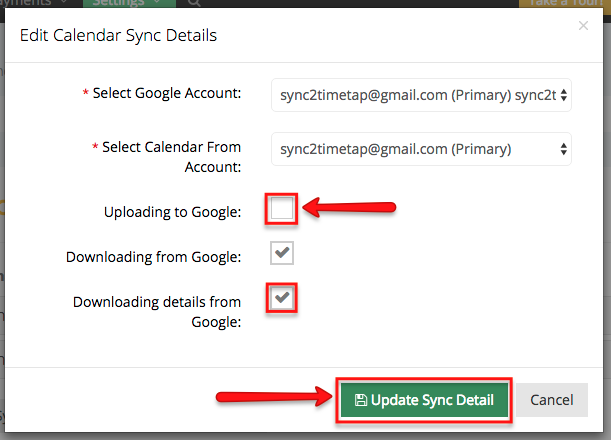
A new window will appear, here you will be able to modify a few things before you finalize the changes:
- This is the Google account this staff member has been granted access to
- A list of all calendars associated with the Google Account selected in step 1. These are typically sub calendars created within your Google calendar or calendars other people have shared with you
- Check this box to upload all appointments set in TimeTap for this staff to the selected Google Calendar
- Check off which services/classes you want to sync up to Google Calendar (most of our users have all of them selected but you can pick and choose if you'd like)
- This is the title of the TimeTap appointment once it appears as an appointment in Google calendar. If you leave it blank it will display the client's name, phone number, and reason (service/class) or you can use tags to display different information
- Once the TimeTap appointment gets added as an appointment in the synced calendar, this is what would appear in the appointment's description. If you leave it blank it will display the client's name, phone number, and reason (service) or you can use tags to display different information
- Check this box to download all appointments from the Google Calendar you've selected to the staff member's TimeTap calendar
- Check this box to allow this user to download the appointment details from the Google Calendar you have granted access to
In this example we will uncheck the box next to Downloading from Google but will keep the box checked next to Uploading from Google, to commit to the changes click Update Sync Detail:
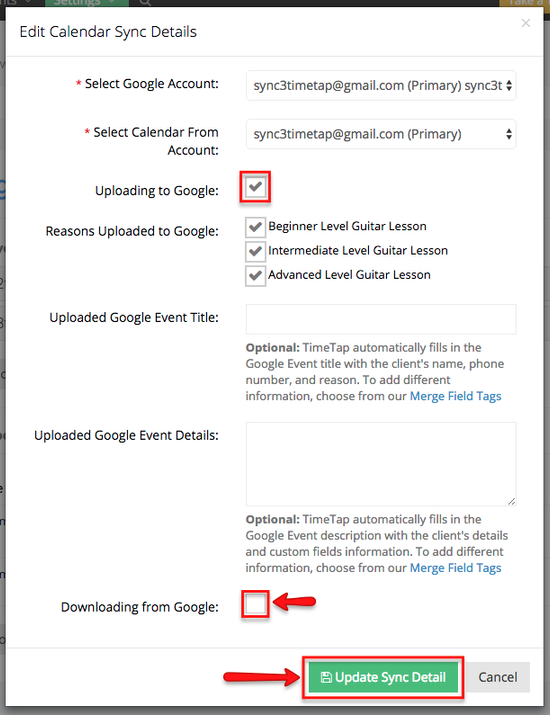
After saving the changes, every time an appointment is added to this Google Calendar it will not appear but if an appointment is added in TimeTap this appointment will appear in your Google calendar.
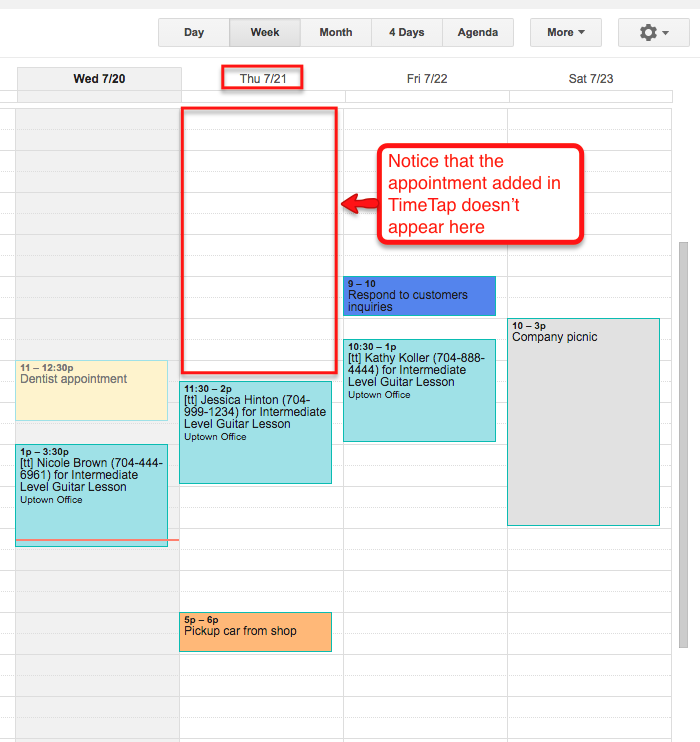
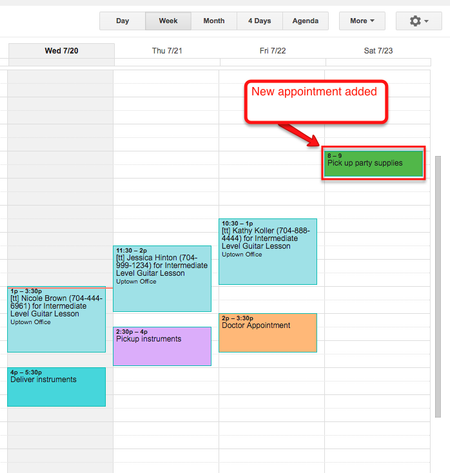
In the image below a new appointment was added in this Google Calendar but it does not appear in the TimeTap calendar. This is the view in the Google Calendar:
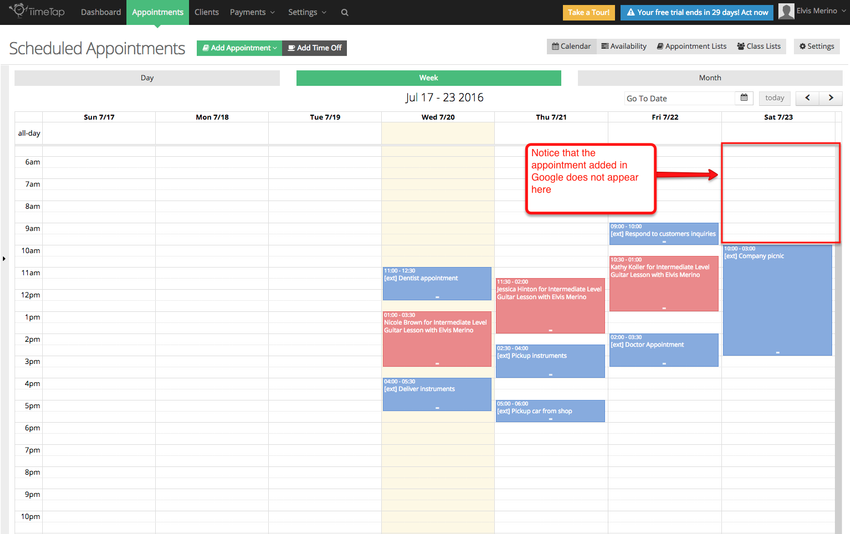
This is the view in the TimeTap calendar, keep in mind that at this point that this account is still syncing with two Google accounts, but it is only downloading appointments from one of them:
If you need to stop the uploading appointments added in TimeTap to one of the Google calendars but would like to continue downloading appointments create in your Google Calendar, simply go back to the staff profile for the account you wish to stop syncing and click on the "Calendar Sync" tab:
Under the Calendar Sync tab, you will see the Google calendars you are syncing to. From here determine from which calendar you want to stop uploading TimeTap appointment, but would like to continue downloading appointments created in Google Calendar, then click the Edit button next to it:
A new window will appear, here you will be able to modify a few things before you finalize the changes:
- This is the Google account this staff member has been granted access to
- A list of all calendars associated with the Google Account selected in step 1. These are typically sub calendars created within your Google calendar or calendars other people have shared with you
- Check this box to upload all appointments set in TimeTap for this staff to the selected Google Calendar
- Check off which services/classes you want to sync up to Google Calendar (most of our users have all of them selected but you can pick and choose if you'd like)
- This is the title of the TimeTap appointment once it appears as an appointment in Google calendar. If you leave it blank it will display the client's name, phone number, and reason (service/class) or you can use tags to display different information
- Once the TimeTap appointment gets added as an appointment in the synced calendar, this is what would appear in the appointment's description. If you leave it blank it will display the client's name, phone number, and reason (service) or you can use tags to display different information
- Check this box to download all appointments from the Google Calendar you've selected to the staff member's TimeTap calendar
- Check this box to allow this user to download the appointment details from the Google Calendar you have granted access to
In this example we will uncheck the box next to Uploading to Google but will keep the box checked next to Downloading from Google, to commit to the changes click Update Sync Detail:
After saving the changes, every time an appointment is added in TimeTap it will not appear in the Google Calendar you selected, but if an appointment is added in this Google Calendar then this appointment will appear in your TimeTap calendar.
In the image below a new appointment was added in TimeTap but and it doesn't appears in this Google Calendar. This is the view of the calendar in TimeTap:
This is the view in the Google Calendar, keep in mind that at this point that this TimeTap account is still syncing with two Google Calendar, is just not uploading to appointment to one of them: